
Font of choice - I'm using Bailey Script here
Filters Unlimited 2 (optional)
DSB Flux – Bright Noise (optional)
Mask of Choice. I used Weescotlass 84 – here
Word Art of Choice
"Butterfly Effect" PTU Scrap kit by Eclipse of which can be found at Pink Krush.
This kit is delicately beautiful. Thank you so much Eclipse!!
This tutorial was written assuming you have knowledge of PSP.
~♥~ Let’s get started ~♥~
Open a 600 X 600 transparent canvas. Flood fill white.
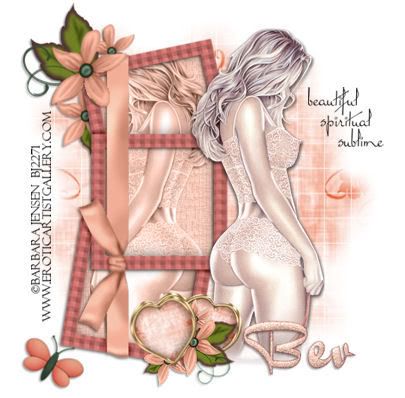
Copy and paste Frame 1 as a new layer. Free rotate left 90 degrees. Image/Mirror. Move to the left side of your canvas.
Use your Freehand Selection tool and outline the frame. Copy and paste a paper of choice as a new layer beneath the frame. Selections/Invert. Hit the delete key. If you’re going to use Filters Unlimited, go ahead and pick out a paper texture of choice and apply to this layer. For those who don’t have Filters Unlimited and you wish to give the paper a texture then go to Effects/Texture Effects and toy around with the many options there.
Copy and your tube as a new layer beneath the frame. Hit the delete key. Deselect. Change the properties to Luminance Legacy.
Copy and paste a Heart Brad of choice. Resize 30%. Duplicate. Free rotate one of them 15 degrees to the left. The other 15 degrees to the right. Position near the bottom right of your frame. See my tag for reference.
Copy and paste a Multi Bloom Flower of choice as a new layer. Image/Mirror. Resize 50% and move between heart brad layers. See my tag for reference.
Paste your Multi Bloom Flower as a new layer again. Resize 70%. Free rotate to the right 30 degrees. Position behind the top left corner of the frame. See my tag for reference. Once you’re happy with it, duplicate and move that layer in your layer pallet to the front of the frame. Use your selection tool to outline any parts of the flower bloom you don’t want to see in front of the frame then hit the delete button.
Copy and paste a butterfly of choice. Resize 30% and position where you like.
Highlight your white canvas. New Raster Layer. Select all. Copy and paste into selection a paper of choice. Deselect. Apply the mask. Merge Group.
Add any word art you might want to use.
Add your copyrights.
Add your name. Give it a bevel if you like and also add Bright Noise to it if you like as well.
Crop your image.
I hope you enjoyed this tutorial.
I would love to see your results.
Email me!
Hugs,
Bev
Filters Unlimited 2 (optional)
DSB Flux – Bright Noise (optional)
Mask of Choice. I used Weescotlass 84 – here
Word Art of Choice
"Butterfly Effect" PTU Scrap kit by Eclipse of which can be found at Pink Krush.
This kit is delicately beautiful. Thank you so much Eclipse!!
This tutorial was written assuming you have knowledge of PSP.
~♥~ Let’s get started ~♥~
Open a 600 X 600 transparent canvas. Flood fill white.
Copy and paste Frame 1 as a new layer. Free rotate left 90 degrees. Image/Mirror. Move to the left side of your canvas.
Use your Freehand Selection tool and outline the frame. Copy and paste a paper of choice as a new layer beneath the frame. Selections/Invert. Hit the delete key. If you’re going to use Filters Unlimited, go ahead and pick out a paper texture of choice and apply to this layer. For those who don’t have Filters Unlimited and you wish to give the paper a texture then go to Effects/Texture Effects and toy around with the many options there.
Copy and your tube as a new layer beneath the frame. Hit the delete key. Deselect. Change the properties to Luminance Legacy.
Copy and paste a Heart Brad of choice. Resize 30%. Duplicate. Free rotate one of them 15 degrees to the left. The other 15 degrees to the right. Position near the bottom right of your frame. See my tag for reference.
Copy and paste a Multi Bloom Flower of choice as a new layer. Image/Mirror. Resize 50% and move between heart brad layers. See my tag for reference.
Paste your Multi Bloom Flower as a new layer again. Resize 70%. Free rotate to the right 30 degrees. Position behind the top left corner of the frame. See my tag for reference. Once you’re happy with it, duplicate and move that layer in your layer pallet to the front of the frame. Use your selection tool to outline any parts of the flower bloom you don’t want to see in front of the frame then hit the delete button.
Copy and paste a butterfly of choice. Resize 30% and position where you like.
Highlight your white canvas. New Raster Layer. Select all. Copy and paste into selection a paper of choice. Deselect. Apply the mask. Merge Group.
Add any word art you might want to use.
Add your copyrights.
Add your name. Give it a bevel if you like and also add Bright Noise to it if you like as well.
Crop your image.
I hope you enjoyed this tutorial.
I would love to see your results.
Email me!
Hugs,
Bev
No comments:
Post a Comment