Wednesday, June 16, 2010

Blossom Dreams

Clicking on the image will enlarge to full view.

Supplies
1 tube of choice - I used the wonderful artwork of Michael Calandra at MPT
Font of Choice - I used Ar Blanca which came with my PC
Becky Mask 9 here
“Cherry Blossom” is a FTU scrap kit created by Sabre of Sabre’s Quill and Parchment and can be downloaded from here.
Please leave a thank you when downloading as it’s a small gesture for hard work given freely.
This tutorial was written assuming you have a working knowledge of PSP.

~♥~ Let’s get started ~♥~

Open up a 700 X 700 blank canvas.
Flood fill white.

Copy and paste Frame 4 as a new layer.
Resize 70%
Use your Magic Wand and click inside each of the frames.
Selections/Modify/Expand by 6.
New Raster layer below the frame.
Copy and paste a paper of choice Into Selection.
Deselect.

Copy and paste your tube as a new layer below the frame.
Resize if needed and position it exactly where you want it.
Duplicate/Resize much larger and move behind the smaller tube in your layers pallet.
Change the Properties to Soft Light.

Highlight the frame.
Click inside the frame with your Magic Wand.
Selections/Modify/Expand by 6.
Selections/Invert
Highlight each of your tubes and tap the delete key.
Deselect.

Add your embellishments. I used:
Bonsai Tree
Cat Tail: Mirror
Easter Kit Sabre Flower 3: Resize 80% Duplicate/Mirror/Move behind the frame to the upper left area.
Easter Kit Sabre Flower 2: Resize 40% - Move behind the frame to the lower left area. Duplciate/Flip/position where you like
Eastern Kit Sabre Feaf: Resize 40% - position near Flower 2.
Dragonfly Easter Kit Sabre: Resize 70%

Highlight your white background.
New Raster layer.
Select All.
Copy and paste a paper of choice Into Selection.
Deselect.
Apply the mask.
Merge Group.

Add your copyrights.

Add your name.
Stroke: 2
Foreground: #3e1e01
Background: Open up the frame. Choose an area with your Selection Tool and set your patten to it. Scale it to your liking.
Type your name.
Convert to Raster layer.
Select All/Float/Defloat
Selections/Modify/Contract by 2.
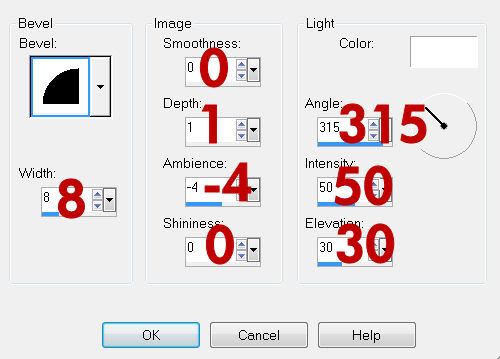
Give it an inner bevel:
Deselect.

Resize all layers 80%.

I hope you enjoyed this tutorial.
I’d love to see your results and show it off in my gallery.
Email me!
Hugs,
Bev

Dragons and Castles


Clicking on the image will enlarge to full view.

Supplies
Font of choice - I used Evanescence Series - I'm sorry I can't find a link
Weescotlass Mask 236 here
Divine Intentionz Template 317 here
DSB Flux - Bright Noise - Optional
Xenofex 1.0 - Shower Door - Optional
“Iris” is a FTU scrap kit created by Sabre of Sabre’s Quill and Parchment and can be downloaded from here.
Please leave thank you when downloading as it‘s a small gesture for hard work given freely.
This tutorial was written assuming you have a working knowledge of PSP.

~♥~ Let’s get started ~♥~

Open up the template.
Shift + D
Close out the original.
Delete the Copyright and Word Art layers.
Image/Canvas Size
700 X 600
Flood fill the background layer white.

Highlight Circle 1 layer.
Use your Magic Wand and click on it.
New Raster layer.
Copy and paste a paper of choice Into Selection.
Deselect.
Delete the template layer.
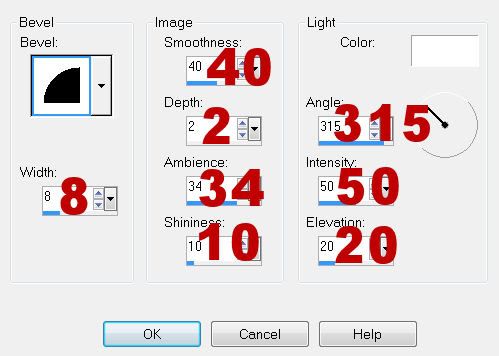
Give it a slight Inner Bevel:


Highlight the Oval layer.
Repeat the above step using a different paper.

Highlight Circle 2 layer.
Use your Magic Wand and click on it.
New Raster layer.
Flood fill with a plain color that will match the papers.
Deselect.
Delete the template layer.
Give it the same inner bevel.

Highlight Circle 3 layer.
Repeat the above step accept use a different color.
Highlight Raster 2 layer.
Select All/Float/Defloat
New Raster layer.
Flood fill with a color of choice.
Deselect.
Delete the template layer.
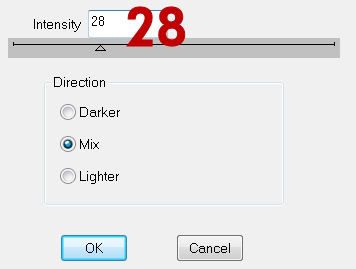
Apply DSB Flux - Bright Noise


Highlight Small Circle 1 layer.
Use your Magic Wand and click on it.
New Raster layer.
Copy and paste a paper of choice Into Selection.
Deselect.
Delete the template layer.
Give it the same slight Inner Bevel.

Highlight Small Circle 2 layer.
Repeat the above step.

Highlight Brush layer.
In your layers pallet change the foreground to a color you want the brush layer to be.
Using your Target Tool change the brush layer color.
Apply DSB Flux - Bright Noise:
Same settings.

Using your Freehand Selection tool outline the heart.
Copy and paste the Dragon as a new layer.
Resize 150%
Selections/Invert
Tap the delete key.
Selections/Modify/Feather
Number of Pixels:
23
OK
Tap the delete key a couple of times.
Deselect.
Change the Properties to Hard Light.

Copy and paste the Pillar as a new layer.
Resize 70%
Move into position over the Thin Rectangle template layer.
Delete the template layer.

Add your embellishments. I used:
Irish Swag: Resize 90%
Leaf 1: Resize 60% Duplciate/Mirror Duplicate/Resize 80%
Dragon

Highlight your white canvas.
New Raster layer.
Select All.
Copy and paste the Preview Paper Into Selection.
Deselect.
Apply Xenofex 1.0 - Shower Door:
Default Settings
If you didn’t use the filter then do this:
Adjust/Blur/Gaussian Blur:
Radius: 5
OK
Merge Group.

Add your copyrights.

Add your name.

Resize all layers 80%.

I hope you enjoyed this tutorial.
I’d love to see your results and show it off in my gallery.
Email me!
Hugs,
Bev