Supplies Needed
Brush Strokes – Crosshatch
My template 141 here
“Lost Toys” is a tagger
size scrap kit created by Crys of Creative Scraps by Crys and can be purchased from
Mystical Scraps here. You
can visit her blog here.
Thank you Crys for such a crazy adorable kit!!
This tutorial was written
assuming you have a working knowledge of PSP.
~♥~ Let’s
get started ~♥~
Open up the template.
Shift + D
Close out the original.
Close out the original.
Image/Canvas Size
700 x 700
OK
Highlight the background
layer and flood fill white.
Delete the credit layer.
Highlight Rectangle 1
layer.
Click on it with your
Magic Wand.
Copy and paste Paper 16
as a new layer.
Right click on it in the layer’s
pallet and choose “Promote to Section Layer”
Delete the original paper
layer.
Deselect.
Delete the template
layer.
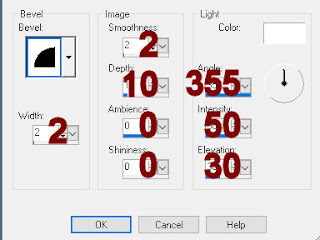
Give the paper a slight
Inner bevel:
Highlight Glitter Circle
1 layer.
Click anywhere outside of
it with your Magic Wand.
Selections/Invert
New Raster layer.
Copy and paste Paper 4
Into Selection.
Deselect.
Change the Properties of
the paper to Multiply.
DO NOT delete the template
layer.
When giving a drop
shadow, give it to the template layer, not the paper.
Repeat the above step
with Glitter Circle 2.
Highlight Dotted Line 1.
Select All/Float/Defloat
New Raster layer.
Paste Paper 4 (it should
still be in the memory from the previous step) Into Selection.
Deselect.
Give it the same slight
Inner Bevel.
Delete the template
layer.
Repeat the above step
with Dotted Line 2.
Repeat the above step
with Dotted Circle accept DO NOT give it a slight Inner bevel.
Highlight Strip 1.
Click on it with your
Magic Wand.
New Raster layer.
Copy and paste Paper 13
Into Selection.
Deselect.
Delete the template
layer.
To the paper, apply Brush
Strokes – Crosshatch:
Stroke Length: 9
Sharpness: 6
Strength: 1
OK
Highlight Strip 2.
Click on it with your
Magic Wand.
New Raster layer.
Copy and paste Paper 8
Into Selection.
Deselect.
Delete the template
layer.
To the paper, apply Brush
Strokes – Crosshatch:
Use same settings
Highlight Circle 1 layer.
Click on it with your
Magic Wand.
New Raster layer.
Copy and paste Paper 9
Into Selection.
Deselect.
Delete the template
layer.
Highlight Rectangle 2.
Click on it with your
Magic Wand.
New Raster layer.
Copy and paste Paper 15
Into Selection.
Deselect.
Delete the template
layer.
Give the paper the same
slight Inner Bevel.
Highlight Circle 2 layer.
Click on it with your
Magic Wand.
New Raster layer.
Copy and paste Paper 11
Into Selection.
Deselect for now.
Arrange in front of the
paper the following elements (don’t worry about what overhangs the circle, we’ll
clean that up in a bit) see my tag for reference:
Blocks 1, 2, 3, and
4: Resize each 25%
Unicorn: Resize 80%
Rocking Horse: Resize 50%
Mobile: Resize 50% and
85%
Duplicate the Unicorn and
Rocking Horse layers.
Move each up and to the
right just a little. In your layers
pallet, move the Unicorn below the blocks and move the rocking horse below the
blocks and below the Unicorn.
Lower each element’s
Opacity to 24.
Because you can now see
the horse through the Unicorn, to fix that:
Highlight the Unicorn.
Click anywhere outside of
it with your Magic Wand.
Selections/Invert
Selections/Modify/Contract
by 1
Highlight the Rocking
Horse.
Tap the delete key.
Deselect.
Highlight Circle 2
template layer.
Click anywhere outside of
it with your Magic Wand.
Highlight each element
that overhangs the paper that belongs to this template and tap the delete key.
Ta-da! The mess you just had hanging over the circle
should now be all neat and cleaned up.
Add your
elements. I used:
Feather: Resize
45%/Duplicate/Free rotate Left 45 degrees.
Leaf 5: Resize 40%/Duplicate/Mirror
Plant: Resize 90%
Flowers 1 & 2: Resize 30%
Clock: Resize 40%
Shoe: Resize 40%/Duplicate/Mirror
Toy 3: Resize 25%
Stars: Resize 40%/Duplicate
Highlight your white
background.
New Raster layer.
Select All.
Copy and paste Paper 17
Into Selection.
Deselect.
Apply the mask.
Merge Group.
Change the Properties to
Overlay and lower the Opacity to 61.
Highlight your white
background.
New Raster layer.
Select All.
Copy and paste Paper 4
Into Selection.
Deselect.
Apply the mask.
Merge Group.
Add your copyrights.
Add your name.
Color Pallet:
Foreground: #454031
Background: #7d755d
Make your Text Tool
active.
Set stroke width to 3.0
Type your name.
Give it the same slight Inner
Bevel:
I hope you enjoyed this
tutorial.
I’d love to see your results.
Hugs,
Bev


No comments:
Post a Comment