Supplies Needed
1 tube of choice – I
used the wonderful artwork of Cris Delara and can be purchased from UpYour Art.
You must have a license to use.
Jwy Mask 10 here
“Bowling Night” is a tagger
size freebie scrap kit created by myself and can be downloaded from my blog
here.
This tutorial was
written assuming you have working knowledge of PSP.
~♥~ Let’s get started ~♥~
Open up a 700 x 700 blank canvas.
Flood fill white.
Copy and paste EL 17 as a new layer.
Click inside of it with your Magic
Wand.
Selections/Modify/Expand by 4.
New Raster layer below the frame.
Copy and paste Paper 9 Into
Selection.
Copy and paste EL 23 as a new layer.
Resize 45%
Deselect.
Copy and paste your tube as a new
layer.
Move it into position in front of
the frame.
Duplicate/Move this layer below the
frame.
Highlight the tube layer that’s
above the frame.
Use your Eraser Tool and erase the
areas of the tube you don’t want to overhang the frame.
Copy and paste Paper 8 as a new
layer.
Resize 40%
Duplicate
Move both papers into position
behind the frame – see my tag for reference.
Copy and paste Paper 7 as a new
layer.
Resize 40%
Duplicate
Move both papers into position – see
my tag for reference.
Copy and paste your tube as a new
layer.
Move it into a position you like
over the top Left red paper.
Change the Properties of the tube to
Soft Light.
Duplicate the tube.
Move it into position over the
bottom Right red paper.
To each red paper:
Highlight the red paper layer.
Click anywhere outside of it with
your Magic Wand.
Highlight the tube layer above it in
your layers pallet.
Tap the delete key.
Deselect.
Add your elements. I used:
El 24: Resize 40%/Duplicate/Free rotate Left 90
degrees
El 24 again: Resize 40%/Duplicate/Flip/to the other Free
rotate Right 90 degrees
El 34: Resize 70%/Duplicate
El 32: Resize 25%/Duplicate/Free rotate Left 90
degrees/Merge Visible both ribbon layers/Duplicate/Mirror/Flip
El 32 again: Duplicate
El 31: Duplicate
El 30: Resize 40%
El 29: Resize 30%
El 33: Resize 45%
El 25: Resize 65%
El 35: Resize 40%
El 3: Resize 40%/Free Rotate Left 30
degrees/Duplicate/Free Rotate Left 10 degrees
El 14: Resize 50%
El 1: Resize 50%/Free Rotate Right 10 degrees/Duplicate/Mirror
El 4: Resize 40%
El 6: Resize 30%
El 26: Resize 85%
Highlight your white background.
New Raster layer.
Select All.
Copy and Paper 9 Into Selection.
Deselect.
Apply the mask.
Merge Group.
Add your copyrights.
Add your name.
Color Pallet:
Foreground: #000000
Background: ##af140f
Stroke: 08
Type your name.
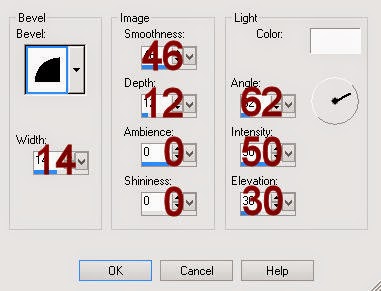
Give it a slight Inner Bevel:
Resize all layers 85%.
I’d love to see your results.
Hugs,
Bev


Thank you so much for the kit and all your tutorials. I have learnt a lot from your tuts and so pleased you will be keeping them up so i have more to do :-) all the very best
ReplyDeleteThank you so much, Maggie. I'm thrilled to hear you'll be stopping by often!! Enjoy all you can find to snag and do on my blogs <3
ReplyDelete