Supplies Needed
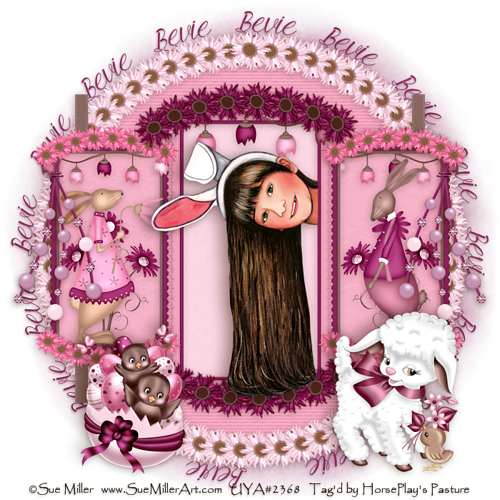
1 tube of choice – I
used the wonderful artwork of Sue Miller which can be purchased from UpYour Art. You must have a license to use.
Plug Ins used:
Mura’s Meister – Copies
“Fluffy Bunny” is a
FTU scrap kit created by Leanne of Icy Blue Mystic Designs and can be
downloaded from her blog here. Be sure to leave a thank you for work given
freely.
~♥~ Let’s get started ~♥~
Copy and paste Element 23 as a new
layer.
Resize 10%
Apply Mura’s Meister – Copies:
Choose Encircle.
Change the top 3 numbers:
Number: 50
Shift X: 80
Shift Y: 80
OK
Click inside the ring of flowers
with your Magic Wand.
Selections/Modify/Expand by 4.
New Raster layer below the ring.
Copy and paste Paper 13 Into
Selection.
Deselect.
Copy and paste Frame 3 as a new
layer.
Resize 60%
Click inside of it with your Magic
Wand.
Selections/Modify/Expand by 4.
New Raster layer below the frame.
Copy and paste Paper 7 Into
Selection.
Copy and paste your tube as a new
layer.
Selections/Invert
Tap the delete key.
Deselect.
Copy and paste Frame 2 as a new
layer.
Resize 45%
Position at the left side of the
center frame – see my tag for reference.
Duplicate
Mirror
To each of these frames:
Click inside of it with your Magic
Wand.
Selections/Modify/Expand by 4.
New Raster layer below the frame.
Copy and paste Paper 2 Into
Selection.
Deselect.
Copy and paste Element 24 as a new
layer.
Resize 10%
Apply Mura’s Meister – Copies:
Choose Cards
Use Default Settings.
OK
Free rotate Left 3 degrees.
Duplicate/Flip
Move both layers into position – see
my tag for reference.
Copy and paste Element 27 as a new layer.
Resize 10%
Apply the same Mura’s Meister –
Copies:
Choose Cards
Use Default Settings.
OK
Free rotate Left 3 degrees.
Resize 65%
Move into position above the left
frame – see my tag for reference.
Duplicate/Mirror
Duplicate and flip each flower arch and
move into position at the bottom of the frames.
Add your elements. I used:
Element 55: Resize 45%/Duplicate/Resize 70%/Duplicate
Element 61: Resize 35%/Duplicate
Element 44: Resize 35%
Element 43: Resize 35%
Element 9: Resize 35%/Duplicate/Mirror
Element 13: Resize 40%
Element 11: Resize 40%
Highlight your white background.
New Raster layer.
Select All.
Copy and paste Paper 8 Into
Selection.
Deselect.
Apply the mask.
Merge Group.
Add your copyrights.
Add your name -
Color Pallet:
Foreground: #000000
Background: Null
Make your Elipse Tool active set on
Circle.
Create a circle that’s just slightly
larger than the circle of light pink daisies.
Color Pallet:
Foreground: Null
Background: #8b235b
Make your Text Tool active and run
the mouse along the center line of the circle.
When you see a Rocking A click your mouse.
A text box will appear.
Type your name and hit the space bar
3 times.
Highlight your name and the 3
spaces.
Right Click and choose Copy.
Click your mouse after the 3 spaces
and press Ctrl + V to paste your name again.
Continue to press Ctrl + V until
your name is around the entire circle.
Once you have your name repeated all
the way around the circle…
Click on the + sign in your layer’s
pallet.
Close out the New Ellipse layer by
clicking on the eye.
Highlight Vector 1 layer.
Right Click and choose “Convert to
Raster Layer”
Move the name layer just above the mask layer in your layer's pallet.
Resize all layers 85%.
I’d love to see your results.
Hugs,
Bev

thanks for the awesome tut Bevie.
ReplyDeleteYou're welcome! Have fun with it!!
ReplyDelete