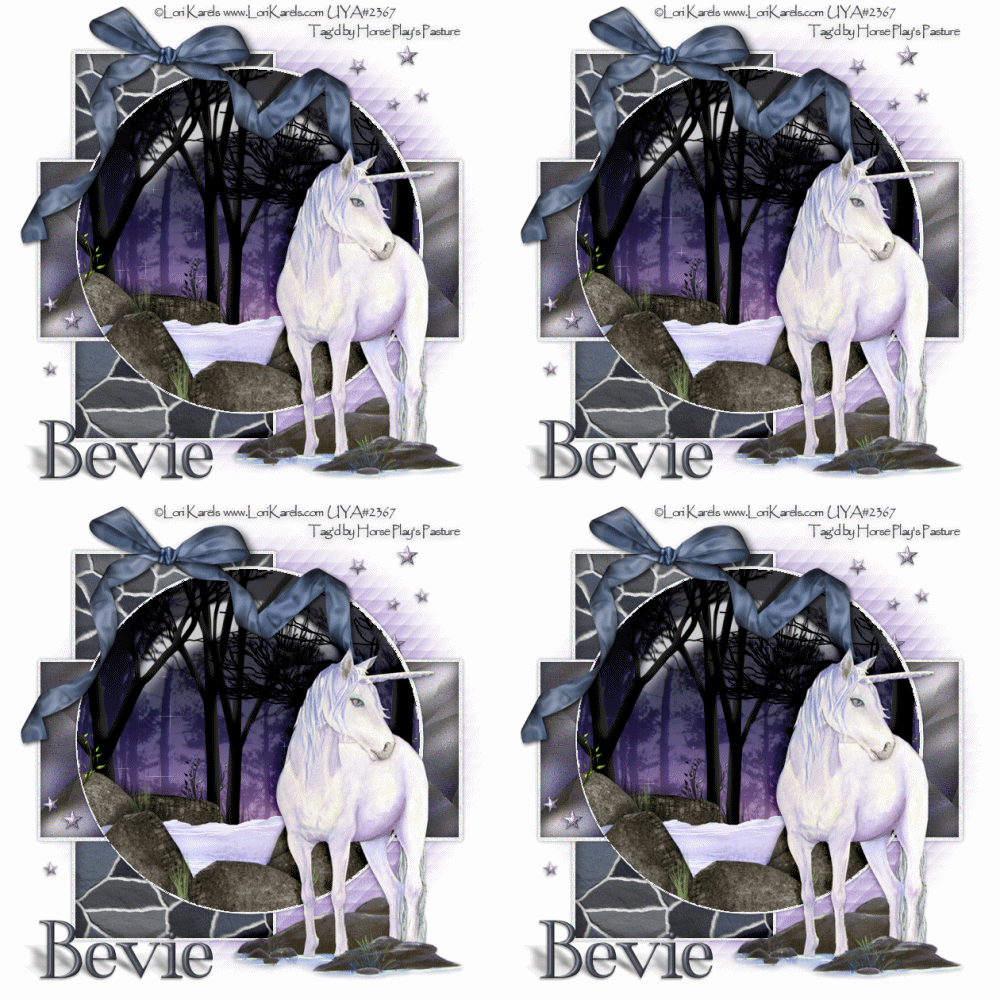
Supplies Needed
1 tube of choice – I used the wonderful artwork of Lori Karels which can now be purchased from Up Your Art. You must have a license to use.
Font of choice – I used Wonderland here
Crazy Vicky's Template 31 here
Plug Ins used:
Brosh Strokes - Sprayed Strokes
Photo Tools - Gradient Sky - Compliment
VM Natural - Sparkle
Eyecandy 5 - Texture - Stone Wall
Eyecandy 5 - Impact - Glass
Simple - Diamonds
DSB Flux - Bright Noise
Animation Shop - Optional
Supplies which I provide here
They are to be used for this tutorial only.
~♥~ Let’s get started ~♥~
Open up the template.
Shift + D.
Close out the original.
Delete the top 7 layers.
Color Pallet:
Foreground: #44454a
Background: #d5c8e5
Highlight the Mask Layer.
Use your Target Tool and change it to the background color.
Highlight Rec 1 layer.
Click on it with your Magic Wand.
Apply Eyecandy Texture - Stone Wall:
Basic Tab:
OK
Deselect.
Of the tube, copy the image layer.
Paste as a new Image.
Effects/Image Effects/Seamless Tile
Copy
Highlight your working canvas.
Highlight Rec 2 layer.
Click on it with your Magic Wand.
New Raster layer.
Paste the Image Into Selection.
Adjust/Blur/Gaussian Blur:
Radius: 20
OK
Apply Brush Strokes - Sprayed Strokes:
Stroke Length: 12
Spray Raidus: 7
Stroke Direction: Right Diag
OK
Apply Simple - Diamonds - 2x's
Deselect.
Delete the template layer.
Color Pallet:
Set to gradient:
Style: Linear
Angle: 0
Repeats: 0
Invert checked
Highlight Circle 1 layer.
Click on it with your Magic Wand.
New Raster layer.
Flood fill with the gradient.
Name this layer "GRADIENT"
Apply Photo Tools - Gradient Sky- - Compliment:
Duplicate the gradient layer 4x's.
Name each one Star 1, Star 2, Star 3, and Star 4.
Do NOT deselect.
Highlight Star 1 layer.
Apply VM Natural - Sparkle:
Change the Properties of this layer to Soft Light.
Close this layer out.
Highlight Star 2 layer.
Repeat the above step accept move the Random Seed button.
Don't forget to change the Properties of the layer to Soft Light.
Repeat the above step with Star 3 and Star 4 layer.
Reopen Star 1 layer.
Star 2, 3, and 4 layers should all be closed.
Deselect for now.
Copy and paste all the elements I supplied accept for the bow as
new layers just above Star 1 layer.
Move them into position - see my tag for reference, and don't worry about what overhangs the circle. We'll clean that up in a bit.
TIPS: The faint looking trees on my tag are made with the glass plug in so don't waste your time copying and pasting the tree that many times. I did duplicate the tree on the left once, used the Pick Tool to stretch it, duplicated the tree. The rock was duplicated many times and the Pick Tool was used to turn different ways to change their look. The grass was duplicated several times.
This is your tag. Let your imagination go and make a forest any unicorn would love to romp in on a starry night!
Once you have your scene created with the elements -
Highlight the circle template layer.
Click anywhere outside of it with your Magic Wand.
Highlight each element layer and tap the delete key.
Selections/Invert
New Raster layer at the top of your layers pallet.
Apply Eyecandy 5 - Impact - Glass:
Basic Tab:
Lighting Tab:
(check Select from File, choose Nature - Forest)
(check Select from File, choose Nature - Forest)
Tada! You should have a faint looking forest now :)
Copy and paste your tube as a new layer.
Position it in front of the glass - see my tag for reference.
Change the Foreground color in your pallet to #44454a
Make your Symmetric Shape Tool active.
Settings should be:
Choose "Draw Stellated" - it looks like a star
Number of side: 5
Radius: 38
Line Style: Solid
Width: 1
Anti alias checked
mixer limit: 15
Draw a small star - about the side of my largest star on my tag.
Give it a slight Inner Bevel:
Apply DSB Flux - Bright Noise:
Intensity: 38
Mix checked
OK
Duplicate the star as many times as you like, turning them this way
and that.
Color Pallet:
Change the background color to #5f6876
Type your name.
Give it the same Inner Bevel.
Give it a drop shadow on it's own layer.
Use your Pick Tool to flatten it a little.
Adjust/Blur/Motion Blur:
Angle: 309
Strength: 53
OK
Duplicate the drop shadow.
Add your copyright.
Copy Merged.
~Time To Animate~
OPen up Animation Shop.
Edit/Paste/As New Animation
Back in PSP.
Close out Sar 1 layer.
Open up Star 2 layer.
Copy Merged.
Back in AS.
Edit/Paste/After Current Frame.
Back in PSP.
Close out Sar 2 layer.
Open up Star 3 layer.
Copy Merged.
Back in AS.
Edit/Paste/After Current Frame.
Back in PSP.
Close out Sar 3 layer.
Open up Star 4 layer.
Copy Merged.
Back in AS.
Edit/Paste/After Current Frame.
View your animation. If you're happy with it....
Ctrl + A (to highlight all frames)
Animation/Frame Properties:
Display Time: 25
OK
Animation/Resize Animation:
Pixel Size checked
Width: 500
OK
I hope you enjoyed this tutorial as much as I did creating it!
I’d love to see your results.
Email me!
Hugs,
Bev


No comments:
Post a Comment