Supplies Needed
1 tube of choice – I
used the wonderful artwork of Lori Karels which can be purchased from UpYour Art.
You must have a license to use.
Plug Ins used:
Mura’s Meister – Copies
Xero - Porcelian
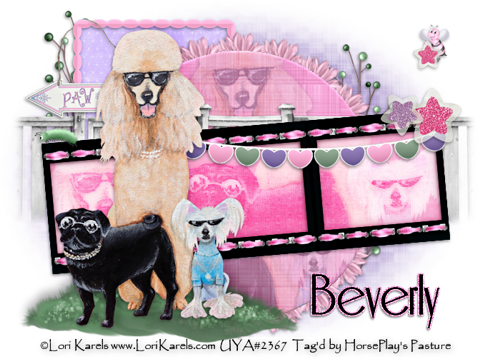
“Hear Me Rawr! …Mewo!” is a tagger size scrap
kit created by me, Bev of HorsePlay’s Pasture Designs and can be purchased at
either of your favorite stores: Scraps From the Heart, Heartbeatz Creationz, or PSP Tube Stop.
This tutorial was
written assuming you have working knowledge of PSP.
~♥~ Let’s get started ~♥~
Open up the template.
Shift + D.
Close out the original.
Delete the top 2 layers and
Rectangle 2 layer..
Image/Canvas Size
700 x 500
OK
Highlight the background layer.
Flood fill white.
Highlight Rectangle 2 layer.
Click on it with your Magic Wand.
New Raster layer.
Copy and paste Paper 12 Into
Selection.
Deselect.
Delete the template layer.
Highlight Circle layer.
Click on it with your Magic Wand.
New Raster layer.
Copy and paste Paper 8 Into
Selection.
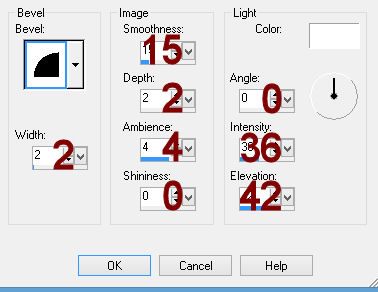
Give it a slight Inner Bevel:

Copy and paste your tube as a new
layer over the paper layer.
Move into position.
Selections/Invert
Tap the delete key.
Deselect.
Delete the template layer.
Lower the Opacity of the tube layer
to about 37.
Highlight Film Strip Background
layer.
Click on each rectangle with your Magic
Wand.
New Raster layer.
Copy and paste Paper 13 Into
Selection.
Copy and paste your tube as a new
layer over the paper layer.
Selections/Invert
Tap the delete key.
Deselect.
Change the Properties of the tube to
Overlay.
Merge Down.
The paper and tube layer should both
be on the same layer now.
Apply Xero – Porcelain:
Use Default Settings accept lower
the Blue Channel button to 0.
Delete the template layer.
Copy and paste El 3 as a new layer.
Duplicate
Mirror
Match both fence layers together to
create one long fence.
Move into position behind the merged
layer – see my tag for reference.
To feather the ends of the fence:
Be sure the fence layer is
highlighted in your layers pallet.
Make your Selection Tool active set
on Rectangle.
Create a huge rectangle on your
canvas but be sure the dotted lines touch the left and right sides of the fence
– keep far away from the top and bottom of the fence.
Selections/Invert
Selections/Modify/Inside Outside
Feather
Both checked
Feather amount: 20
OK
Tap the delete key until you have
the feathered look you want.
Deselect.
Copy and paste your tube as a new
layer.
Move into position – see my tag for
reference.
Copy and paste El 23 as a new layer.
Resize 70%
Free rotate Left 90 degrees
Move into position over the
rectangle paper – see my tag for reference.
The tube I used covers the bottom,
but if your tube doesn’t hide the bottom of the frame and make your Pick Tool
active and pull on the bottom to lengthen the frame.
Copy and paste El 9 as a new layer.
Resize 35%
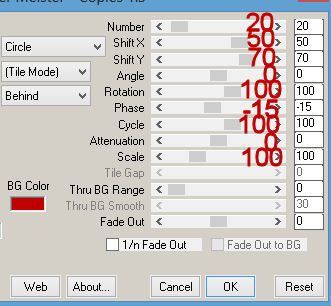
Apply Mura’s Meister – Copies:
Choose Encircle.
Match your settings to mine:

Resize 95%
Move into position behind the circle
paper layer.
Add your elements. I used:
El 65: Resize 70%/Duplicate
El 15
El 36: Resize 25%
El 56: Resize 60%
El 30: Resize 70%
El 58: Resize 85%/Free rotate Left 5 degrees
El 70: Resize 20%
El 53: Resize 40%
El 53 again: Resize 20%
El 52: Resize 30%/Flip
Highlight your white background.
New Raster layer.
Select All.
Copy and paste Paper 9 Into
Selection.
Deselect.
Apply the mask.
Position it a little better on your
canvas.
Merge Group.
Add your copyrights.
Add your name.
Color Pallet:
Foreground and Background: #000000
Stroke: 1.0
Type your name.
Convert to Raster layer.
Select All/Float/Defloat
New Raster layer below your name.
Flood fill with #faaedd
Adjust/Add Remove Noise/Add Noise:
Random and Monochrome checked
Noise: 50%
OK
Deselect.
Merge Visible both name layers.
Resize all layers 85%.
I’d love to see your results.
Hugs,
Bev

No comments:
Post a Comment