

Supplies
1 tube of choice - I used the wonderful artwork of Mitzi- Sato-Wiuff which can be purchased from PSP Tube Stop. You must have a license to use.
Font of choice - I used Parseltongue here
Plug Ins used:
Mura's Meister - Cloud
DSB Flux - Bright Noise
AAA Frames - Photo Frames
Greg's Factory Output Vol. II - Pool Shadow
My Supplies here
It is to be used for this tutorial only.
This tutorial assumes you have a working knowledge of PSP.
~♥~ Let's get started ~♥~
Open up a blank 550 x 200 canvas.
Color Pallet:
Foreground: #c96f26
Background: #962a1a
Change your foreground color of your color pallet to Gradient.
Style: Linear
Angle: 10
Repeats: 0
Flood fill your canvas with the gradient.
Open up the template I supplied.
Copy and paste it as a new layer.
Click on each line with your Magic Wand.
New Raster layer.
Invert your gradient and flood fill.
Effects/Text Effects/Blinds:
Match your settings to mine.

Deselect.
Delete the template layer.
From the tube, highlight the Steampunk Kitten layer and copy.
Paste it as a new layer on your working canvas.
Resize 65% - Change the Properties to Soft Light.
Duplicate/Mirror
Copy each kitten layer and place in opposite corners - see my tag for reference.
Color Pallet:
Foreground: #e39948
Background: #ffd890
Make your Selection Tool active set on Rectangle.
Section out the area between the thin rectangles.
New Raster layer below the rectangles.
Apply Mura's Meister - Cloud:
Change the Grain to 9.
OK
Adjust/Blur/Gaussian Blur:
Radius: 5
OK
DSB Flux - Bright Noise:
Mix checked
Intensity: 5
OK
Deselect.
Copy and paste your tube as a new layer above the cloud layer.
Change the Properties to Soft Light.
Paste your tube as a new layer again and move to the top of your layers pallet.
Move the tube into position - see my tag for reference.
Copy and paste as new layers both kittens that came with the tube.
Resize both 65%
Copy and paste the flower I supplied.
Duplicate the flower
See my tag for placement of all elements.
Merge Visible all layers.
Shift + D.
It should now be duplicated.
Working with the duplicated layer:
Image/Add Borders:

Highlight your Original canvas.
Copy
Highlight your duplicated canvas (the one iwth the border on it)
Paste Into Selection.
Adjust/Blur/Gaussian Blur:
Radius: 5
OK
Apply AAA Frames:
Use Default Settings.
Selections/Invert
Selections/Modify/Expand by 2.
New Raster layer.
Flood fill with Metal Brass:
Use same settings
Selections/Modify/Contract by 3.
Tap the delete key.
Deselect.
Select All/Float/Defloat
Apply Greg's Factory Output Vol. II - Pool Shadow:
Use Default settings
Add your Copyright.
Add your name.
Foreground: #341600
Background: #960f06
Stroke: 1.5
Type your name.
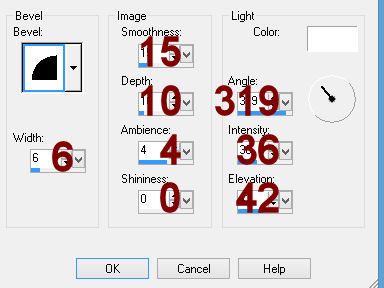
Give it a slight Inner Bevel 2x's:
Merge Flatten.
Save.
Copy
To make the Avatar:
Open up a 125 x 125 blank canvas.
Paste your banner as a new layer.
Move it into a position you like - see my avatar for reference.
New Raster layer.
Flood fill with your Foreground color.
Select All.
Selections/Modify/Contract by 2.
Tap the delete key.
Deselect.
Type the first letter of your name.
Give it the same slight Inner Bevel 2x's.
Add your copyright.
Save.
I hope you enjoyed this tutorial.
Hugs,
Bev
Thank you for using my tube, Beverly! Your forum set is gorgeous! <3
ReplyDeleteThank YOU and you're welcome xx
ReplyDeleteI am having a hard time with this one. I feel like such an idiot. I keep trying to paste the original into selection of the duplicated one like it says but it won't let me...help..
ReplyDeleteYvette,
DeleteUse the magic wand to select the border on the duplicate. Then copy original and paste into selection on duplicate. Hope that helps!
Gorgeous forum set!