Supplies Needed
1 tube of choice – I
used the wonderful artwork of Christina Lank which can be purchased from PSPTube Stop. You must have a license to use.
Which include
template, elements, and mask
These supplies are to
be used for this tutorial only.
PlugIns used:
VM Natural – Sparkle
Mura’s Meister -
Copies
This tutorial was
written assuming you have working knowledge of PSP.
~♥~ Let’s get started ~♥~
Open up the template.
Shift + D.
Close out the original.
Delete the credit layer.
Highlight Raster 2 layer.
Click on it with your Magic Wand.
New Raster layer.
Flood fill with #333842
Adjust/Add Remove Noise/Add Noise:
Gaussian checked
Noise: 50%
OK
Deselect.
Delete the template layer.
Color Pallet:
Foreground: #83acc5
Background: #eaeef7
Gradient:
Style: Linear
Angle: 0
Repeat: 0
Invert checked
Highlight Raster 3 layer.
Click anywhere outside of it with
your Magic Wand.
Selections/Invert
New Raster layer.
Flood fill with Gradient.
Lock the layer by clicking on the
lock icon at the top of your layers pallet.
Adjust/Blur/Gaussian Blur:
Radius: 10
OK
Click the lock icon again to unlock
the layer.
Duplicate
Change the Properties to Multiply
Apply VM
Natural – Sparkle:
Use Default settings
accept move the Random Seed button to get the star look you want.
Deselect.
Copy and paste your
tube as a new layer.
If you’re using the
same one as I did, Resize 65% and snug nicely into the bottom right corner of
the gradient layer.
Add your elements I supplied and
resize as follows:
Flower: Duplicate/Resize
85%/Duplicate/Resize 70%
Doodle: Duplicate/Mirror/Flip
Highlight your white canvas (Raster
1)
New Raster layer.
Paste your tube as a new layer. If you’re using the same tube as I did,
resize to 65%.
Apply Mura’s Meister – Copies:
Choose Wallpaper – Rotate –
Change Number to 25.
OK
If you can see any of the white
canvas after applying Mura’s Meister - Copies then duplicates the layer and
move to cover the gap.
Merge Visible both Mura’s Meister
Copies layers.
Apply the mask.
Merge Group.
Tap the letter K on your keyboard to
activate the Pick Tool and pull the sides in – see my tag for reference.
Crop your image.
Add your copyrights.
Add your name.
Color Pallet:
Foreground: #000000
Background: #44505d
Stroke: 1.0
Type your name.
Convert to Raster layer.
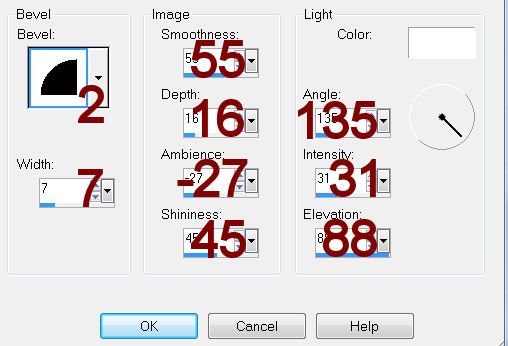
Give it a slight Inner Bevel:
Select All/Float/Defloat
Selections/Modify/Expand by 2.
New Raster layer below your name.
Flood fill with #e7edf3
Deselect.
Merge Visible both name layers.
Resize all layers 80%.
I’d love to see your results.
Hugs,
Bev


No comments:
Post a Comment