Supplies Needed
1 tube of choice – I
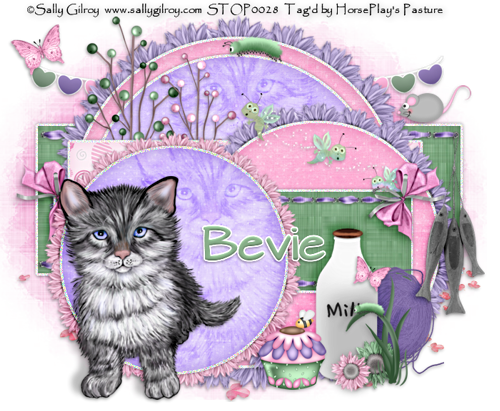
used the wonderful artwork of Sally Gilroy which can be purchased from PSPTube Stop. This kit can be purchased with the tube at
the store with a savings here! You must have a license to use.
Plug Ins used:
Mura’s Meister - Copies
“Hear Me Rawr! …Mewo!” is a tagger size scrap
kit created by me, Bev of HorsePlay’s Pasture Designs and can be purchased at
either of your favorite stores: Scraps From the Heart, Heartbeatz Creationz, or PSP Tube Stop.
This tutorial was
written assuming you have working knowledge of PSP.
~♥~ Let’s get started ~♥~
Open up the template.
Shift + D.
Close out the original.
Delete the credit layer.
Image/Canvas Size
700 x 575
OK
Highlight the background layer.
Flood fill white.
Highlight Rec 1 layer.
Click on it with your Magic Wand.
New Raster layer.
Copy and paste Paper 10 Into
Selection.
Deselect.
Delete the template layer.
Repeat the above step with Rec 3 layer.
Highlight Circle 1 layer.
Click on it with your Magic Wand.
New Raster layer.
Copy and paste Paper 13 Into
Selection.
Deselect.
Delete the template layer.
Repeat the above step with Circle 3
layer.
Highlight Circle 2 layer.
Click on it with your Magic Wand.
New Raster layer.
Copy and paste Paper 12 Into
Selection.
Copy and paste your tube as a new
layer over the paper layer.
Change the Properties to Soft Light.
Move the tube into position over the
paper – see my tag for reference.
Selections/Invert
Tap the delete key.
Deselect.
Delete the template layer.
Repeat the above step with Circle 4
layer.
Highlight Rec 2 layer.
Click anywhere outside of it with
your Magic Wand.
Copy and paste Paper 1 as a new
layer.
Resize 65%
Move into position over the template
layer.
Tap the delete key.
Deselect.
Delete the template layer.
Copy and paste your tube as a new
layer.
Copy and paste 8 as a new layer.
Resize 40%
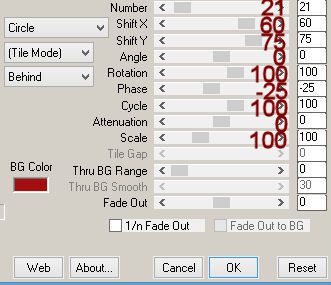
Apply Mura’s Meister – Copies:
Choose Encircle. Match your settings to mine –

Move the Flower Ring into position
behind the largest glitter circle.
Duplicate the flower ring.
Resize the flower ring 75%
Move it into position – see my tag
for reference.
Copy and paste 9 as a new layer.
Resize 40%
Apply Mura’s Meister – Copies –
Use same settings.
Resize the flower ring 75% and 90%
Move into position – see my tag for
reference.
Add your elements. I used:
31:
Resize 50%
59:
Resize 90%/Duplicate/Duplicate/Resize 83%/Duplicate
65:
Resize 85%
67:
Resize 70%
45:
Resize 40%/Duplicate/Mirror
44:
resize 60%
68:
Resize 30%
41:
Resize 25%/Duplicate/Mirror/Resize 70%
38:
Resize 60%
36:
Resize 35%
35:
Resize 45%
33:
Resize 65%
10:
Resize 25%
9:
Resize 25% and 80%
30:
Resize 70%/Duplicate
2
Highlight your white background.
New Raster layer.
Select All.
Copy and paste Paper 10 Into
Selection.
Deselect.
Apply the mask.
Resize 120%
Merge Group.
Add your copyrights.
Add your name.
Color Pallet:
Foreground and Background: #749d77
Stroke: 1.0
Type your name.
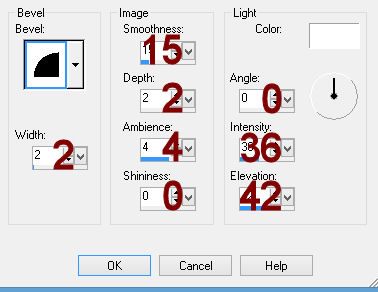
Give it a slight Inner Bevel:

Select All/Float/Defloat
New Raster layer below your name.
Flood fill with #ffffff
Deselect.
Merge Visible both name layers.
Resize all layers 85%.
I’d love to see your results.
Hugs,
Bev

No comments:
Post a Comment