Supplies
1 tube of choice – I used the artwork of Ellie Milk and can be
purchased from Pics for Design. You must generate
a license to use.
Plug Ins used:
Eyecandy 3.1 – Glow
“Little Flower” is a FTU tagger size scrap kit created by Annie of AJ’s
Scraps and can be downloaded from her blog here. Don’t forget to leave a thank
you for hard work given freely.
~♥~ Let’s get started ~♥~
Open up the template.
Shift + D.
Close out the original.
Delete the top 3 layers.
Click on the “Rotate Right” icon:

The entire template should have turned left so that it’s a vertical
template.
Image/Canvas Size:
600 x 750
Open up the background layer.
Flood fill white.
Highlight Circle layer.
Click on it with your Magic Wand.
New Raster layer.
Copy and paste Paper 4 Into Selection.
Deselect.
Delete the template layer.
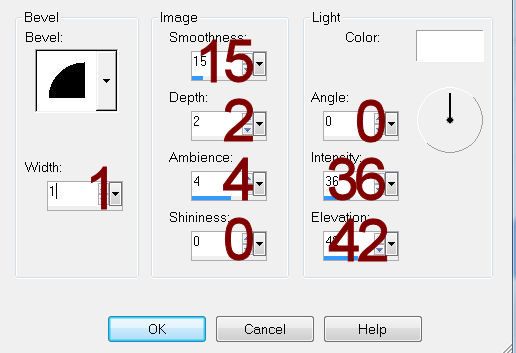
Give it a slight Inner Bevel:

Apply Eyecandy 3.1 – Glow:
Width: 3
Opacity: 100
Opacity Drop Off: Fat
Color: white
OK
Highlight Copy of Thin Rectangle layer.
Merge Down.
Both black rectangles should be on the same layer now.
Click on both rectangles with your Magic Wand.
New Raster layer.
Copy and paste Paper 10 Into Selection.
Deselect.
Duplicate
Change the Properties to Multiply.
Merge Down.
Give it the same slight Inner Bevel.
Highlight Circle Left layer.
Click on it with your Magic Wand.
New Raster layer.
Copy and paste Paper 8 Into Selection.
Deselect.
Delete the template layer.
Give it the same slight Inner Bevel.
Apply Eyecandy 3.1 – Glow:
Use Same settings.
Highlight Circle Right layer.
Repeat the above step.
Highlight Frame Back layer.
Click on each square with your Magic Wand.
New Raster layer.
Copy and paste Paper 10 Into Selection.
Copy and paste your tube as a new layer just over the paper layer.
For placement see my tag for reference.
Selections/Invert
Tap the delete key.
Deselect.
Delete the template layer.
Change the Properties of the tube to Multiply.
Highlight Frame layer.
Select All/Float/Defloat.
New Raster layer.
Copy and paste Paper 13 Into Selection.
Adjust/Add Remove Noise/Add Noise:
Gaussian and Monochrome checked
Noise: 30%
OK
Deselect.
Delete the template layer.
Copy and paste your tube as a new layer.
Place in front of the frame – see my tag for reference.
Add your elements. I used:
25
22: Resize 65%/Duplicate
18: Resize 35%/Duplicate 3x’s
16
33: Resize 40%/Duplicate/Mirror/Duplicate/Resize
70%
Highlight your white background.
Select All.
New Raster layer.
Copy and paste Paper 9 Into Selection.
Deselect.
Apply the mask.
Merge Group.
Add your credits.
Add your name.
Color Pallet:
Foreground & Background: #2e6337
Stroke: 0.8
Type your name.
Convert to Raster layer.


No comments:
Post a Comment