Supplies
1 tube and 1 close up image of choice – I used the artwork of Keith
Garvey which can now be purchased here. You must have a license to
use.
Plug Ins used:
Brush Strokes – Crosshatch
“Sticky Sweet” is a tagger size
scrap kit created by Krissy of Krissy’s Scraps and can be purchased from her
store Exquisite Scraps. You can visit her blog here. Thank you Krissy for such a fun kit.
~♥~ Let’s get started ~♥~
Open up the template.
Shift + D.
Close out the original.
Delete the Credit Layer and Circle Block layer.
Copy and paste Beaded Heart 1 as a new layer at the top of your layers
pallet.
Resize 65%
Free rotate Left 15 degrees
Move into position so it covers the heart on the left.
Duplicate
Move into position over the middle heart on the right side.
Duplicate/Mirror/Duplicate
Move both hearts into position over the top and bottom hearts on the
right side.
Delete the following template layers:
Mid Heart, Top Heart, Bottom Heart, Bit Heart Border, Big Heart Line,
Big Heart
Highlight Rectangle layer.
Click on it with your Magic Wand.
New Raster layer.
Copy and paste Paper 9 Into Selection.
Apply Brush Strokes – Crosshatch:
Stroke length: 34
Sharpness: 6
Strength: 1
OK
Deselect.
Delete the template layer.
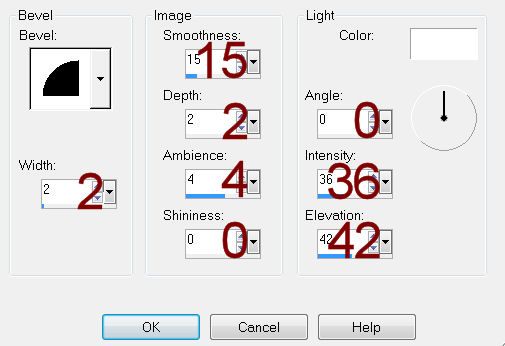
Give it a slight Inner Bevel:

Highlight Rectangle Border layer.
Select All/Float/Defloat
New Raster layer.
Copy and paste Paper 1 Into Selection.
Adjust/Add Remove Noise/Add Noise:
Uniform and Monochrome checked
Noise: 55%
OK
Deselect.
Delete the template layer.
Repeat the above step with Oval Border and Circle Border.
Highlight Oval layer.
Click on it with your Magic Wand.
New Raster layer.
Copy and paste Paper 8 Into Selection.
Deselect.
Delete the template layer.
Color Pallet:
Foreground: #000000
Background: #201616
Highlight Dotted Line layer.
Make your Color Replacer Tool active.
Hold your mouse over the dotted line and double right click.
The Line should now be the dark brown color.
Change your foreground color to #404040
Highlight Dotted Half Circle and repeat the above step.
Highlight Oval Block layer.
Click anywhere outside of it with your Magic Wand.
Copy and paste Paper 4 as a new layer.
Resize 55%
Tap the delete key.
Deselect.
Delete the template layer.
Highlight Back Circle layer.
Click on it with your Magic Wand.
New Raster layer.
Copy and paste Paper 9 Into Selection.
Deselect.
Delete the template layer.
Highlight Mid Circle layer.
Click on it with your Magic Wand.
New Raster layer.
Copy and paste Paper 8 Into Selection.
Copy and paste your close up image as a new layer.
Change the Properties to Overlay.
Selections/Invert
Tap the delete key.
Deselect.
Delete the template layer.
Copy and paste your tube as a new layer.
See my tag for placement.
Add your elements. I used:
Bow 3: Resize 40%/Free rotate
Left 15 degrees/Duplicate/Duplicate/Mirror/Duplicate
Carnation 2: Resize 80% (place
behind the oval) Duplicate
Carnation 2 again: Resize
45%/Duplicate/Mirror (place in front of the large heart)
Carnation 3: Resize 80%
Carnation 3 again: Resize 45%
Sweet Bear 1: Resize 50%
Eyelet Brad 4: Resize 10%/Duplicate
3x’s
Realistic Bloom 2: Resize
25%/Duplicate/Mirror/Duplicate/Resize 80%
Winged Beaded Heart 1: Resize
50%
Highlight your white background.
New Raster layer.
Select All.
Copy and paste Paper 7 Into Selection.
Deselect.
Apply the mask.
Resize 110%
Merge Group.
Add your credits.
Add your name:
Color Pallet:
Foreground and Background: #201616
Stroke: 0.8
Type your name.
Convert to Raster layer.
Resize all layers 80%.


No comments:
Post a Comment