Supplies
Font of choice – I used Retro Loops here
Monti Circular Mask here
Plug Ins used:
Eyecandy 5: Nature – Snow Drift
“It’s a Wonderland” is a tagger
size scrap kit created by me, Bev of HorsePlay’s Pasture Designs and can be
purchased from either of your favorite
stores – Lollipops n Gumdrops or Butterfly Blush Designs or Inspirations of ScrapFriends. You can visit
my designing blog here.
~♥~ Let’s get started ~♥~
Open up a 700 x 700 blank canvas.
Flood fill white.
Copy and paste E26 as a new layer.
Resize 75%
Free rotate Left 90 degrees.
Click inside of it with your Magic Wand.
Selections/Modify/Expand by 4.
New Raster layer below the frame.
Copy and paste Paper 3 Into Selection.
Deselect for now.
Add the following elements below the frame – see my tag for reference. Don’t worry about what overhangs the
frame. We’ll clean that up in a bit.
E63
E43: Resize 40%
E44
E44 again: Resize 25%/Duplicate/
Resize 70%
E65
Highlight the paper layer.
Click anywhere outside of it with your Magic Wand.
Highlight each element that overhangs the frame and tap the delete key.
Deselect.
Close out your white background layer.
Merge Visible.
Reopen your white background.
Copy and paste E27 as a new layer.
Resize 60%
Move into position behind the merged layer.
Copy and paste E26 as a new layer.
Resize 75%
Free rotate Left 90 degrees.
Click inside of it with your Magic Wand.
Selections/Modify/Expand by 4.
New Raster layer below the frame.
Copy and paste Paper 3 Into Selection.
Deselect.
Merge Visible the frame and paper layer.
Move into position behind the round frame – see my tag for reference.
Duplicate.
Move in the opposite direction.
Copy and paste E27 as a new layer.
Resize 70%
Click inside of it with your Magic Wand.
Selections/Modify/Expand by 4.
New Raster layer below the frame.
Copy and paste Paper 9 Into Selection.
Deselect.
Merge Visible the frame and paper.
In your layers pallet move just above your white background – see my
tag for reference.
Add your elements. I used:
E59: Resize 70%/Mirror/Duplicate
E54: We’ll add snow effect later in the tutorial.
E31: Resize 80%
E33: Resize 65%/Mirror
E36: Resize 65%
E57: Resize 70%
E40: Resize 55%
E63
E41: Resize 40%/Use your Pick
Tool to rotate just a little
E52: Resize 15%/Use your Pick
Tool to tilt it just a little
E51: Resize 15%/Use your Pick
Tool to tilt it just a little/Duplicate
Highlight your white background.
New Raster layer.
Select All.
Copy and paste Paper 14 Into Selection.
Deselect.
Apply the mask.
Merge Group.
I had to move my mask just a little to center it more behind the tag.
Add your credits.
Add your name.
Foreground: #275128
Background: #aa292b
Stroke: 1
Type your name.
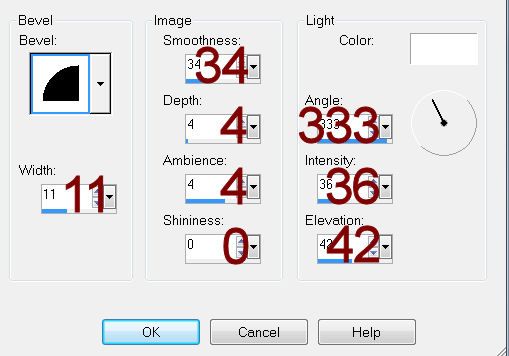
Give it a slight Inner Bevel:

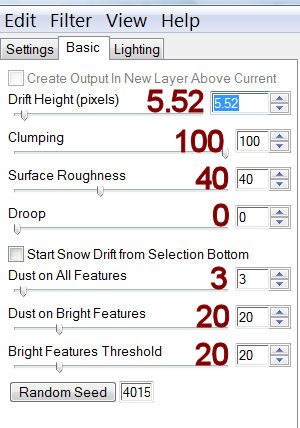
Apply Eyecandy 5: Nature – Snow Dift
Settings Tab:
Small, First flakes
Basic Tab:

OK
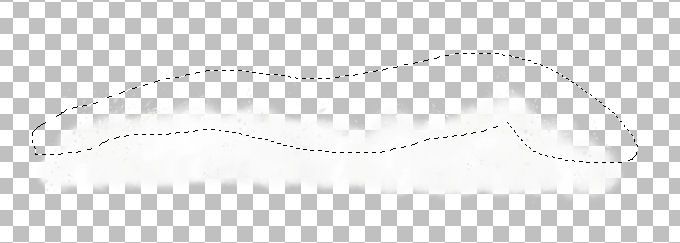
To make your name look as if it’s sitting in the snow:
Open up element 63.
Use your Freehand selection Tool set on Free hand and section off along
the top area of the snow:

Copy.
Highlight your working canvas.
Paste as new layer.
Move it into position near the bottom of your name.
You can also use pieces of this element to make the baubles, reindeer
feet, and Santa’s boots look as if they’re sitting in the snow, too.
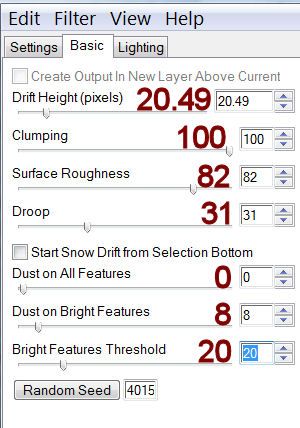
Highlight the striped pole layer.
Apply the same snow effect accept change the settings on the basic tab
to match mine:

Resize all layers 80%.


No comments:
Post a Comment