Supplies
1 tube of choice – I used the artwork of Simon Han which can be
purchased from PSPTubes Emporium You must have a license to use.
Font of choice - I used Before the Rain here
Weescotlass Mask 23608 here
Creative by Nature Template 165 here
“Chocolate Cherries” is a tagger size scrap kit created by Gina of Gina’s
Gems Scraps and can be purchased from Inspirations of Scrap Friends. You can visit
her blog here.
Thank you Gina for a really gorgeous kit.
This tutorial was written assuming you have a working knowledge of PSP.
~♥~ Let’s get started ~♥~
Open up the template.
Shift + D.
Close out the original.
Resize all layers 85%
Image/Canvas Size:
700 x 600
OK
Delete the top 4 layers.
Highlight 10 layer.
Click on it with your Magic Wand.
New Raster layer.
Copy and paste Paper 4 Into Selection.
Deselect.
Delete the template layer.
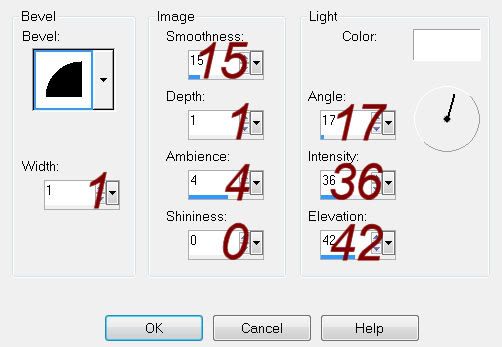
Give it a slight Inner Bevel:

Highlight 9 layer.
Click on it with your Magic Wand.
New Raster layer.
Copy and paste Paper 5 Into Selection.
Deselect.
Delete the template layer.
Give it the same slight Inner Bevel.
Highlight 8 layer.
Click on it with your Magic Wand.
New Raster layer.
Copy and paste Paper 27 Into Selection.
Deselect.
Delete the template layer.
Give it the same slight Inner Bevel.
Highlight 7 layer.
Click on it with your Magic Wand.
New Raster layer.
Copy and paste Paper 30 Into Selection.
Deselect.
Delete the template layer.
Give the paper the same slight Inner Bevel.
Highlight 6 layer.
Click on it with your Magic Wand.
New Raster layer.
Copy and paste Paper 28 Into Selection.
Deselect.
Delete the template layer.
Give the paper the same slight Inner Bevel.
Highlight 5 layer.
In your layers pallet:
Foreground: #ec63a8
Background: #b0654e
Make your Color Replacer Tool active.
Double Right click the mouse over the dotted line.
Highlight 4 layer.
Click on it with your Magic Wand.
New Raster layer.
Copy and paste Paper 29 Into Selection.
Deselect.
Delete the template layer.
Give the paper the same slight Inner Bevel.
Repeat the above step with 3 layer.
Copy and paste your tube as a new layer.
Change the Properties to Overlay.
Move into position over both little squares.
Duplicate/In your layers pallet move above the other little square.
Highlight either little square paper layer.
Click anywhere outside of it with your Magic Wand.
Highlight the tube layer just above it.
Tap the delete key.
Deselect.
Repeat the above step with the other tube layer.
Copy and paste your tube again as a new layer.
Position in front of the large square.
Add your elements. I used:
Brush: Resize 70%
Lace: Resize 95%
Torn Heart 3: Resize 10% and 50%/Free
rotate Right 10 degrees/Duplicate/Duplicate and Mirror both hearts
Flower Dot Doodle: Resize
85%/Duplicate/Mirror
Tree 1: Resize 60%
Bird 1: Resize 20%
Bird 2: Resize 20%/Mirror
Butterfly 1: Resize 20%/Duplicate/Mirror
Picot Bow 2: Resize
60%/Flip/Mirror
Cherry Blossom 1: Resize 25%
Cherry Blossom 2: Resize 20%
Highlight your white canvas.
New Raster layer.
Select All.
Copy and paste Paper 32 Into Selection.
Deselect.
Apply the mask.
Resize 105%
Use the Pick Tool and pull the sides out a little.
Merge Group.
Add your credits.
Resize all layers 80%


No comments:
Post a Comment