

Supplies
1 tube of choice – I used the wonderful artwork of Carla Lee Morrow
which can be purchased from PSP Tube Stop. You must have a license to use.
Font of choice - I used Pavane here
Becky mask 22 here
Creative by Nature template 103 here
“Written in the Stars” is tagger size scrap kit created by Jay of Bello
Scarto and can be purchased from her store Heartbeatz Creationz. You can visit
her blog here.
Thank you Jay for a really beautiful kit.
This tutorial was written assuming you have a working knowledge of PSP.
~♥~ Let’s get started ~♥~
Open up the template.
Shift + D.
Close out the original.
Resize all layers 85%
Image/Canvas Size:
700 x 600
OK
Delete the top 7 layers, and layers 9, 10, and 11.
Highlight 16 layer.
Click on it with your Magic Wand.
New Raster layer.
Copy and paste Paper 8 Into Selection.
Deselect
Delete the template layer.
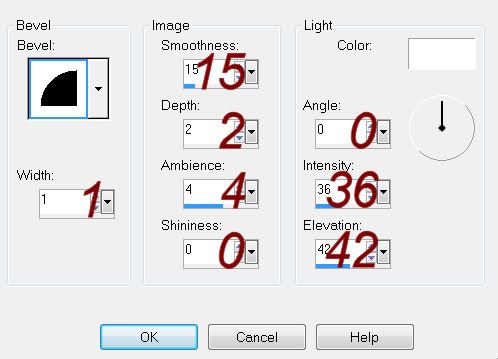
Give it a slight Inner Bevel:
Highlight 15 layer.
Click on it with your Magic Wand.
New Raster layer.
Copy and paste Paper 10 Into Selection.
Deselect.
Delete the template layer.
Give it the same slight Inner Bevel.
Highlight 14 layer.
Click on it with your Magic Wand.
New Raster layer.
Copy and paste Element 31 Into Selection.
Deselect.
Delete the template layer.
Highlight 12 layer.
Click on it with your Magic Wand.
Copy and paste Paper 2 as a new layer.
Deselect.
Delete the template layer.
Adjust/Add Remove Noise/Add Noise:
Gaussian and Monochrome checked
Noise: 91%
OK
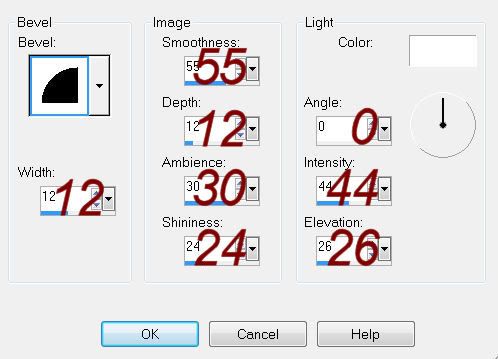
Give it a slight Inner Bevel:
Highlight 7 layer.
Repeat the above step.
Highlight 13 layer.
Click on it with our Magic Wand.
New Raster layer.
Copy and paste Paper 9 Into Selection.
Copy and paste your tube as a new layer – move into position over the
paper.
Selections/Invert
Tap the delete key.
Change the Properties to Overlay.
Deselect.
Delete the template layer.
Highlight 8 layer.
Click on it with your Magic Wand.
New Raster layer.
Copy and paste 10 Into Selection.
Deselect for now.
Copy and paste your tube as a new layer. Move it into position in front of the frame;
positioned so that it looks like it’s crawling out of the frame.
Duplicate the tube layer.
Move below the frame in your layers pallet.
Highlight the paper layer.
Click anywhere outside of it with your Magic Wand.
Highlight the tube layer just above the paper.
Tap the delete key.
Deselect.
Highlight the tube layer above the frame.
Use your Eraser Tool and erase whatever you don’t want to overhang the
frame.
Delete the template layer.
Copy and paste Element 10 as a new layer.
Resize 60%
Use your Target Tool and change the color to #553379.
Add your elements. I used:
3: Resize 90% (position behind
the oval)
3 again: Resize 70% (position behind
the square frame.
36: Resize 35%/Duplicate/Mirror
20: Resize 80%
22: Resize 25%/Duplicate
Element 1: Resize
40%/Duplicate/Mirror
Highlight your white canvas.
New Raster layer.
Select All.
Copy and paste Paper 2 Into Selection.
Deselect.
Apply the mask.
Use your Pick Tool to pull the top up a little.
Merge Group.
Use your Target Tool and change the color to the same as you used to
change the star element.
Add your credits.
Add your name.
Resize all layers 80%
No comments:
Post a Comment