

Supplies
1 tube of choice – I used the artwork of VeryMany which can be
purchased from Pics for Design. You must generate
a license to use.
Font of choice – I used Graff Caps here
Dee’s Sign Post “Stealing the Show” template.
It can be found here under Monday, August 13, 2012
Plug Ins used:
Xero – Porcelain
Eyecandy 3.1 – Glow
“Emoshun 1” is a tagger size scrap kit created by Krissy of Krissy’s
Scraps & Imaging and can be purchased from her store ExquisiteScraps. You can visit her blog here.
~♥~ Let’s get started ~♥~
Open up the template.
Shift + D.
Close out the original.
Delete the top 9 layers.
Usually I like to write my tutorials in an “orderly” fashion. I think the film strip part of the tutorial
may become complicated for some so I’ll just get the film strip part of this
over and done with first.
Highlight Photo 1 layer.
Click anywhere outside of it with your Magic Wand.
Copy and paste Paper 8 as a new layer.
Move into position so that you only have the wood grain look in the
frame.
Tap the delete key.
Deselect.
Delete the template layer.
Highlight Photo 2 layer.
Repeat the above step.
Highlight Photo 3 layer.
Click anywhere outside of it with your Magic Wand.
Copy and paste Paper 8 as a new layer.
Resize 70%
Selections/Invert
Tap the delete key.
Deselect.
Highlight Photo 4 layer.
Repeat the above step.
Copy and paste your tube as a new layer below the film strip.
Change the Properties of the tube to Soft Light.
Move it into position over the far right paper frame. Since the film strip is tilted slightly make
your Pick Tool active so that you can tilt your tube so that it’s straight
WITHIN the frame.
Highlight the paper layer just below the tube.
Click anywhere outside of it with your Magic Wand.
Highlight the tube layer.
Tap the delete key.
Deselect.
Apply Xero – Porcelain effect to the tube –
Use Default Settings.
Repeat the above step with the remaining frames but here’s the trick –
try to position your tube so that it looks like each one is identical. Meaning, after you tilt the tube whichever
way it needs to be tilted, position it within the frame as you did the first
one.
Yikes! I hope I didn’t over
explain and really complicate things!!
If you need more help email me.
Highlight Drk Grey Square layer.
Click on it with your Magic Wand.
New Raster layer.
Copy and paste Paper 7 Into Selection.
Deselect.
Delete the template layer.
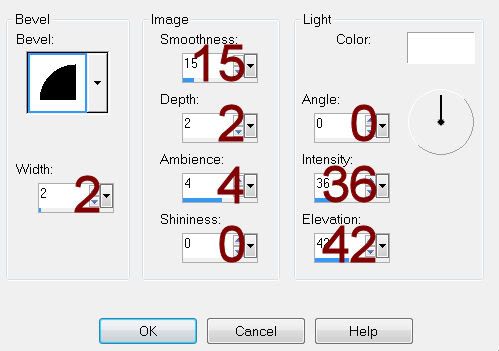
Give the paper a slight Inner Bevel:
Open up Paper 8.
Make your Selection Tool active set on square.
Section off a small plain area of the paper that doesn’t have the dark
horizontal line in it.
Copy.
Make your working canvas active.
Highlight Film Strip bg layer.
Click on it with your Magic Wand.
New Raster layer.
Paste Into Selection.
Deselect.
Highlight Film Strip layer.
Click on it with your Magic Wand.
New Raster layer.
Copy and paste Paper 10 Into Selection.
Deselect.
Delete the template layer.
Give it the same slight Inner Bevel.
Highlight Frame layer.
Repeat the above step.
Highlight Grey Circle layer.
Click on it with your Magic Wand.
New Raster layer.
Copy and paste Paper 9 Into Selection.
Deselect.
Delete the template layer.
Give it the same slight Inner Bevel.
Highlight Bottom White Circle layer.
Click on it with your Magic Wand.
New Raster layer.
Copy and paste Sticker 2 Into Selection.
Deselect.
Delete the template layer.
Repeat the above step with Left and Right White Circle layers.
Highlight Lt Grey Square layer.
Click on it with your Magic Wand.
New Raster layer.
Copy and paste Paper 17 Into Selection.
Deselect.
Delete the template layer.
Give it the same slight Inner Bevel.
Highlight Large Gray Star layer.
Click on it with your Magic Wand.
New Raster layer.
Copy and paste Paper 7 Into Selection.
Deselect.
Delete the template layer.
Give it the same slight Inner Bevel.
Add your elements. I used:
Skull 1: Resize 25%
Skull 2: Resize 25%
Double Bow 3: Resize 35%
Flower 3: Resize
25%/Duplicate/Flip/Resize 70%
Bead String 1: Resize 70%/Free
rotate Right 10 degrees
Teddy 1: Resize 50%
Flower 3: Resize
65%/Duplicate/Mirror/Duplicate the Original 2x’s – move all into position – see
my tag for reference.
Highlight your white background.
New Raster layer.
Select All.
Copy and paste Paper 15 Into Selection.
Deselect.
Adjust/Blur/Gaussian blur:
Radius: 10
OK
Apply the mask.
Resize 110%
Merge Group.
Add your credits.
Add your name.
Convert to Raster layer.
Apply Eyecandy 3.1 – Glow:
Width: 3
Opacity: 100
Opacity Drop Off: Fat
Color: #d8ceba
OK
Resize all layers 80%.
No comments:
Post a Comment