Supplies
Font of choice – I used LD Gregarious – a pay font
Childish will work just as well here
“Ah-Ah-Choo!” is a tagger size scrap kit created by me, Bev of
HorsePlay’s Pasture Designs and can be purchased from either of your favorite stores – Lollipops n Gumdrops or Butterfly Blush Designs or Inspirations of Scrap Friends. You can visit
my designing blog here.
~♥~ Let’s get started ~♥~
Open up a 700 x 700 blank canvas.
Flood fill white.
Copy and paste 22 as a new layer.
Resize 80%
Click inside of it with your Magic Wand.
Selections/Modify/Expand by 4.
New Raster layer below the frame.
Copy and paste Paper 4 Into Selection.
Deselect for now.
Add the following elements below the frame – see my tag for reference:
Don’t worry about what overhangs the frame. We’ll clean that up in a bit -
26: Resize 50%
27: Resize 25%
30: Resize 25%
52: Resize 10%
56: Resize 40%
28: Resize 30%
7: Resize 20%
8: Resize 15% - I will explain
how to put him “behind” the bottom bed post.
Position the yellow bear on the bed where you want him.
Highlight the bed layer.
Use your Selection Tool set on Rectangle and section off the bottom bed
post.
Right click in the layers pallet/Promote Section to layer.
In your Layers pallet move the Promoted section layer just above the
bear layer.
Tada! It looks like he’s placed
behind the bedpost.
Highlight the paper layer.
Click anywhere outside of it with your Magic Wand.
Highlight each element below the frame and tap the delete key.
Deselect.
Close out your white background.
Merge Visible.
Reopen your white background.
New Raster layer.
Make your Selection Tool active set on Rectangle.
Create a Rectangle approximately 200 x 300 pixels.
Copy and paste Paper 3 Into Selection.
Deselect.
Move into position behind the upper right area of the merged layer –
see my tag for reference.
Duplicate
Flip
Mirror
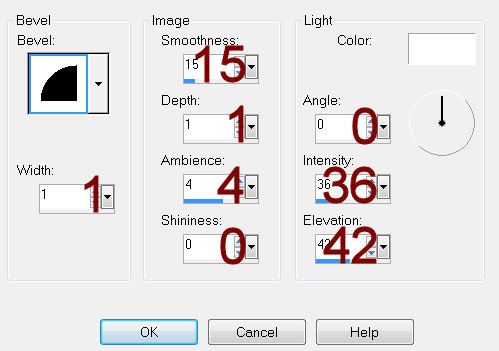
To each Rectangle give it a slight Inner Bevel:

Adjust/Add Remove Noise/Add Noise:
Uniform and Monochrome checked
Noise: 16%
OK
To each Rectangle:
Highlight the rectangle layer.
Click anywhere outside of it with your Magic Wand.
Selections/Invert
Selections/Modify/Contract by 7
New Raster layer.
Copy and paste Paper 5 Into Selection.
Deselect.
Highlight the upper green rectangle layer.
Click anywhere outside of it with your Magic Wand.
Copy and paste 10 as a new layer.
Resize 70%
Move into position over the rectangle – see my tag for reference.
Copy and paste 36 as a new layer.
Resize 50%
Free rotate Right 90 degrees
Move into position – see my tag for reference.
Highlight each element layer and tap the delete key.
Deselect.
Change the Properties of the giraffe to Soft Light.
Highlight the lower left green rectangle layer.
Copy and paste 9 as a new layer.
Resize 65%
Mirror
Move into position over the rectangle.
Copy and paste 36 as a new layer.
Resize 50%
Free rotate Right 90 degrees
Move into position – see my tag for reference.
Highlight the rectangle layer.
Click anywhere outside of it with your Magic Wand.
Highlight each element layer and tap the delete key.
Deselect.
Change the Properties of the horse to Soft Light.
Highlight 25 as a new layer.
Resize 50%
Move into position just above your white background layer – see my tag
for reference.
Duplicate/Flip/Mirror
To each Frame:
Click inside of it with your Magic Wand.
Selections/Modify/Expand by 4.
New Raster layer below the frame.
Copy and paste Paper 1 Into Selection.
Deselect.
Copy and paste 19 as a new layer.
Resize 50%
Move into position – see my tag for reference.
Duplicate/Mirror/Flip
To each round frame:
Click inside of it with your Magic Wand.
Selections/Modify/Expand by 4.
New Raster layer below the frame.
Copy and paste Paper 13 Into Selection.
Deselect.
Add your elements. I used:
29: Resize 35%
46: Resize 25%
45: Resize 25%
10: Resize 60%
9: Resize 50%
2: Resize 30%/Duplicate/Mirror
15, 16, & 17: Resize 25%/Duplicate
each
6: Resize
25%/Duplicate/Mirror/Resize 80%
Highlight your white background.
New Raster layer.
Select All.
Copy and paste Paper 7 Into Selection.
Deselect.
Apply the mask.
Resize 120%
Merge Group.
Add your credits.
Add your name.
Foreground: #000000
Background: Set to Pattern/Paper
3
Stroke: 1
Type your name.
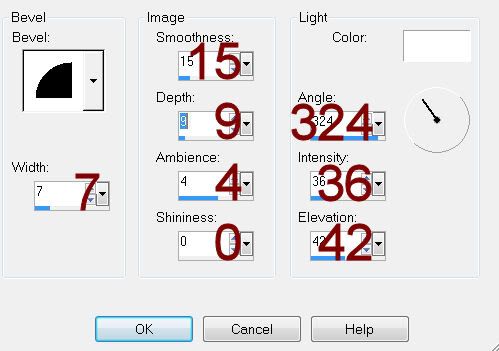
Give it a slight Inner Bevel:

Resize all layers 80%.


No comments:
Post a Comment