

Supplies
1 tube of choice – I used the awesome artwork of Ismael Rac which can
be purchased from his store here. You must have a license to
use.
Font of choice - I used HFF Pessoas Lindas here
Becky Mask 22 here
Creative by Nature Template “Cakes for Deb” – Part of a collab that can
be found here under Saturday, January 28, 2012.
Plug Ins:
Mura’s Meister – Copies
Eyecandy 3.1 0 - Glow
“Blue Dayz” is a FTU tagger size scrap kit created by Lou of Designz by
Lou and can be downloaded from her blog here.
Please leave a thank you when downloading. It’s a small gesture for her generosity!
This tutorial was written assuming you have a working knowledge of PSP.
~♥~ Let’s get started ~♥~
Open up the template.
Shift + D.
Close out the original.
New Raster layer.
Flood fill white.
Send to bottom.
Delete the top five layers and “5” layer.
Highlight 11.
Click on it with your Magic Wand.
New Raster layer.
Copy and paste Paper 8 Into Selection.
Deselect.
Delete the template layer.
Apply Eyecandy 3.1 – Glow:
Width: 3
Opacity: 100%
Opacity Drop Off: Fat
Color: White
OK
Highlight 10.
Click on it with your Magic Wand.
New Raster layer.
Copy and paste Paper 5 Into Selection.
Deselect.
Delete the template layer.
Apply the same Glow effect.
Highlight 9.
Click on it with your Magic Wand.
New Raster layer.
Copy and paste Paper 1 Into Selection.
Deselect.
Delete the template layer.
Apply the same Glow effect.
Highlight 8.
Repeat the above step.
Highlight 7.
Click on it with your Magic Wand.
New Raster layer.
Copy and paste Paper 6 Into Selection.
Deselect.
Delete the template layer.
Apply the same Glow effect.
Highlight 6.
Click on it with your Magic Wand.
New Raster layer.
Copy and paste Paper 4 Into Selection.
Deselect.
Delete the template layer.
Apply the same Glow effect.
Highlight 4.
Click on it with your Magic Wand.
New Raster layer.
Copy and paste Paper 3 Into Selection.
Deselect.
Delete the template layer.
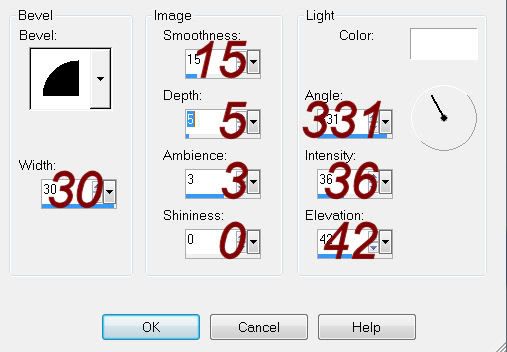
Give it a slight Inner Bevel:
Highlight 3.
Select all/Float/Defloat
New Raster layer.
Flood fill with #4673a5.
Deselect.
Delete the template layer.
Copy and paste your tube as a new layer below the heart paper layer..
Move into a position you like.
Highlight the heart paper layer.
Click inside of it with your Magic Wand.
Selections/Modify/Expand by 4.
Selections/Invert
Highlight the tube layer.
Tap the delete key.
Selections/Modify/Inside Outside Feather:
Both checked
Feather amount: 30
OK
Tap the delete key until you have the feathered look you want.
Deselect.
Copy and paste your tube as a new layer.
Position at the left side of the heart.
Copy and paste Flower 1 as a new layer.
Apply Mura’s Meister – Copies:
Choose “encircle” – Default settings.
Resize 90%
Move into position behind the circle layer.
Add your elements. I used:
Ribbon Buckle 2: Resize
40%/Duplicate
Flower 7: Resize 70%
Double Bow 1: Resize 40%
Butterfly 5: Resize
30%/Duplicate/Mirror
Flower 3: Resize 50%/Duplicate/Mirror/Flip/Duplicate
both flowers and resize them 70%
Crop your Image.
Highlight your white canvas.
New Raster layer.
Select All.
Copy and paste Paper 2 Into Selection.
Deselect.
Apply the mask.
Use your Pick Tool and pull the sides out a little.
Merge Group.
Add your name.
Apply the same glow effect.
Resize all layers 80%.
No comments:
Post a Comment