Supplies
1 tube of choice - I used the artwork of Kirsche which can be purchased from Pics for Design
Font of choice - I used SNF Infinity Bold which is a pay font. Aquarelle will work just as nice here
Dee’s Sign Post template “Coffee” here under Monday, March 21, 2011
Designs by Vaybs Mask 107 here
Plug Ins:
Brush Strokes - Sprayed Strokes
Eyecandy 3.1 - Glow
Eyecandy 5 - Nature: Snow Drift
“Christmas Gold” is a tagger size scrap kit created by Jay of Bello Scarto and can be purchased from her store Heartbeatz Creationz. You can visit her blog here.
Thank you Jay for a really beautiful kit.
This tutorial was written assuming you have a working knowledge of PSP.
~♥~ Let’s get started ~♥~
Open up the template.
Shift + D.
Close out the original.
Image/Canvas Size
750 x 700
OK
Highlight Bg layer.
Flood fill white.
Delete the top 7 layers, Blue Strip, Right and Left Pink Squares, Right and Left White Squares.
Highlight Dots layer.
Click anywhere outside of it with your Magic Wand.
Selections/Invert
New Raster layer.
Copy and paste Paper 2 Into Selection.
Adjust/Add Remove Noise/Add Noise:
Monochrome and Gaussian checked
Noise: 43%
OK
Repeat the above step with the following layers:
Dotted Rectangle
White Circle
Right Blue Rectangle
Left Blue Rectangle
Highlight Black Rectangle layer.
Click anywhere outside of it with your Magic Wand.
Copy and paste Paper 3 as a new layer.
Resize 80%
Tap the delete key.
Deselect.
Delete the template layer.
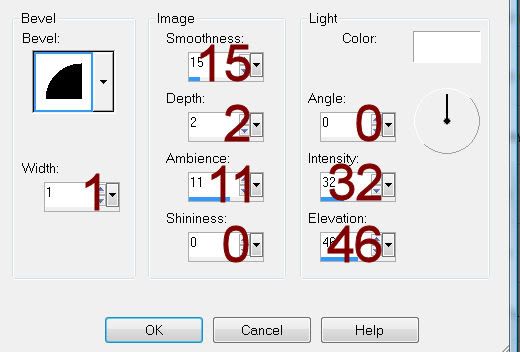
Give it a slight Inner Bevel:

Highlight Black Circle layer.
Click on it with your Magic Wand.
New Raster layer.
Copy and paste Paper 1 Into Selection.
Deselect.
Delete the template layer.
Open up Paper 8.
Shift + D.
Close out the original.
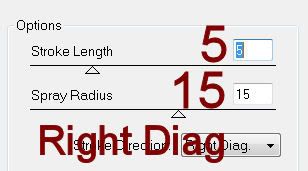
Apply Brush Strokes - Sprayed Strokes:
Match your settings to mine:

Copy.
Highlight Right White Rectangle layer.
Click on it with your Magic Wand.
New Raster layer.
Paste the brush strokes paper Into Selection.
Deselect.
Delete the template layer.
Rename Right Rectangle.
Highlight Left White Rectangle layer.
Repeat the above step accept rename this layer Left Rectangle.
Copy and paste your tube as a new layer.
Position it in front of both frames.
Paste your tube again as a new layer over the Left Rectangle layer in your layers pallet.
This tube layer you want slightly larger.
Change the Properties to Multiply.
Lower the Opacity to about 48.
Move it into position in front of both of the rectangles.
Duplicate/In your layers pallet move it above the Right Rectangle.
Highlight the paper below the tube layer.
Click anywhere outside of it with your Magic Wand.
Highlight the tube layer just above it.
Tap the delete key.
Deselect.
Highlight the other rectangle layer.
Click anywhere outside of it with your Magic Wand.
Highlight the tube layer just above it.
Tap the delete key.
Deselect.
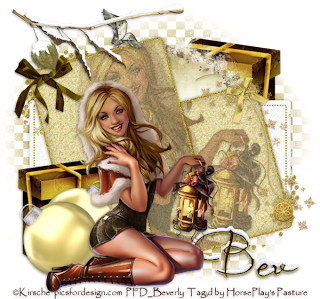
Add your elements. I used:
45: Resize 65%
27: Position behind the rectangle
27 again: Resize 80%/Mirror
32: Resize 60%
11: Resize 50%/Mirror
17: Resize 50%
3: Resize 80%/Free rotate Right 30%
3 again: Resize 80%/Free rotate Left 50%
Highlight your white canvas.
New Raster layer.
Select All.
Copy and paste Paper 2 Into Selection.
Deselect.
Apply the mask.
Use your Pick Tool and pull the sides out slightly.
Merge Group.
Duplicate
Add your copyrights.
Add your name.
Color Pallet:
Foreground: Null
Background: #2f1400
Type your name.
Convert to Raster layer.
Apply Eyecandy 3.1 - Glow
Width: 3
Opacity: 100%
Opacity Drop off: Fat
Color: #ccb52e
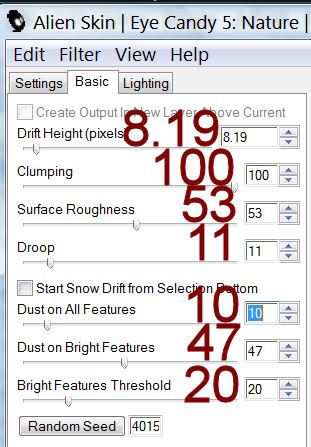
Apply Eyecandy Nature - Snow Drift:
Settings Tab:
Small, A Little White snow
Basic Tab:

Resize all layers 80%
I hope you enjoyed this tutorial.
I’d love to see your results.
Email me!
Hugs,
Bev


No comments:
Post a Comment