

Supplies
2 tubes of choice - I used the artwork of Jennifer Janesko which can be purchased from CDO. You must have a license to use.
Font of choice - I used Levitee here
Monti Circular Mask here
Plug Ins:
Eyecandy 5 - Nature: Snow Drift
Animation Shop
Snow which I’ve supplied here and Twinks here
“Winter Blessings” is a tagger size scrap kit created by Cindy of ChiChi Designz and can be purchased from Aussie Scrap Designs. You can visit her blog here.
Thank you Cindy for an incredibly beautiful winter kit.
This tutorial was written assuming you have a working knowledge of PSP.
~♥~ Let’s get started ~♥~
Open up a 700 x 700 blank canvas.
Flood fill white.
Copy and paste Frame 1 as a new layer.
Free rotate Left 90 degrees.
Click inside of it with your Magic Wand.
Selections/Modify/Expand by 4.
New Raster layer below the frame.
Copy and paste Paper 13 Into Selection.
Deselect.
Add elements below the frame. Don’t worry about what overhangs. We’ll clean it up in a bit. I used:
Tree 1: Resize 70%/Duplicate/Mirror/Resize 70%/Duplicate
Tree 1 again: Resize 40%/Change the Properties to Multiply/Lower the Opacity to about 59
Fence: Resize 25% and 50%
Reindeer: Resize 25%
Snow 1: Duplicate as many times as you like/mirror as you like
Highlight the paper layer.
Click anywhere outside of it with your Magic Wand.
Highlight each element layer and tap the delete key.
Deselect.
Highlight the frame layer.
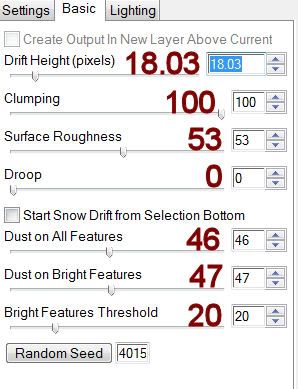
Apply Eyecandy 5: Nature - Snow Drift:
Settings Tab:
Small, A Little White Snow
Basic Tab:
Open up the snow that I’ve supplied.
Copy Frame 1.
Make your working canvas active.
Highlight the layer just below the frame.
Paste Frame 1
Rename S1.
Don’t worry about what overhangs. We’ll clean it up later.
Make the snow that I supplied active.
Copy Frame 2.
Make your working canvas active.
Paste Frame 2
(it should be just above S1 layer).
Rename S2.
Repeat the above step until you have all 10 snow layers pasted and renamed onto your working canvas.
Highlight the paper layer.
Click anywhere outside of it with your Magic Wand.
Highlight each snow layer and tap the delete key.
Deselect.
Close out all layers accept for S1 - keep it open.
Copy and paste Frame 2 as a new layer.
Resize 40%
Free rotate Left 5 degrees.
Duplicate/Mirror
Move both frames into position - see my tag for reference.
Highlight the left frame.
Click inside of it with your Magic Wand.
Selections/Modify/Expand by 4.
New Raster layer below the frame.
Copy and paste Paper 8 Into Selection.
Copy and paste your tube below the frame.
Selections/Invert
Tap the delete key.
Deselect.
Repeat the above step with the right frame accept use a different tube.
Add your elements. I used:
Bow 1: Resize 35%
Branch: Resize 50%/Free rotate Right 10 degrees/Duplicate/Duplicate and mirror both branches
Flowers: Resize 30%/Duplicate/Mirror
Element: Resize 30%
Bunny: Resize 40%/Duplicate/Mirror
Crop your image.
Highlight your white canvas.
New Raster layer.
Select All.
Copy and paste Paper 16 Into Selection.
Deselect.
Apply the mask.
Merge Group.
Duplicate
Copy and paste Fence as a new layer just above your mask.
Apply the mask.
Merge Group.
Add your copyrights.
Add your name.
Color Pallet:
Foreground: #618093
Background: Pattern/Paper 16
Stroke: 1
Make your Ellipse Tool active.
Width: 2
Create an oval that’s the same width as the oval frame. Don’t worry about trying to get it perfect - you can always make your Pick Tool active an manipulate the oval until you have the top of the oval runny along the inside of the oval frame.
Make your Text Tool active.
Run it along the top of the oval until you see a Rocking A.
Click your Mouse.
A Text Box will open - type your name.
Apply
In your layers pallet click on the + sign.
Close out the New Ellipse layer.
Highlight Vector 1 layer.
Right Click
Convert to Raster layer.
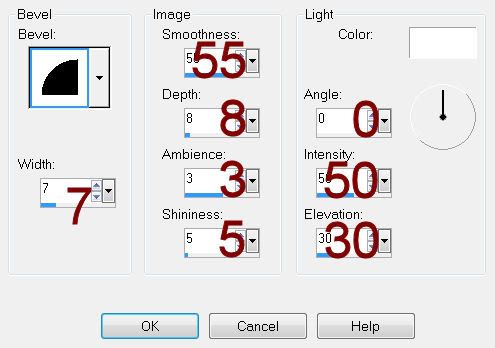
Give it a slight Inner Bevel:
Be sure only S1 layer is open.
Copy Merge
~Time to Animate~
Open up Animation Shop
Edit/Paste/As New Animation
Back in PSP.
Close out S1.
Open up S2.
Copy Merge
Back in AS.
Edit/Paste/After Current Frame.
Back in PSP.
Close out S2.
Open up S3.
Copy Merge
Back in AS.
Edit/Paste/After Current Frame.
Back in PSP.
Close out S3.
Open up S4.
Copy Merge
Back in AS.
Edit/Paste/After Current Frame.
Back in PSP.
Close out S4.
Open up S5.
Copy Merge
Back in AS.
Edit/Paste/After Current Frame.
Back in PSP.
Close out S5.
Open up S6.
Copy Merge
Back in AS.
Edit/Paste/After Current Frame.
Back in PSP.
Close out S6.
Open up S7.
Copy Merge
Back in AS.
Edit/Paste/After Current Frame.
Back in PSP.
Close out S7.
Open up S8.
Copy Merge
Back in AS.
Edit/Paste/After Current Frame.
Back in PSP.
Close out S8.
Open up S9.
Copy Merge
Back in AS.
Edit/Paste/After Current Frame.
Back in PSP.
Close out S9.
Open up S10.
Copy Merge
Back in AS.
Edit/Paste/After Current Frame.
Open up the Twinks that I’ve supplied.
Ctrl + A (the highlight all frames)
Edit/Copy
Make your tag animation active.
Click on Frame 1.
Hold down the Ctrl key and click on frames 2, 3, 4, 5, and 6.
Ctrl + E.
Place the twink wherever you want by giving your mouse a click - I used the twink on my name.
Click on Frame 5.
Hold down the Ctrl key and click on frames 6, 7, 8, 9, and 10.
Place the twink again.
Animation/Resize Animation:
Percentage of Original checked
Width x Height: 80
OK
View your animation.
If you’re happy with it then save.
I hope you enjoyed this tutorial.
I’d love to see your results.
Email me!
Hugs,
Bev
No comments:
Post a Comment