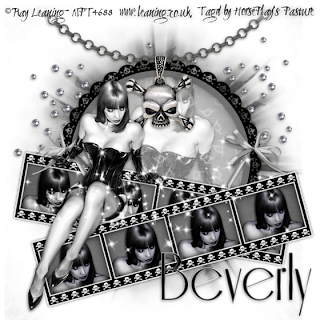
Clicking on the image will allow you to enlarge for bigger view.
Supplies
1 tube of choice (one that is sitting works best) - I used the artwork of Ray Leaning at MPT
Font of Choice - I used Riesling here
Gem Mask 71 here
“Emo Skull” is a tagger size scrap kit created by Aurelie of Pink Candy Designs and can be purchased at Lollipops n Gumdrops.
Thank you Aurelie for an amazingly beautiful kit!
This tutorial was written assuming you have a working knowledge of PSP.
~♥~ Let’s get started ~♥~
Open up a 700 x 700 blank canvas.
Flood fill white.
Copy and paste Frame as a new layer.
Resize 75%
Click inside of it with your Magic Wand.
Selections/Modify/Expand by 6.
New Raster layer.
Copy and paste Paper 5 Into Selection.
Deselect.
Copy and paste Filmstrip as a new layer.
Resize 90%
Free rotate Right 10 degrees.
Paste the filmstrip again.
Resize 90%
Free rotate Left 15 degrees
Paste your tube as a new layer.
Resize as needed.
Move the Filmstrip frames and tube into exact positions - see my tag for reference.
Highlight the film strip that’s tilted to the left (should be the one in front).
Click inside of each square with your Magic Wand.
Selections/Modify/Expand by 4.
New Raster layer below the frame.
Copy and paste Paper 2 Into Selection.
Deselect.
Copy and paste your tube as a new layer below the frame.
Free rotate Left 15 degrees.
Duplicate 3 times and move a tube below each from opening.
Highlight the Paper layer.
Click anywhere outside of it with your Magic Wand.
Highlight each tube layer and tap the delete key.
Deselect.
Merge Visible the 4 tube layers that are below the frame.
Change the Properties to Multiply.
Duplicate/Change the Properties to Overlay.
Highlight the other Filmstrip frame and repeat the above step accept free rotate your tube Right 10 degrees.
Paste your tube one last time.
Resize as needed and move beneath the circle frame.
Highlight the circle paper.
Click anywhere outside of it with your Magic Wand.
Highlight the tube layer.
Tap the delete key.
Deselect.
Change the Properties to Overlay.
Add your embellishments. I used:
Bow 2: Resize 35%/Duplicate/Mirror
Beads: Duplicate and move to the other side of your canvas.
Chain: Resize 80%
Charm 2: Resize 80%
Sparkles
Highlight your white background.
New Raster layer.
Copy and paste Paper 10 Into Selection.
Deselect.
Apply the Mask.
Merge Group.
Add your credits.
Add your name.
Resize all layers 80%
I hope you enjoyed this tutorial.
I’d love to see your results and show it off in my gallery.
Email me!
Hugs,
Bev

No comments:
Post a Comment