Supplies
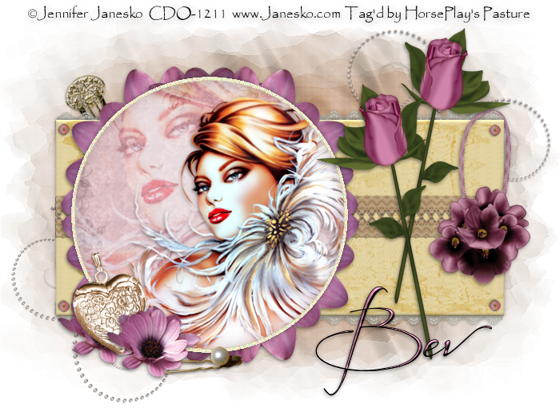
1 tube of choice - I used the artwork of Jennifer Janesko and can be purchased from CDO. You must have a license to use.
Font of choice - I used Before the Rain here
My Mask 27 here
“Vintage Times” is a full size scrap kit created by Debbie of Graphics by Poka Dot and can purchased from Lollipops n Gumdrops. You can visit her blog here.
Thank you Debbie for a really beautiful and classy kit.
This tutorial was written assuming you have a working knowledge of PSP.
~♥~ Let’s get started ~♥~
Open up a 700 x 700 blank canvas.
Flood fill white.
Make your Selection Tool active set on rectangle.
Make a rectangle approximately 500 x 225 pixels.
New Raster layer.
Copy and paste Paper 7 Into Selection.
Deselect.
Center it on the canvas.
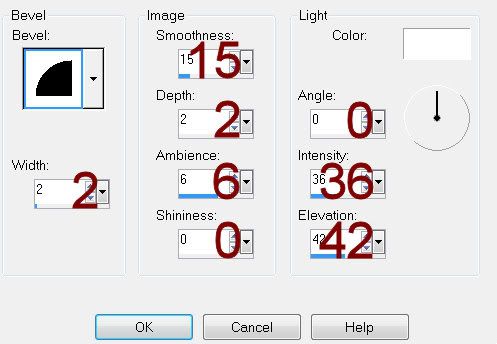
Give it a slight Inner Bevel.

Make your Selection Tool active set on Circle.
Make a circle approximately 350 pixels.
New Raster layer.
Copy and paste Paper 54 Into Selection - it’s alright wherever this circle is on your canvas. We’ll move it later.
Adjust/Add Remove Noise/Add Noise:
Gaussian checked
Noise: 35%
OK
Selections/Modify/Contract by 5.
New Raster layer.
Copy and paste Paper 5 Into Selection.
Copy and paste your tube as a new layer.
Move into position.
Selections/Invert
Tap the delete key.
Duplicate the tube layer.
Make it slightly larger and move below the original tube layer in your layers pallet.
Tap the delete key.
Deselect.
Change the Properties to Soft Light.
Close out your white canvas and the rectangle layer.
Merge visible.
Reopen all layers.
Move the Merged layer to the left on your canvas - see my tag for reference.
Copy and paste Vintage Lace 50 as a new layer.
Resize 25% and 50%
Position behind the right rectangle side.
Duplicate/Move over to the side left so that it’s flush with the side to make one long piece of lace.
Use your Eraser tool to erase the overlapping lace.
Merge Down.
Duplicate
Flip
Position behind the top of the rectangle.
Copy and paste Vintage Lace 2 as a new layer.
Resize 25% and 25%
Position at the right side of rectangle - see my tag for reference.
Duplicate/Move to the left so that it’s flush with the side to make one long piece of lace.
Use your Eraser Tool and erase the overlapping lace.
Add your embellishments. I used:
Vintage Button 12: Resize 25%, 25%, and 30%/Duplicate 3x’s and position at each corner of the rectangle.
Hair Clip 21: Resize 25% and 50%/Free rotate Left 30 degrees
Pearl Swirl: Resize 25% and 40%/Flip/Position at the top right corner/Duplicate/Flip/Position at the top right corner. Duplicate/Mirror both Pearl Swirl layers and position at the bottom left corner.
Flower 7: Resize 25%/Position at the top left area behind the circle/Duplicate/Mirror. Duplicate and flip both flower layers.
Violet Ball: Resize 25% and 60%
Vintage Rose: Resize 25% and 40%/Dulicate/Mirror
Bronze Locket: Resize 25% and 35%/Mirror
Purple flower 2: Resize 25% and 40%/Duplicate
Vintage Clip: Resize 25% and 40%/Mirror
Crop your Image.
Highlight your white canvas.
New Raster layer.
Select All.
Copy and paste Paper 14 Into Selection.
Deselect.
Apply the mask.
Merge Group.
Duplicate/Change the Properties to Overlay.
Add your copyrights.
Add your name.
Color Pallet:
Foreground: #000000
Background: #d385ac
Stroke: .80
Type your name.
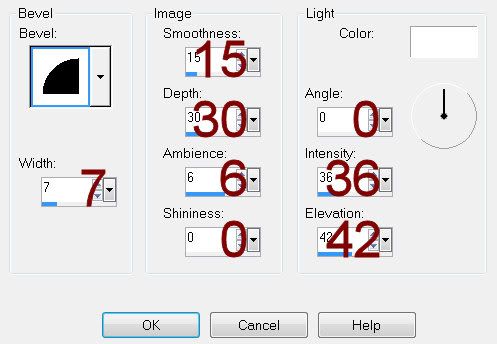
Give it a slight Inner Bevel:’

Resize all layers 80%
I hope you enjoyed this tutorial.
I’d love to see your results.
Email me!
Hugs,
Bev

No comments:
Post a Comment