
Supplies
1 tube of choice - I used the awesome artwork of Steve Baier and can be purchased from Up Your Art. You must have a license to use.
Font of choice - I used Before the Rain here
Vix Mask 452 here
Crazy Cakes Scraps Devil’s Candy template here. It’s the 8th template down under June 29, 2011.
Animation Shop
Plug Ins:
Eyecandy 5: Nature - Fire
“Beautiful Monster” is a tagger size scrap kit created by Jessica of Gothic Inspirations and can purchased from her store Gothic Inspirations. You can visit her blog here.
Thank you Jessica for another fantastic kit.
This tutorial was written assuming you have a working knowledge of PSP.
~♥~ Let’s get started ~♥~
Open up the template.
Shift + D.
Close out the original.
Resize all layers 80%
Image/Canvas Size:
700 x 600
OK
New Raster layer.
Send to bottom.
Flood fill white.
Delete the following layers:
Top 2 layers, 7, 8. And 10
Highlight 9.
Click on it with your Magic Wand.
New Raster layer.
Copy and paste Paper 11 Into Selection.
Deselect.
Delete the template layer.
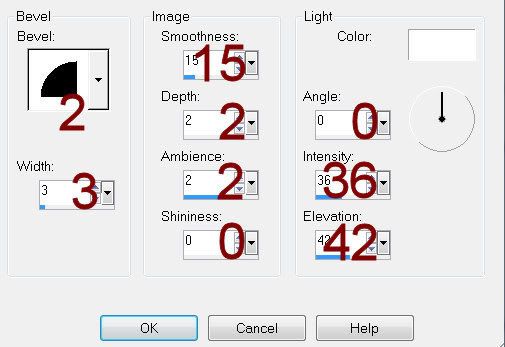
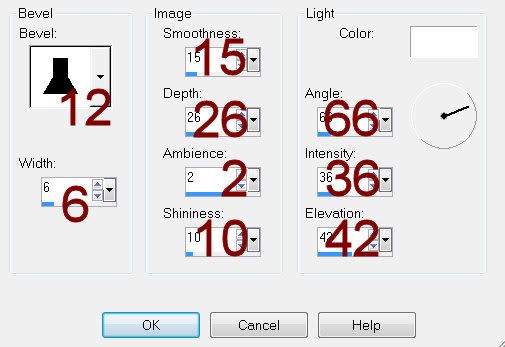
Give it a slight Inner Bevel:
Highlight 6.
Click on it with your Magic Wand.
Copy and paste Paper 9 Into Selection.
Resize 60%
Deselect.
Delete the template layer.
Give it the same slight Inner Bevel.
Highlight 5.
Click anywhere outside of it with your Magic Wand.
Selections/Invert
New Raster layer.
Copy and paste Paper 4 Into Selection.
Adjust/Add Remove Noise/Add Noise:
Gaussian and Monochrome checked
Noise: 45%
OK
Deselect.
Delete the template layer.
Highlight 1.
Merge Down.
Both slim rectangle should be on the same layer.
Select All/Float/Defloat
New Raster layer.
Paste Paper 4 Into Selection.
Deselect.
Delete the template layer.
Give it the same noise effect.
Highlight Raster 4 layer.
Click on it with your Magic Wand.
New Raster layer.
Copy and paste Paper 8 Into Selection.
Deselect.
DO NOT delete the template layer.
Highlight 3.
Click on it with your Magic Wand.
New Raster layer.
Copy and paste Paper 14 Into Selection.
Deselect.
DO NOT delete the template layer.
Copy and paste your tube as a new layer at the top of your layers pallet.
This tube you want to position over both rectangles - see my tag for reference (it’s the larger of the two tubes)
Nestle it nicely into the corner of the paper that covers Template 4.
Highlight the Template 4 layer.
Click anywhere outside of it with your Magic Wand.
Highlight the tube layer.
Use your Eraser Tool to erase whatever you don’t want overhanging the rectangle.
Deselect.
Delete the template layer.
Paste your tube again.
This time position it over the paper that covers Template 3.
Highlight the template layer.
Click anywhere outside of it with your Magic Wand.
Highlight the tube layer.
Tap the delete key.
Deselect.
Delete the template layer.
Change the Properties to Overlay.
Add your embellishments. I used:
Ribbon w Charm: Resize 70%
Bow 2: Resize 25% and 70%
Tree 1: Resize 65%/Mirror
Tab: Resize 65%
Fence Piece: Resize 70%/Duplicate
Bow 1: Resize 30%/Free rotate Left 45 degrees
Leaves: Resize 90%/Mirror
Drop Back: Resize 60%
Flower: Resize 25%/Duplicate/Resize 70%
Candle 2: Resize 60%
Highlight your white canvas.
New Raster layer.
Select All.
Copy and paste Paper 4 Into Selection.
Deselect.
Apply the mask.
Merge Group.
Duplicate/Mirror
Add your copyrights.
Add your name.
Color Pallet:
Foreground: #000000
Background: #6f1d31
Stroke: .80
Type your name.
Give it a slight Inner Bevel:
If you don’t want to animate your tag you can save.
To animate:
Highlight the Candle layer.
Duplicate twice for a total of 3 candle layers.
Rename them Candle 1, 2, and 3.
Highlight Candle 1 layer.
Make your Selection Tool active set on Freehand.
Use it to outline all of the candle flames.
Apply Eyecandy 5: Nature - Fire:
Settings Tab:
Small, Candle
Basic Tab:

Color:
Default Settings
OK
Highlight Candle 2 layer.
Apply the same fire effect accept hit the random seed button once.
OK
Highlight Candle 3 layer.
Apply the same fire effect accept hit the random seed button once.
OK
Deselect.
Close out Candle 2 and Candle 3 layers.
Keep open Candle 1 layer.
Copy Merge.
Time to Animate:
Open up Animation Shop.
Edit/Paste as New Animation.
Back in PSP.
Close out Candle 1 layer.
Open up Candle 2 layer.
Copy Merge
Carry into AS.
Edit/Paste/After Current Frame.
Back in PSP.
Close out Candle 2layer.
Open up Candle 3 layer.
Copy Merge
Carry into AS.
Edit/Paste/After Current Frame.
Ctrl + A to highlight all frame.
Animation/Frame Properties:
Change the Display time to 23.
Animation/Resize Animation:
Percentage of Original checked.
Width x Height: 80
OK
View your animation.
If you’re happy with it then save.
I hope you enjoyed this tutorial.
I’d love to see your results.
Email me!
Hugs,
Bev
No comments:
Post a Comment