Supplies
1 tube of choice - I used the beautiful artwork of Carlos Diez which can be purchased from Up Your Art. You must have a license to use.
Font of choice - I used Aquarelle here
Becky Mask 22 here
Dee’s Sign Post Template here under Oct. 21, 2011
Plugs Ins:
Greg’s Factory Output Vol. II - Pool Shadow
DSB Flux - Bright Shadow
“On the Veranda” is a tagger size scrap kit created by Deanna of Butterfly Kisses Scraps and can be purchased from Twilight Scraps. You can visit her blog here.
Thank you Deanna for a really beautiful kit.
This tutorial was written assuming you have a working knowledge of PSP.
~♥~ Let’s get started ~♥~
Open up the template.
Shift + D.
Close out the original.
Image/Canvas Size:
700 x 550
OK
Highlight the background layer.
Flood fill white.
Delete the following layers -
Credit, Stars, Finding Neverland, Black Shape, Kandi Word Art, Word Art Back, and Word Art Shadow
Highlight Top Rectangle layer.
Click anywhere outside of it with your Magic Wand.
Copy and paste Paper 10 as a new layer.
Resize 50%
Move into position over the rectangle layer.
Tap the delete key.
Deselect.
Delete the template layer.
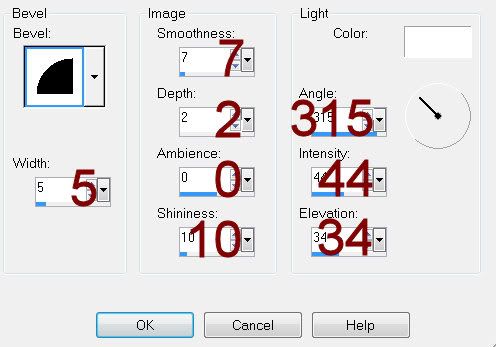
Give it a slight Inner Bevel:

Highlight Bottom Rectangle layer.
Repeat the above step.
Highlight Right Blue Circle layer.
Click anywhere outside of it with your Magic Wand.
Copy and paste Paper 6 as a new layer.
Resize 50%
Tap the delete key.
Copy and paste your tube as a new layer.
Position over the circle paper layer.
Tap the delete key.
Deselect.
Delete the template layer.
Give the paper layer the same Inner Bevel.
Highlight Left Blue Circle layer.
Repeat the above step accept be sure the tube is facing opposite of the other tube layer.
Highlight Right Rectangle layer.
Click on it with your Magic Wand.
New Raster layer.
Copy and paste Paper 8 Into Selection.
Copy and paste your tube as a new layer.
Selections/Invert
Tap the delete key.
Deselect.
Delete the template layer.
Highlight Left Rectangle layer.
Repeat the above step accept be sure the tube is facing opposite of the other tube layer.
Highlight Rectangle Frames layer.
Select All/Float/Defloat
New Raster layer.
Copy and paste 15 Into Selection.
New Raster layer.
Copy and paste Paper 14 Into Selection.
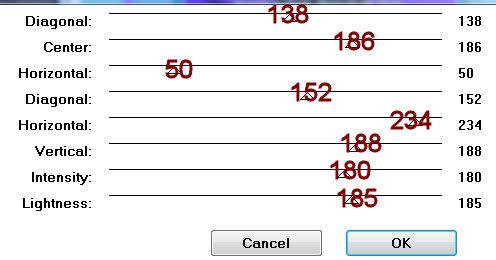
Apply Greg’s Factory Output Vol. II - Pool Shadow:

Apply the Pool Shadow Effect once more.
Deselect.
Delete the template layer.
Highlight Circle Frame layer.
Select All/Float/Defloat
New Raster layer.
Copy and paste 15 Into Selection.
New Raster layer.
Copy and paste Paper 14 Into Selection.
Apply Greg’s Factory Output Vol. II - Pool Shadow:
Same Settings
Apply the Pool Shadow Effect once more.
Apply DSB Flux - Bright Noise:
Intensity: 35
Mix checked
OK
Deselect.
Delete the template layer.
Highlight Purple Circle layer.
Click on it with your Magic Wand.
New Raster layer.
Copy and paste Paper 14 Into Selection.
Copy and paste Diamond Rain as a new layer.
Resize 50%
Selections/Invert
Tap the delete key.
Deselect.
Delete the template layer.
Highlight Dotted Line layer.
Select All/Float/Defloat
New Raster layer.
Copy and paste Paper 15 Into Selection.
Deselect.
Delete the template layer.
Copy and paste your tube as a new layer.
Position in front of the circle layer.
Open up Spill 01element.
Use your Freehand Selection tool set on Rectangle and section out one of the starts.
Copy.
Paste as a new layer on your working canvas.
Resize 30%
Duplicate
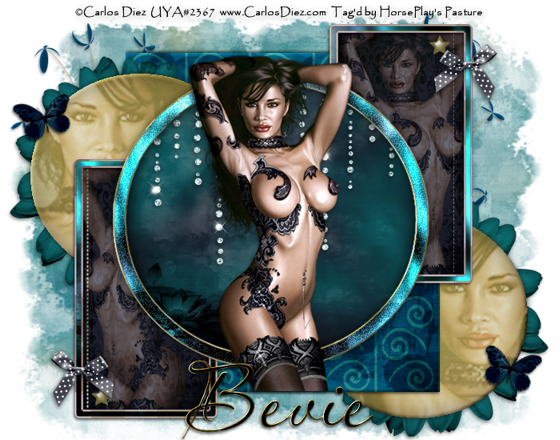
Position one star at the corner of each rectangle - see my tag for reference.
Add your embellishments. I used:
Flower Spray: Resize 50%/Duplciate/Mirror
Bow 2: Resize 25% and 60%
Butterfly 2: Resize 25% and 40%
Daisy 01: Resize 60%
Highlight your white canvas.
New Raster layer.
Select All.
Copy and paste Paper 2 Into Selection.
Deselect.
Apply the mask.
Resize 105%
Merge Group.
Duplicate
Add your copyrights.
Add your name.
Color Pallet:
Foreground: Gradient/Metal Brass/Angle: 66 Repeat: 3
Background: #000000
Stroke: 1
Type your name.
Give the the same inner bevel 2 times.
Resize all layers 80%.
I hope you enjoyed this tutorial.
I’d love to see your results.
Email me!
Hugs,
Bev

No comments:
Post a Comment