Supplies
2 tubes of choice - I used the artwork of Anna Marine which can now be purchased from CDO. You must have a license to use.
Font of choice - I used Nadine Script here
Weescotlass Mask 297 here
Plugs Ins:
Greg’s Factory Output Vol. II - Pool Shadow
“Independent Woman” is a tagger size scrap kit created by Jessica of Gothic Inspirations and can be downloaded from her blog here. Please leave a thank you when downloading as it’s a small gesture for hard work given freely.
This tutorial was written assuming you have a working knowledge of PSP.
~♥~ Let’s get started ~♥~
Open up a 700 x 700 blank canvas.
Flood fill white.
Copy and paste Frame 3 as a new layer.
Resize 60%
Duplicate
Copy and paste Frame 5 as a new layer.
Resize 55%
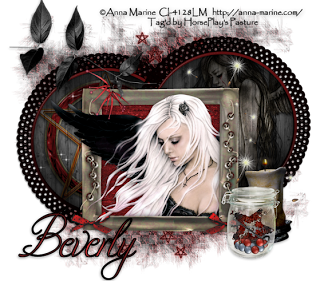
Move all 3 frames into position - see my tag for reference.
The Left round frame should be below the right round frame in your layers pallet.
Highlight the Left round frame.
Click inside of it with your Magic Wand.
Selections/Modify/Expand by 4.
New Raster layer below the frame.
Copy and paste Paper 1 Into Selection.
Apply Greg’s Factory Output Vol. II - Pool Shadow:
Use Default Settings.
Copy and paste Pent as a new layer.
Resize 50%
Center it over the paper.
Copy and paste Sparkles as a new layer.
Resize 25%
Position over the pent.
Selections/Invert
Tap the delete key.
Deselect.
Highlight the Right round frame.
Click inside of it with your Magic Wand.
Selections/Modify/Expand by 4.
New Raster layer below the frame.
Copy an paste Paper 1 Into Selection.
Apply the same Pool Shadow effect accept move the Intensity slider bar down to 80.
Copy and paste a tube as a new layer.
Move into position over the paper layer.
Selections/Invert
Tap the delete key.
Change the Properties to Overlay.
Deselect.
Highlight the Square Frame.
Click inside of it with your Magic Wand.
Selections/Modify/Expand by 4.
Copy and paste Paper 5 as a new layer.
Resize 50%
Selections/Invert
Tap the delete key.
Copy and paste your tube as a new layer.
If you want part of your tube to be shown outside of the frame then duplicate the tube and move above the frame in your layers pallet.
Highlight the original tube layer.
Tap the delete key.
Deselect.
Highlight the copy of the tube layer.
Use your Eraser Tool and erase whatever part of the tube you don’t want to show.
Add your embellishments. I used:
Stars
Rivets: Resize 40%/Free rotate Left 90 degrees/Duplicate/Mirror
Dandelions: Resize 60%
Leaves 1: Resize 50%
Bow 2: Resize 25% and 60%/Duplicate/Mirror
Candle: Resize 50%
Jar: Resize 30%
So you won’t see the drop shadow through the jar-
Give the jar a drop shadow on a layer of its own.
Highlight the jar layer.
Click anywhere outside of it with your Magic Wand.
Selections/Invert
Selections/Modify/Contract by 1
Highlight the drop shadow layer.
Tap the delete key.
Deselect.
Crop a little off the bottom of your canvas.
Highlight your white canvas.
New Raster layer.
Select All.
Copy and paste Paper 2 Into Selection.
Deselect.
Apply the mask.
Merge Group.
Add your copyrights.
Add your name.
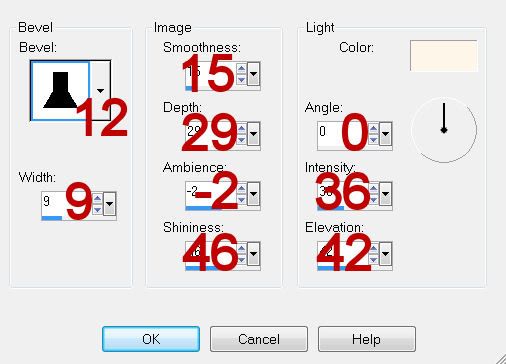
Give it a slight Inner Bevel:

Select All/Float/Defloat
Selections/Modify/Contract by 1
Apply the same Pool Shadow effect accept move the Intensity bar back up to 128.
Deselect.
Resize all layers 80%.
I hope you enjoyed this tutorial.
I’d love to see your results and show it off in my gallery.
Email me!
Hugs,
Bev

No comments:
Post a Comment