Supplies
1 tube of choice - I used the artwork of Steve Baier which can be purchased from Up Your Art. You must have a license to use. Up Your Art is now open!! You must stop by if you haven't already and check the new and improved place out. Your shopping experience will be a pleasure!

Font of choice - I used Aquarelle here
Divine Intentionz Template 380 here
Weescotlass Mask 297 here
“Remember Vintage” is Full size scrap kit created by Annette of AW Design and can be purchased from Butterfly Blush Designs. You can visit her blog here.
Thank you Annette for an absolutely beautiful Vintage kit!
This tutorial was written assuming you have a working knowledge of PSP.
~♥~ Let’s get started ~♥~
Open up the template.
Shift + D.
Close out the original.
Resize all layers 85%
Image/Canvas Size:
700 x 500
Flood fill the background layer white.
Delete the top 9 layers.
Highlight Raster 2.
Click on it with your Magic Wand.
New Raster layer.
Copy and paste Paper 21 Into Selection.
Deselect.
Delete the template layer.
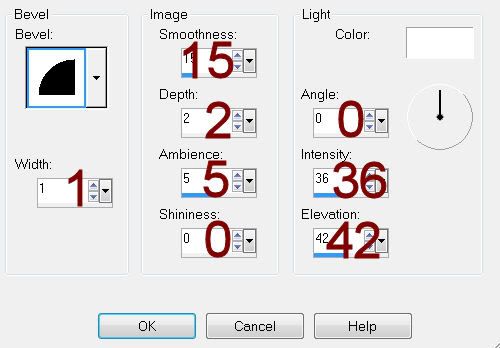
Give it a slight Inner Bevel:

Highlight Oval Back layer.
Click anywhere outside of it with your Magic Wand.
Selections/Invert
New Raster layer.
Copy and paste Paper 6 Into Selection.
Adjust/Add Remove Noise/Add Noise:
Monochrome and Gaussian checked
Noise: 25%
OK
Deselect.
Delete the template layer.
Highlight Glittered Square Back layer.
Repeat the above step.
Highlight Oval layer.
Click on it with your Magic Wand.
New Raster layer.
Copy and paste Paper 19 Into Selection.
Deselect.
Delete the template layer.
Give it the same slight Inner Bevel.
Highlight Raster 1 layer..
Click on it with your Magic Wand.
New Raster layer.
Copy and paste Paper 15 Into Selection.
Deselect.
Delete the template layer.
Give it the same slight Inner Bevel.
Highlight Rectangle layer.
Click on it with your Magic Wand.
New Raster layer.
Copy and paste Paper 20 Into Selection.
Deselect.
Delete the template layer.
Give it the same slight Inner Bevel.
Highlight Square layer.
Click on it with your Magic Wand.
New Raster layer.
Copy and paste Paper 12 Into Selection.
Deselect.
Delete the template layer.
Give it the same slight Inner Bevel.
Highlight Square 2 layer.
Click on it with your Magic Wand.
New Raster layer.
Copy and paste Paper 13 Into Selection.
Deselect.
Delete the template layer.
Give it the same slight Inner Bevel.
Copy and paste rahmen_4 as a new layer.
Resize 25% and 80%
Free rotate Right 10 degrees.
Duplicate/Mirror
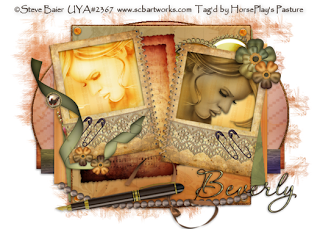
Move both frames into position - see my tag for reference.
Copy and paste Paper 2 as a new layer.
Free rotate right 10 degrees - I realize you can’t see a thing accept the close up of the paper! lol It’s ok, just rotate 10 degrees and copy.
Close the layer out.
Highlight the frame on the right.
Click inside of it with your Magic Wand.
Selections/Modify/Expand by 4.
New Raster layer below the frame.
Paste the paper Into Selection.
Deselect.
Reopen the huge paper layer.
Free rotate Left 20 degrees.
Copy.
Delete the paper. You won’t need it any more.
Highlight the frame on the left.
Click inside of it with your Magic Wand.
Selections/Modify/Expand by 4.
New Raster layer below the frame.
Paste the paper Into Selection.
Copy and paste your tube as a new layer below the frame.
Selections/Invert
Tap the delete key.
Deselect.
Change the Properties to Soft Light.
Depending on the color of your tube, duplicate it until your tube is still light but distinct. If you’re using the tube I did, I had to duplicate it twice for a total of 3 layers.
Deselect.
Highlight the paper layer just below the frame on the right.
Click anywhere outside of it with your Magic Wand.
Paste your tube as a new layer.
Tap the delete key.
Deselect.
Change the Properties to Multiply.
Add your embellishments. I used:
blatt: Resize 25% and 50%/Free rotate Left 5 degrees/Duplicate/erase the bit of flower that sticks out.
brosche_5: Resize 25%, 25%, and 70%/Duplciate twice for a total of 3 and place at each corner of the square.
brosche_8: Resize 25%, 25%, and 70%/place at the top right corner of the square.
band_5: Resize 25% and 50%
nadel_5: Resize 25% and 40%/Free rotate Left 10 degrees
brosche_6: Resize 30%/Dulpliccate/Flip/Place behind the right frame
fueller: Resize 25% and 50%/Free rotate Left 10 degrees
perlenkette: Resize 25%, 50%, and 90%/Free rotate Left 40 degrees
blume: Resize 25% and 25%
blume 1: Resize 25%, 25%, and 70%/Mirror/Flip/Duplicate/Resize 70%/Duplicate
Highlight your white canvas.
Select All
New Raster layer.
Copy and paste Paper 1 Into Selection.
Deselect.
Apply the mask.
Merge Group.
Duplicate
Add your copyrights.
Add your name.
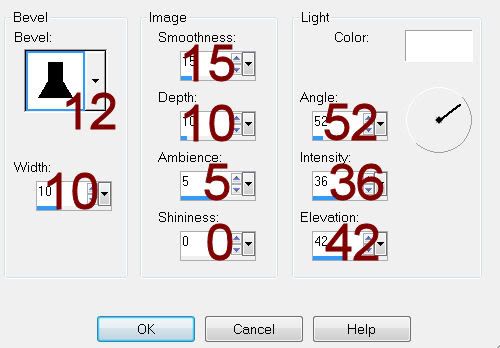
Give it a slight Inner Bevel:

Resize all layers 80%.
I hope you enjoyed this tutorial.
I’d love to see your results and show it off in my gallery.
Email me!
Hugs,
Bev

No comments:
Post a Comment