Supplies
1 tube of choice - I used the artwork of Steve Walker and can be purchased from MPT. You must have a license to use.
Font of Choice - I used Jellyka Castle’s Queen here
Weescotlass Mask 161 here
Divine Intentionz Template 390 here
Greg’s Factory Output Vol. II - Pool Shadow
“Earth Day” is a PTU scrap kit created by Cindy of Puddicat Creations and can be purchased from Twilight Scraps. You can visit her blog here.
Thank you Cindy for such an awesome outdoor kit! This one is fantastic!!
This tutorial was written assuming you have a working knowledge of PSP.
~♥~ Let’s get started ~♥~
Open up the template.
Shift + d.
Close out the Original.
Resize all layers 85%.
Delete the following layers:
Raster 1, Word Art, Word Art Back 2, Word Art Back, rectangle, Thin Rectangle, Shape, and Glitter Back.
Highlight the Background layer.
Image/Canvas Size:
700 x 550
OK
Flood fill white.
Highlight Shape 1 layer.
Click anywhere outside of it with your Magic Wand.
Selections/Invert
New Raster layer.
Copy and paste Paper 13 Into Selection.
Deselect.
Delete the template layer.
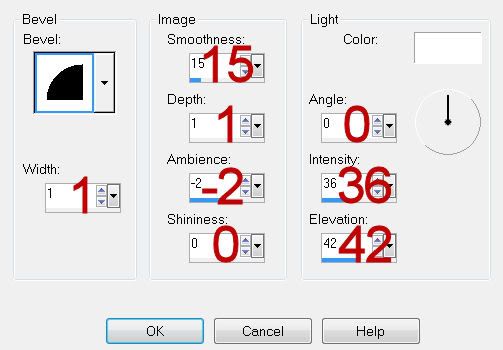
Give it a slight Inner Bevel:

Highlight shape 2 layer.
Repeat the above step.
Highlight Rectangle layer.
Click on it with your Magic Wand.
Copy and paste Paper 12 as a new layer.
Resize 55%
Move into a position you like.
Selections/Invert
Tap the delete key.
Deselect.
Delete the template layer.
Give it the same inner bevel.
Highlight Rectangle 2 layer.
Click on it with your Magic Wand.
New Raster layer.
Copy and paste paper 12 Into Selection.
Deselect.
Delete the template layer.
Give it the same inner bevel.
Highlight Dotted Rectangle layer.
Select All/Float/Defloat
New Raster layer.
Copy and paste Paper 6 Into Selection.
Duplicate.
Deselect.
Delete the template layer.
Highlight Dotted Rectangle 2 layer.
Repeat the above step.
Highlight Circle Left Noise layer.
Click anywhere outside of it with your Magic Wand.
Selections/Invert
New Raster layer.
Copy and paste Paper 6 Into Selection.
Adjust/Add Remove Noise/Add Noise:
Random and Monochrome checked
Noise: 55%
OK
Deselect.
Delete the template layer.
Highlight Circle Right Noise layer.
Repeat the above step.
Highlight Circle Left layer.
Click anywhere outside of it with your Magic Wand.
Selections/Invert
New Raster layer.
Copy and paste Paper 14 Into Selection.
Deselect.
Delete the template layer.
Highlight Circle Right layer.
Repeat the above step.
Highlight Thin Rectangle Right layer.
Copy and paste Paper 12 as a new layer.
Move into a position you like.
Selections/Invert
Tap the delete key.
Deselect.
Delete the template layer.
Give it a slight Inner Bevel.
Highlight Thin Rectangle Left layer.
Repeat the above step.
Highlight Thin Rectangle layer.
Click on it with your Magic Wand.
New Raster layer.
Copy and paste Paper 6 Into Selection.
Apply Greg’s Factory Output Vol. II - Pool Shadow
Use Default settings.
Deselect.
Delete the template layer.
Highlight Thin Rectangle layer.
Click anywhere outside of it with your Magic Wand.
Copy and paste Paper 11 as a new layer.
Move into a position you like.
Selections/Invert
Tap the delete key.
Deselect.
We’re going to add the elements to the Left Circle. Don’t worry about what overhangs. We’ll clean it up in a bit.
Tree 1: Resize 60%
Tree 1 again: Resize 40%/Mirror
Deer 1: Resize 25% and 70%
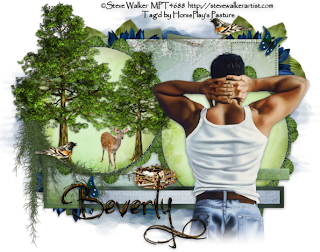
Move the elements into position - see my tag for reference.
Highlight the Circle paper layer.
Click anywhere outside of it with your Magic Wand.
Selections/Invert
Use your Erase tool and erase the parts of the elements you don’t want sticking outside of the circle paper.
Deselect.
Copy and paste your tube as a new layer.
Add your embellishments. I used:
Spanish Moss 1: Resize 45%
Frame 3: Resize 50%/Duplicate
Flower 1: Resize 40%
Leaves 1: Resize 40%/Duplciate/Mirror
Bird 1: Resize 25%/Duplicate/Mirror
Bird Nest 1: Resize 25% and 70%
Butterfly 2: Resize 25% and 60%/Duplicate/Mirror
Highlight your white canvas.
New Raster layer.
Select All.
Copy and paste Paper 12 Into Selection.
Deselect.
Apply the mask.
Merge Group.
Add your copyrights.
Add your name.
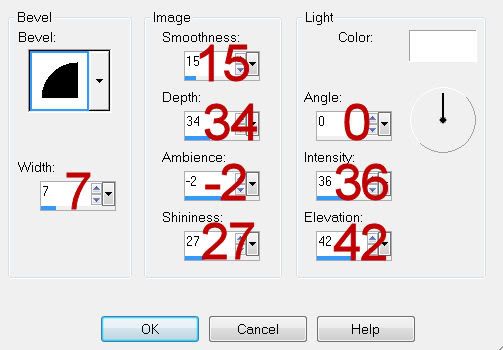
Give it the same Inner Bevel:

Resize all layers 80%.
I hope you enjoyed this tutorial.
I’d love to see your results and show it off in my gallery.
Email me!
Hugs,
Bev

No comments:
Post a Comment