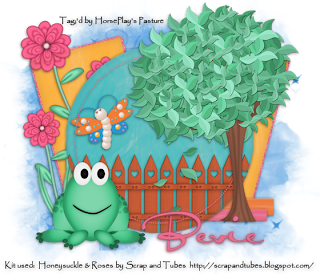
Supplies
Font of choice - I used Al Sandra here
Gem mask 204 here
Scrap Rebellion Template 43 here
“Honeysuckle & Roses ” is a scrap kit collaboration in both tagger and full size available at TKO Scraps. This entire collaboration has 468 elements, 3 Alpha’s, and 160 Papers. Tagger size is $3. Full size is $10 or free with an $8 purchase. This is one sweet deal the store is having and I would highly recommend taking advantage of it. Each designer’s portion is gorgeous! For this tutorial I’m using the portion of ZaZa of Scrap and Tubes. You can visit her blog here. Thank you ZaZa for your fun portion of this collab!
This tutorial was written assuming you have a working knowledge of PSP.
~♥~ Let’s get started ~♥~
Open up the template.
Shift + D.
Close out the original.
Resize all layers 85%
Image/Canvas Size
700 x 600
OK
Open up the background layer and flood fill white.
Delete the top 3 layers.
Highlight Glitter Back 1 layer.
Click anywhere outside of it with your Magic Wand.
New Raster layer.
Copy and paste Paper 1 Into Selection.
Adjust/Add Remove Noise/Add Noise:
Uniform & Monochrome checked
Noise: 45%
OK
Deselect.
Delete the template layer.
Repeat the above step with Glitter Back 2 layer.
Highlight Rectangle 1 layer.
Click on it with your Magic Wand.
New Raster layer.
Copy and paste Paper 4 Into Selection.
Deselect.
Delete the template layer.
Repeat the above step with Pink Rectangle 2 layer.
Highlight Thick Bk Rectangle layer.
Click on it with your Magic Wand.
New Raster layer.
Copy and paste Paper 2 Into Selection.
Deselect.
Delete the template layer.
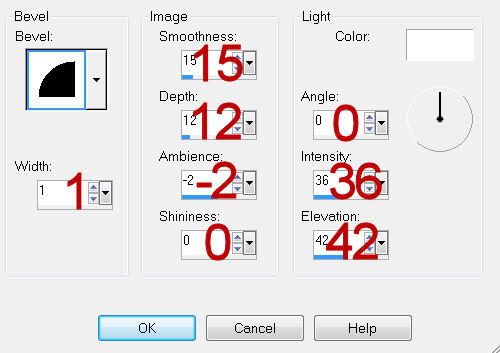
Give it a slight Inner Bevel:

Highlight Thin Pk Rectangle layer.
Click on it with your Magic Wand.
New Raster layer.
Copy and paste Paper 1 Into Selection.
Deselect.
Delete the template layer.
Give it the same slight Inner Bevel.
Highlight Black Circle layer.
Click on it with your Magic Wand.
New Raster layer.
Copy and paste Paper 6 Into Selection.
Deselect.
Give it the same slight Inner Bevel.
Close out the template layer for now.
Now we’re going to give the fence some color - I love changing colors of things with any feature in PSP!!
Open up Fence.
Shift + D.
Close out the original.
In your layers pallet change the foreground to #7b4d3b.
Make your Target Tool active and change the fence color using the foreground color.
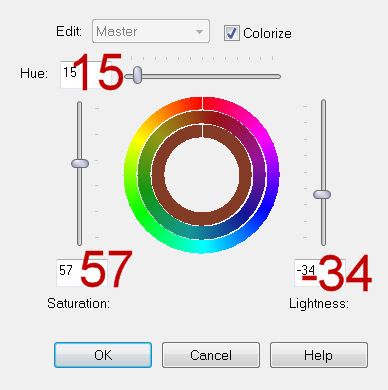
Adjust/Hue and Saturation/Hue Saturation Lightness:
Match your settings to mine:

Ta da! Now you should have a brown fence!
Copy
Make your working canvas active.
Paste above the circle paper layer.
Resize 70%
Move into position.
Highlight Black circle template layer.
Click anywhere outside of it with your Magic Wand.
Highlight the fence.
Tap the delete key.
Deselect.
Delete the circle template layer.
Highlight Dotted circle layer.
Select All/Float/Defloat
New Raster layer.
Copy and paste Paper 1 Into Selection.
Deselect.
Delete the template layer.
Add your embellishments. I used:
Flowers 1
Butterfly 2: Resize 25%
Tree
Frog: Resize 40%
Highlight your white canvas.
New Raster layer.
Select All.
Copy and paste Paper 5 Into Selection.
Deselect.
Apply the mask.
Merge Group.
Add your copyrights.
Add your name:
Type your name
Duplicate
Highlight the original name layer.
Adjust/Blur/Gaussian blur:
Radius: 5
OK
Give the duplicate name layer a drop shadow.
Resize all layers 80%
I hope you enjoyed this tutorial.
I’d love to see your results and show it off in my gallery.
Email me!
Hugs,
Bev

No comments:
Post a Comment