

Clicking on the tag will allow you to enlarge to bigger view.
Supplies
Font of Choice - I used Fabulous 50’s here
Becky Mask 22 here
My Template 57 here
“Bear-Able” is a FTU scrap kit created by
Farrah’s Designer Scraps and can be downloaded from her blog here.
Please leave a thank you when downloading as it’s a small gesture for hard work given freely.
~♥~ Let’s get started ~♥~
Open up the template.
Shift + D.
Close out the original.
Delete the credit layer.
Image/Canvas Size
700 X 700
OK
Flood fill the background layer white.
Highlight Diamond Back 1 layer.
Click on it with your Magic Wand.
New Raster layer.
Copy and paste Paper 2 Into Selection.
Deselect.
Delete the template layer.
Highlight Diamond Back 2 layer.
Repeat the above step.
Highlight Diamond 1 layer.
Click on it with your Magic Wand.
New Raster layer.
Copy and paste Paper 1 Into Selection.
Copy and paste Bear 1 as a new layer - center it over the diamond.
Selections/Invert
Tap the delete key.
Deselect.
Delete the template layer.
Highlight Diamond 2 layer.
Repeat the above step accept copy and paste Bear 2.
Highlight Diamond Frame 1 layer.
Click on it with your Magic Wand.
New Raster layer.
Copy and paste Paper 5 Into Selection.
Deselect.
Delete the template layer.
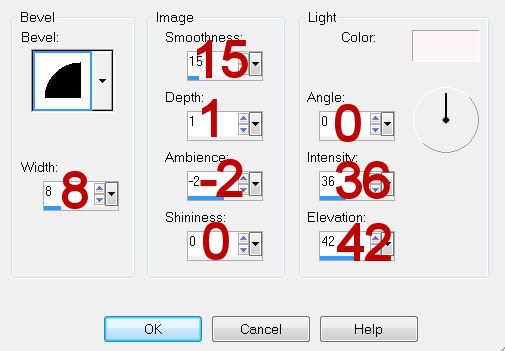
Give it a slight inner bevel:
INSERT PIC HERE
Highlight Diamond Frame 2 layer.
Repeat the above step.
Highlight Circle layer.
Click on it with your Magic Wand.
New Raster layer.
Copy and paste Frame 2 Into Selection.
Deselect.
Delete the template layer.
Click inside the frame with your Magic Wand.
Selections/Modify/Expand by 6.
New Raster layer below the frame.
Copy and paste Paper 1 Into Selection.
Deselect.
Copy and paste Bear 1 as a new layer below the frame.
Copy and paste Bear 2 as a new layer below the frame.
Highlight the Rectangle layer.
Click on it with your Magic Wand.
New Raster layer.
Copy and paste Paper 6 Into Selection.
Deselect.
Delete the template layer.
Highlight Bottom Line template layer.
Merge Down so that both lines are now on one layer.
Click on the top line.
Open up Paper 3/Free rotate left 90 degrees/Copy
Make your working canvas active.
Paste as a new layer.
Choose which stripe you want to have in the template layer - move into position.
Selections/Invert
Tap the delete key.
Deselect.
Highlight the template layer again.
Click on the bottom line.
Paste the paper again.
Choose the same colored stripe and position it over the template line.
Selections/Invert
Tap the delete key.
Deselect.
Delete the template layer.
Add your embellishments. I used:
Flower 1: Resize 50%
Bow 2: Resize 80%
Sequins
Bird
Balloon: Resize 50%
Tree: Resize 80%
Highlight your white background.
Select All
New Raster layer.
Copy and paste Paper 2 Into Selection.
Deselect.
Copy and paste Sun as a new layer - move into the top right corner.
Merge Down.
Apply the mask.
Merge Group.
Add your credits.
Add your name.
Give it a slight inner bevel:
Resize all layers 80%.
I hope you enjoyed this tutorial.
I’d love to see your results and show it off in my gallery.
Email me!
Hugs,
Bev
Supplies
Font of Choice - I used Fabulous 50’s here
Becky Mask 22 here
My Template 57 here
“Bear-Able” is a FTU scrap kit created by
Farrah’s Designer Scraps and can be downloaded from her blog here.
Please leave a thank you when downloading as it’s a small gesture for hard work given freely.
~♥~ Let’s get started ~♥~
Open up the template.
Shift + D.
Close out the original.
Delete the credit layer.
Image/Canvas Size
700 X 700
OK
Flood fill the background layer white.
Highlight Diamond Back 1 layer.
Click on it with your Magic Wand.
New Raster layer.
Copy and paste Paper 2 Into Selection.
Deselect.
Delete the template layer.
Highlight Diamond Back 2 layer.
Repeat the above step.
Highlight Diamond 1 layer.
Click on it with your Magic Wand.
New Raster layer.
Copy and paste Paper 1 Into Selection.
Copy and paste Bear 1 as a new layer - center it over the diamond.
Selections/Invert
Tap the delete key.
Deselect.
Delete the template layer.
Highlight Diamond 2 layer.
Repeat the above step accept copy and paste Bear 2.
Highlight Diamond Frame 1 layer.
Click on it with your Magic Wand.
New Raster layer.
Copy and paste Paper 5 Into Selection.
Deselect.
Delete the template layer.
Give it a slight inner bevel:
INSERT PIC HERE
Highlight Diamond Frame 2 layer.
Repeat the above step.
Highlight Circle layer.
Click on it with your Magic Wand.
New Raster layer.
Copy and paste Frame 2 Into Selection.
Deselect.
Delete the template layer.
Click inside the frame with your Magic Wand.
Selections/Modify/Expand by 6.
New Raster layer below the frame.
Copy and paste Paper 1 Into Selection.
Deselect.
Copy and paste Bear 1 as a new layer below the frame.
Copy and paste Bear 2 as a new layer below the frame.
Highlight the Rectangle layer.
Click on it with your Magic Wand.
New Raster layer.
Copy and paste Paper 6 Into Selection.
Deselect.
Delete the template layer.
Highlight Bottom Line template layer.
Merge Down so that both lines are now on one layer.
Click on the top line.
Open up Paper 3/Free rotate left 90 degrees/Copy
Make your working canvas active.
Paste as a new layer.
Choose which stripe you want to have in the template layer - move into position.
Selections/Invert
Tap the delete key.
Deselect.
Highlight the template layer again.
Click on the bottom line.
Paste the paper again.
Choose the same colored stripe and position it over the template line.
Selections/Invert
Tap the delete key.
Deselect.
Delete the template layer.
Add your embellishments. I used:
Flower 1: Resize 50%
Bow 2: Resize 80%
Sequins
Bird
Balloon: Resize 50%
Tree: Resize 80%
Highlight your white background.
Select All
New Raster layer.
Copy and paste Paper 2 Into Selection.
Deselect.
Copy and paste Sun as a new layer - move into the top right corner.
Merge Down.
Apply the mask.
Merge Group.
Add your credits.
Add your name.
Give it a slight inner bevel:
Resize all layers 80%.
I hope you enjoyed this tutorial.
I’d love to see your results and show it off in my gallery.
Email me!
Hugs,
Bev
No comments:
Post a Comment