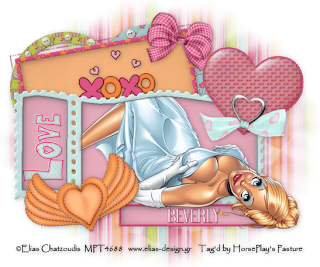
Clicking on the image will allow you to enlarge for a bigger view.
Supplies
1 tube of your choice - I used the wonderful artwork of Elias Chatzoudis at MPT
Font of Choice - I used Dream Orphan here
Weescotlass Mask 138 here
Template 2 by Poppy made exclusive for Misfit Creations here - scroll to near the bottom
Eye Candy 5: Impact - Bevel
“XOXO” is a PTU scrap kit created by Brooke of Butterfly Blush Designs and can be purchased from her store Butterfly Blush Designs. You can visit her store blog here.
Thank you Brooke for such an adorable kit!
~♥~ Let’s get started ~♥~
Open up the template.
Shift + D.
Close out the Original.
Delete Raster 8, Copy of Raster 5, and Raster 7.
Highlight Raster 6.
Click on it with your Magic Wand.
New Raster layer.
Copy and paste a paper of choice Into Selection.
Selections/Modify/Contract by 3.
Tap the delete key.
Selections/Modify/Expand by 2.
New Raster layer below the new frame you just created.
Copy and paste a paper of choice Into Selection.
Deselect.
Deselect the template layer.
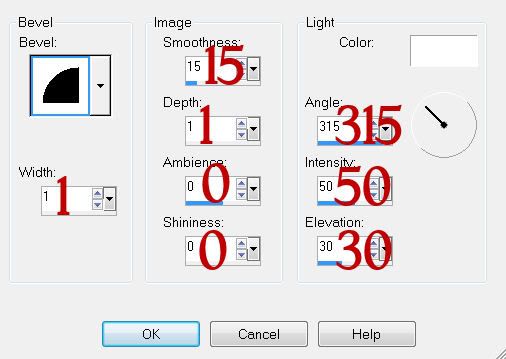
Give the frame a slight Inner Bevel:
Highlight Raster 4 layer.
Select All/Float/Defloat
New Raster layer.
Copy and paste a paper of choice Into Selection.
Deselect.
Delete the template layer.
Highlight Raster 3 layer.
Click on it with your Magic Wand.
New Raster layer.
Copy and paste a paper of choice Into Selection.
Selections/Modify/Contract by 10.
Tap the delete key.
Selections/Modify/Expand by 6.
New Raster layer below the new frame you just created.
Copy and paste a paper of choice Into Selection.
Deselect.
Delete the template layer.
Give the new frame the same slight inner bevel.
Close out Raster 5 for now.
Highlight Raster 1.
Click on it with your Magic Wand.
New Raster layer.
Copy and paste a paper of choice Into Selection.
Deselect.
Close this paper layer out for now.
Highlight Raster 5.
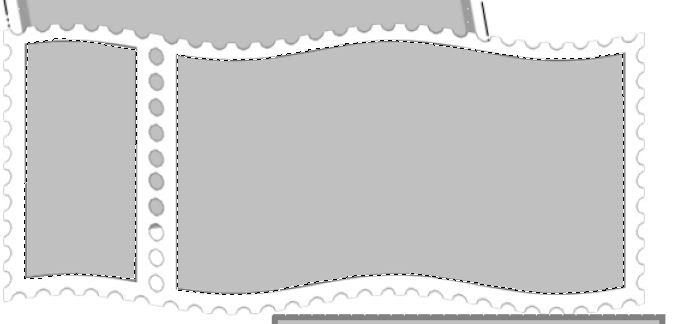
Use your Freehand Selection Tool and outline the inside area of the template:
Highlight the paper layer and open it up.
Tap the delete key.
Selections/Expand by 2.
New Raster layer above this new frame you just created.
Flood fill with a gray color.
Selections/Modify/Contract by 2.
Tap the delete key.
Selection/Modify/Expand by 6.
New Raster layer below the frame.
Copy and paste a paper of choice Into Selection.
Copy and paste your tube above the paper.
Selection/Invert
Tap the delete key.
Deselect.
Give the frame and the thin gray outline the same inner bevel.
Reopen Raster 5 layer.
Click on it with your Magic Wand.
New Raster layer.
Copy and paste a paper of choice Into Selection.
Selections/Modify/Contract by 3.
Tap the delete key.
Selections/Modify/Expand by 2.
New Raster layer below the new frame you just created.
Copy and paste a paper of choice Into Selection.
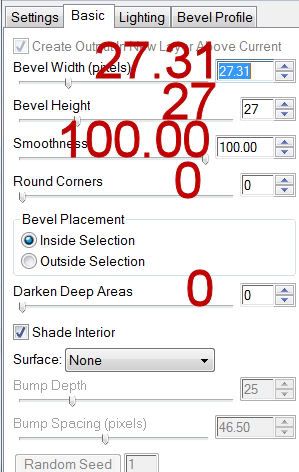
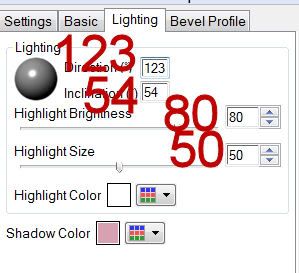
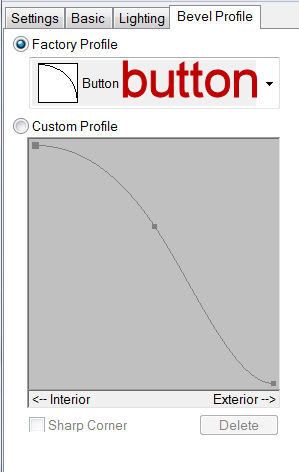
Apply Eyecandy 5: Impact - Bevel:
Basic Tab:
Lighting Tab:
Bevel Profile Tab:
Deselect.
Highlight the Heart frame you created and give it the same slight inner bevel.
Add your embellishments. I used:
Frame 2: Resize 40%
Frame 3: Resize 40%
Bow 1: Resize 50%/Free rotate right 20 degrees
XOXO Word Art: Resize 40%
Heart 4: Resize 40%/Free rotate left 20 degrees
Ribbon Heart 5
Love Word Art: Resize 50%/Free rotate left 90 degrees
Highlight your white background.
Select All
New Raster layer.
Copy and paste a paper of choice Into Selection.
Deselect.
Apply the mask.
Resize 130%
Merge Group.
Add your credits.
Add your name.
Give it the same slight inner bevel.
Resize all layers 80%.
I hope you enjoyed this tutorial.
I’d love to see your results and show it off in my gallery.
Email me!
Hugs,
Bev

No comments:
Post a Comment