

Clicking on the image will allow you to enlarge for bigger view.
Supplies
Font of Choice - I used Horror Hotel here
Divine Intentionz Template 281 here
Artmama’s Mask 6 here - thank you so much AM!
Eyecandy 4000 - Gradient Glow
Greg’s Factory Output Vol. II - Pool Shadow
“Everything Eerie” is a PTU tagger size scrap kit created by Jen of Sleek n Sassy Designs and can be purchased from her store Scrappin Dollars. You can visit her blog here.
Thank you Jen for such a totally WOW Halloween kit! Loved it!!
This tutorial was written assuming you have a working knowledge of PSP.
~♥~ Let’s get started ~♥~
Open up the template.
Shift + D.
Close out the original.
Delete the top 4 layers.
Image/Canvas Size 700 x 600
Highlight the bottom layer and flood fill white.
Highlight the Oval layer.
Click on it with your Magic Wand.
New Raster layer.
Copy and paste Paper 13 Into Selection.
Deselect.
Delete the template layer.
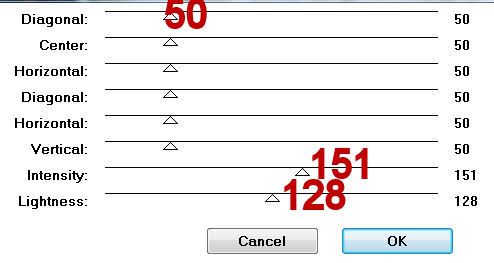
Apply Greg's Factory Output Vol. II - Pool Shadow:
Highlight Circle layer.
Click on it with your Magic Wand.
New Raster layer.
Copy and paste Paper 14 Into Selection.
Deselect.
Delete the template layer.
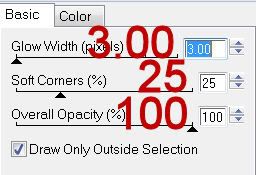
Apply Eyecandy 4000 - Gradient Glow:
Color Tab:
White
OK
Copy and paste Wicked Witch as a new layer.
Resize 70%
Apply Greg’s Factory Output Vol. II - Pool Shadow
Move it into exact position and give it an exaggerated drop shadow on it’s own layer.
Tip: Write down the drop shadow you used. You’ll need to use it again in this tutorial.
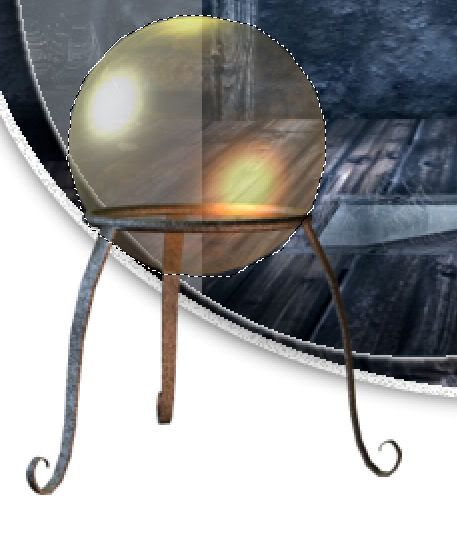
Copy and paste Crystal Ball as a new layer.
Resize 70%
Use your Freehand Selection Tool and outline the ball:
Copy and paste Kneeling Skeleton as a new layer.
Resize 50%
Move into position over the ball - see my tag for reference.
Selections/Invert
Tap the delete key.
Deselect.
Change the Properties to Soft Light.
Using your Freehand Selection Tool and outline the bar that goes across the ball:
Selections/Invert
Be sure your skeleton layer is highlighted and tap the delete key.
Deselect.
Duplicate the skeleton and change the Properties to Multiply.
Merge Visible the Crystal Ball and both skeleton layers.
Give it drop shadow - NOT an exaggerated one.
Copy and paste Crow 2 as a new layer.
Resize 25%
Use your Magic Wand and click anywhere outside of the crow.
Apply the Pool Shadow effect again:
Deselect.
Move the Crow so that it’s perched on top of the ball.
Give it a heavy drop shadow using the color white.
Merge visible the crow and merged crystal ball layer.
Give it the same exaggerated drop shadow you used before on it’s own layer.
Add your embellishments. I used:
Skulls: Resize 70% - give it a drop shadow/give it the exaggerated drop shadow on it’s own layer.
Bat: Resize 25%
Tree: Duplicate/Mirror
Highlight the white background.
New Raster layer.
Select All
Copy and paste Paper 13 Into Selection.
Deselect.
Apply the mask.
Merge Group.
Add your credits. If all you used was the scraps in this kit to create your tag, giving the designer credit on the tag would be greatly appreciated by Jen.
Add your name.
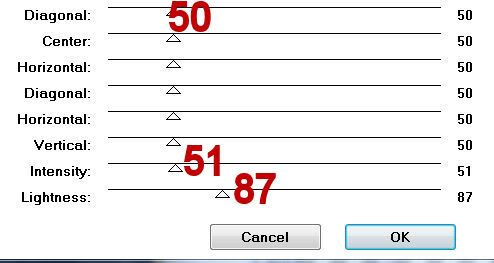
Apply the Pool Shadow effect - play around with the intensity bar to get the effect you like.
Resize all layers 80%.
I hope you enjoyed this tutorial.
I’d love to see your results and show it off in my gallery.
Email me!
Hugs,
Bev
Supplies
Font of Choice - I used Horror Hotel here
Divine Intentionz Template 281 here
Artmama’s Mask 6 here - thank you so much AM!
Eyecandy 4000 - Gradient Glow
Greg’s Factory Output Vol. II - Pool Shadow
“Everything Eerie” is a PTU tagger size scrap kit created by Jen of Sleek n Sassy Designs and can be purchased from her store Scrappin Dollars. You can visit her blog here.
Thank you Jen for such a totally WOW Halloween kit! Loved it!!
This tutorial was written assuming you have a working knowledge of PSP.
~♥~ Let’s get started ~♥~
Open up the template.
Shift + D.
Close out the original.
Delete the top 4 layers.
Image/Canvas Size 700 x 600
Highlight the bottom layer and flood fill white.
Highlight the Oval layer.
Click on it with your Magic Wand.
New Raster layer.
Copy and paste Paper 13 Into Selection.
Deselect.
Delete the template layer.
Apply Greg's Factory Output Vol. II - Pool Shadow:
Highlight Circle layer.
Click on it with your Magic Wand.
New Raster layer.
Copy and paste Paper 14 Into Selection.
Deselect.
Delete the template layer.
Apply Eyecandy 4000 - Gradient Glow:
Color Tab:
White
OK
Copy and paste Wicked Witch as a new layer.
Resize 70%
Apply Greg’s Factory Output Vol. II - Pool Shadow
Move it into exact position and give it an exaggerated drop shadow on it’s own layer.
Tip: Write down the drop shadow you used. You’ll need to use it again in this tutorial.
Copy and paste Crystal Ball as a new layer.
Resize 70%
Use your Freehand Selection Tool and outline the ball:
Copy and paste Kneeling Skeleton as a new layer.
Resize 50%
Move into position over the ball - see my tag for reference.
Selections/Invert
Tap the delete key.
Deselect.
Change the Properties to Soft Light.
Using your Freehand Selection Tool and outline the bar that goes across the ball:
Selections/Invert
Be sure your skeleton layer is highlighted and tap the delete key.
Deselect.
Duplicate the skeleton and change the Properties to Multiply.
Merge Visible the Crystal Ball and both skeleton layers.
Give it drop shadow - NOT an exaggerated one.
Copy and paste Crow 2 as a new layer.
Resize 25%
Use your Magic Wand and click anywhere outside of the crow.
Apply the Pool Shadow effect again:
Deselect.
Move the Crow so that it’s perched on top of the ball.
Give it a heavy drop shadow using the color white.
Merge visible the crow and merged crystal ball layer.
Give it the same exaggerated drop shadow you used before on it’s own layer.
Add your embellishments. I used:
Skulls: Resize 70% - give it a drop shadow/give it the exaggerated drop shadow on it’s own layer.
Bat: Resize 25%
Tree: Duplicate/Mirror
Highlight the white background.
New Raster layer.
Select All
Copy and paste Paper 13 Into Selection.
Deselect.
Apply the mask.
Merge Group.
Add your credits. If all you used was the scraps in this kit to create your tag, giving the designer credit on the tag would be greatly appreciated by Jen.
Add your name.
Apply the Pool Shadow effect - play around with the intensity bar to get the effect you like.
Resize all layers 80%.
I hope you enjoyed this tutorial.
I’d love to see your results and show it off in my gallery.
Email me!
Hugs,
Bev
No comments:
Post a Comment