

Clicking on the image will enlarge to full view.
Supplies
Font of Choice - I’m using Aquarelle here
Gem’s Mask 161 here
“Moonblight Dreams” is a PTU art kit created by KatNKDA. It can be downloaded from her store NK Art Shop. You can visit Kat’s blog here.
Kat, your talent is amazing…you certainly blow me away with each new art kit you create!
This tutorial was written assuming you have a working knowledge of PSP.
~♥~ Let’s get started ~♥~
Open up a transparent 700 X 700 canvas.
Flood Fill white.
Copy and paste Element 31 as a new layer.
Resize 360%
Position at the left side of your canvas.
Make your Selection Tool active - set to Rectangle.
Make a 590 X 250 rectangle.
New Raster layer.
Copy and paste Paper 6 Into Selection.
Selections/Modify/Contract by 8
OK
Tap the delete key.
Selections/Modify/Expand by 3.
New Raster layer below your new frame.
Copy and paste Paper 40 Into Selection.
Deselect.
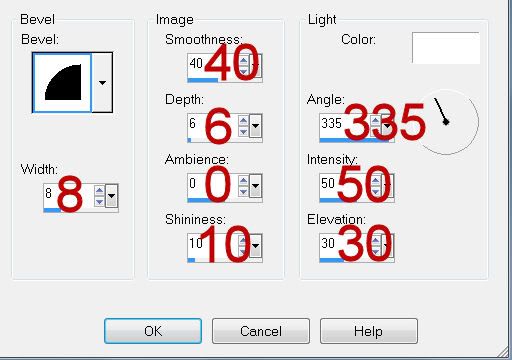
Give the frame an Inner Bevel:
Merge Visible the frame and paper.
Move the circle and merged layer into better position.
Copy and paste Element 34 as a new layer.
Resize 25% and 55%
Free rotate left 10 degrees.
Move into position - see my tag for reference.
Click inside the frame with your Magic Wand.
Selections/Modify/Expand by 3.
New Raster layer below the frame.
Make Paper 40 active/Mirror
Make your canvas active.
Copy and paste Into Selection.
Copy and paste Element 16 as a new layer.
Resize 25% and 60% - center it below the frame.
Selections/Invert
Tap the delete key.
Deselect.
Merge Visible the frame, paper, and swan.
Move all the merged layers into their exact position.
Copy and paste Element 43 as a new layer.
Resize 25% and 70%
Move into position behind the circle.
See my tag for reference.
Using your Pick Tool move the edge in slightly to align it with the merged rectangle layer.
Duplicate Element 43 layer.
Move it lower on your canvas - see my tag for reference.
Using your Pick Tool again, shorten the length of it by bringing the edge in.
Copy and paste Element 44 as a new layer.
Resize 25% and 70%
Using your Pick Tool bring the edge in to make it the same length as the above element.
Add your embellishments. I used:
Element49: Resize 25%
Element 6: Resize 25% and 25%
Element 7: Resize 25% and 25%/Mirror
Element 1: Resize 25%
Element 60: Resize 25% and 25%
Element 25: Resize 25% and 80% Free rotate left 90 degrees
Crop your image.
Highlight your white background.
New Raster layer.
Select All.
Copy and paste a paper of choice Into Selection.
Deselect.
Apply the mask.
Merge Group.
Add your copyrights.
Add your name.
Give it the same inner bevel.
Add some Noise.
Resize all layers 80%.
I hope you enjoyed this tutorial.
I’d love to see your results and show it off in my gallery.
Email me!
Hugs,
Bev
No comments:
Post a Comment