

Clicking on the image will enlarge to full view.
Supplies
1 tube of your choice - I used the beautiful artwork of Barbara Jensen here
Font of Choice - I used Aquarelle here
Gem’s Mask 60 here
“Darker Side of Love” is a PTU scrap kit created by
Monti of Monti’s Scraps can be purchased from I Got Lucky Scraps. You can visit her site here.
Thank you Monti for such a beautiful kit!
This tutorial was written assuming you have a working knowledge of PSP.
~♥~ Let’s get started ~♥~
Open up a 700 X 700 blank canvas.
Flood fill white.
Copy and paste Paper-Hearts 1-Brown as a new layer.
Resize 40%
Duplicate/Mirror
Move into position - see my tag for reference.
Copy and paste Ribbon and Heart Red as a new layer.
Resize 50%
Free rotate left 30 degrees
Move into position over the paper.
Highlight the paper layer and click anywhere outside of it with your Magic Wand.
Selections/Invert
Highlight the ribbon layer.
Use your Eraser tool and erase all that overhangs the paper.
Deselect.
Use your Burn Tool - default settings - and barely burn the ends of the ribbon at the paper’s edge.
Copy and paste Heart Ribbon Red as a new layer.
Resize 60%
Free rotate left 25 degrees
Move into position.
Duplicate/Move it behind the paper.
Highlight the paper layer and click anywhere outside of it with your Magic Wand.
Highlight the Heart Ribbon layer that’s above your paper in your layers pallet.
Selections/Invert
Use your Eraser tool and erase parts of the heart to give it the effect like it’s hung over the paper.
Deselect.
Copy and paste Frame Circle Heart Black as a new layer.
Resize 60%
Click inside of it with your magic Wand.
Selections/Modify/Expand by 6.
New Raster layer below the frame.
Copy and paste a paper of choice Into Selection.
Copy and paste your tube as a new layer.
Selections/Invert
Tap the delete key.
Deselect.
Change the Properties to Hard Light.
Lower the Opacity to about 51 or so.
Copy and paste your tube as a new layer.
Add your embellishments. I used:
Love Rose: Resize 40%
Love Rose again: Resize 35%/Flip
Love Heart Red Brown: Resize 60%
Highlight your white background.
Select All
New Raster layer.
Copy and paste a paper of choice Into Selection.
Deselect.
Apply the mask.
Merge Group.
Crop your Image.
Add your credits.
Add your name.
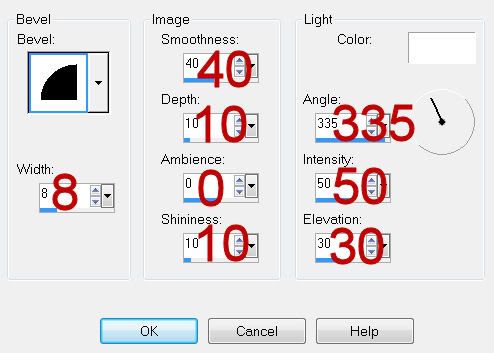
Give it a slight inner bevel:
I hope you enjoyed this tutorial.
I’d love to see your results and show it off in my gallery.
Email me!
Hugs,
Bev
No comments:
Post a Comment