

Clicking on the image will enlarge to full view.
Supplies
2 tubes of choice - I used the fabulous artwork of PinUpToons at CILM
Font of choice - I used Fabulous 50’s. I’m sorry I can no longer find a link for this font.
Weescotlass Mask 81 here
Babes Designz Template # 28 here
“A Cold Winter Night” is a PTU full size scrap kit created by Brenda of Cuddlebeez Scrapsand can be purchased at Butterfly Blush Designs.You can visit her blog here.
Thank you Brenda for an amazing kit!
This tutorial was written assuming you have a working knowledge of PSP.
~♥~ Let’s get started ~♥~
Open up the template.
Delete the credit layer, 3 layer, and the lines layer.
Image/Canvas Size
700 X 650
OK
Delete the credit layer, 3 layer, and the lines layer.
Image/Canvas Size
700 X 650
OK
Highlight 1 Layer.
Select All/Float/Defloat
New Raster Layer.
Copy and paste a paper of choice Into Selection.
Deselect.
Delete the template layer.
Select All/Float/Defloat
New Raster Layer.
Copy and paste a paper of choice Into Selection.
Deselect.
Delete the template layer.
Highlight 2 layer.
Select All/Float/Defloat
New Raster Layer.
Copy and paste a paper of choice Into Selection
Deselect.
Delete the template layer.
Select All/Float/Defloat
New Raster Layer.
Copy and paste a paper of choice Into Selection
Deselect.
Delete the template layer.
Highlight Inner Frame Layer.
Select All/Float/Defloat
Copy and paste a paper of choice Into Selection.
Copy and paste your tube as a new layer - centered over the Inner Frame paper.
Selection/Invert
Tap the delete key.
Deselect.
Copy and paste Stars as a new layer.
Resize 25% and 40%.
Mirror
Move into position behind your tube.
Erase any that might hang outside of the frame.
Delete the Inner Frame template layer.
Highlight Frame layer.
Select All/Float/Defloat
New Raster layer.
Copy and paste a paper of choice Into Selection.
Deselect.
Delete the template layer.
Select All/Float/Defloat
New Raster layer.
Copy and paste a paper of choice Into Selection.
Deselect.
Delete the template layer.
Highlight 4 layer.
Select All/Float/Defloat
New Raster layer.
Copy and paste a paper of choice Into Selection.
Copy and paste your tube as a new layer. Centering it over the 4 Layer paper.
Selections/Modify/Feather
Number of Pixels:
53
OK
Selections/Invert
Tap your delete key until you have the feathered look you want.
Copy and paste Stars as a new layer behind your tube.
Resize 25% and 60%
Free rotate right 20 degrees.
Again, tap the delete key until you have a feathered look to the stars that you like.
Deselect.
Delete the template layer.
Add your embellishments. I used:
Eyelet Bow 2: Resize 25% and 75%. Duplicate/Mirror/Flip
Ric Rac 3: Resize 25% and 55%. Duplicate/Fip
Hanging Star: Resize 25% and 65%
Button 2: Resize 25% and 60%
Button 1: Resize 25% and 50%
Flower 1: Resize 25% and 40%. Duplicate/Resize 80%
Eyelet Bow 2: Resize 25% and 75%. Duplicate/Mirror/Flip
Ric Rac 3: Resize 25% and 55%. Duplicate/Fip
Hanging Star: Resize 25% and 65%
Button 2: Resize 25% and 60%
Button 1: Resize 25% and 50%
Flower 1: Resize 25% and 40%. Duplicate/Resize 80%
Crop you image.
Highlight your white background.
New Raster layer.
Select All.
Copy and paste a paper of choice Into Selection.
Deselect.
Apply the mask.
Resize 110%
Merge Group.
Add your copyrights.
Add your name.
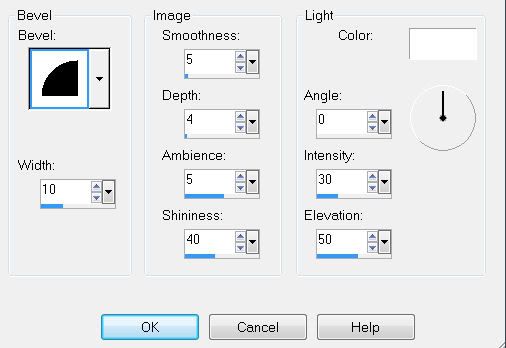
Give it a slight inner bevel:
Resize all layers 85%.
I hope you enjoyed this tutorial.
I’d love to see your results.
Email me!
Hugs,
Bev
No comments:
Post a Comment