
Supplies
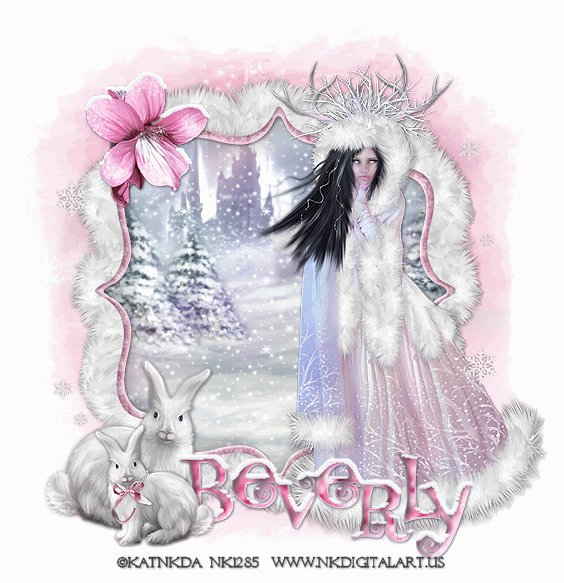
1 tube of choice - I used the amazing artwork of KatNKDA here
Font of choice - I used TS Curly here
Insatiable Dreams Mask 164 here
Snow which I’ve supplied on Box or 4Shared
Alien Skin Eyecandy 5: Nature - Snow Drift
Animation Shop
“Bunny Love” is a PTU full size scrap kit created by Kat of KatNKDA and can be purchased a her store NK Art Shop. You can visit her blog here.
Your talent is truly amazing, Kat!
Thank you once again for yet another beautiful kit.
This tutorial was written assuming you have a working knowledge of PSP.
~♥~ Let’s get started ~♥~
Open up a 700 x 700 transparent image.
Flood fill white.
Copy and paste Element 1 as a new layer.
Resize 25% and 85%
Use your Magic Wand and click inside of it.
Selections/Modify/Expand by 6.
You can either copy and paste a paper of choice as a new layer
Or
I used the image that came with the tube.
Deselect.
Copy and paste your tube as a new layer.
The tube I used I resized 25% and 70%
Copy and paste Element 48 as a new layer.
Resize 25% and 50%
Mirror.
Move into position.
Keeping that layer highlighted, apply the Eyecandy Nature - Snow Drift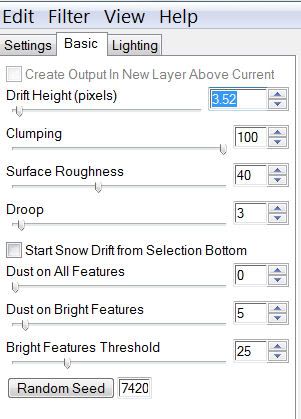
Copy and paste Element 50 as a new layer.
Resize 25% and 70%
Copy and paste Element 51 as a new layer.
Resize 25% and 50%
Mirror
Copy and paste Element 14 as a new layer.
Resize as small as you like.
Duplicate as many times as you like.
Highlight your white background.
New Raster layer.
Select All.
Copy and paste a paper of choice Into Selection.
Deselect.
Apply the mask.
Merge Group.
Add your copyrights.
Add your name.
Give it an inner bevel: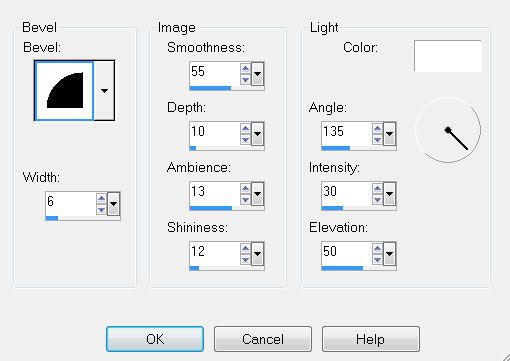
Apply Eyecandy: Nature - Snow Drift.
Same Settings
Now we’re going to apply the snowflakes so that the tag can be animated.
Highlight the frame layer.
Use your Magic Wand and click inside of it.
Selections/Modify/Expand by 6.
Open up the snow that I’ve supplied.
Highlight Frame 1
Copy
Make your working canvas active and paste the snow layer just below the frame.
(The snow will overhang. It’s OK. We’ll take care of that later.)
Rename Snow 1.
Make the snow layers active again.
Highlight Frame 2
CopyHighlight your working canvas.
Paste as a new layer just above Snow 1
Rename this new layer Snow 2.
Repeat the above steps with the remaining snow layers.
Take your time and concentrate so you don’t lost track of which layers you’re copying and pasting….I’m advising from experience:S...lol
Once you’ve copied and pasted all the snow layers onto your working image…
Selections/Invert
Highlight each layer and tap the delete key.
Deselect.
Resize all layers 85%.
Now it’s time to animate.
***********
Close out all snow layers accept for Snow 1.
Copy Merge.
Carry into Animation Shop.
Edit/Paste/As New Animation.
Back into PSP.
Close out Snow 1 and open up Snow 2.
Copy Merge.
Carry into AS.
Edit/Paste/After Current Frame.
Back into PSP.
Close out Snow 2 and open up Snow 3.
Copy Merge.
Carry into AS.
Edit/Paste/After Current Frame.
Back into PSP.
Close out Snow 3 and open up Snow 4.
Copy Merge.
Carry into AS.
Edit/Paste/After Current Frame.
Back into PSP.
Close out Snow 4 and open up Snow 5.
Copy Merge.
Carry into AS.
Edit/Paste/After Current Frame.
Back into PSP.
Close out Snow 5 and open up Snow 6.
Copy Merge.
Carry into AS.
Edit/Paste/After Current Frame.
Back into PSP.
Close out Snow 6 and open up Snow 7.
Copy Merge.
Carry into AS.
Edit/Paste/After Current Frame.
Back into PSP.
Close out Snow 7 and open up Snow 8.
Copy Merge.
Carry into AS.
Edit/Paste/After Current Frame.
Back into PSP.
Close out Snow 8 and open up Snow 9.
Copy Merge.
Carry into AS.
Edit/Paste/After Current Frame.
Back into PSP.
Close out Snow 9 and open up Snow 10.
Copy Merge.
Carry into AS.
Edit/Paste/After Current Frame.
View your animation.
Admire the snow!
If you’re happy then save.
I hope you enjoyed this tutorial.
I’d love to see your results.
Email me!
Hugs,
Bev
Thank you so much for this tutorial! I absolutely adore it and I could gaze at it all day! I bought the two kits to make it and I am totally please with the quality of the kits I bought! They are awesome and I am so going to get more from them!
ReplyDeleteYou are a genius to make this tutorial, and it's excellent!
I guess you might be able to tell that I like it?
Keep up the great work and I can't wait to get started on another of your tutorials!
Suzie,
ReplyDeleteYou're welcome and wow, your comment really means a lot to me.♥ I'm sure Kat appreciates very much your compliment on her hard work that she puts into her kits. Hope you stop by often and please, don't be a stranger!!