Supplies
Font of Choice
Scrapity Scrap and More Template 5 here
Weescotlass Mask 209 here
Xero: Porcelain
“Grandma‘s House” is a PTU tagger size scrap kit created by Kristi W Designs and can be purchased at Scrappindivaz Designz.
Thank you Kristi for an adorable kit!
It’s sure to bring Grandma to mind♥
This tutorial was written assuming you have a working knowledge of PSP.
~♥~ Let’s get started ~♥~
Open up the template.
Shift + D.
Close out the original.
Image/Canvas Size
700 X 700
Delete the credit layer.
Highlight Raster one and flood fill white.
Each template shape has a separate frame layer.
To make this easy to follow I’ll give directions on what to do with each of the frames (instead of telling you how to do it individually, layer by layer). And I’ll also give directions on what to do with each of the template shapes. Again, instead of telling you to highlight each layer, etc.
For all Frame layers:
Select All/Float/Defloat
New Raster layer.
Copy and paste a paper of choice Into Selection.
Deselect.
Delete template layer.
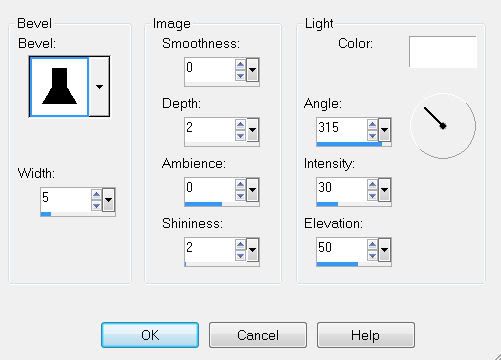
Give it a slight inner bevel:

For all shape layers.
Select All/Float/Defloat
Copy and paste a paper of choice as a new layer.
Selections/Invert
Tap the delete key.
Deselect.
Delete template layer.
Select All/Float/Defloat
Copy and paste a paper of choice as a new layer.
Selections/Invert
Tap the delete key.
Deselect.
Delete template layer.
Highlight the top oval.
Select All/Float/Defloat
Copy and paste each of these elements below the frame of the oval:
Rocking Grandma: Resize 35%
Tree 2: Resize 60%
Tree 2 again: Resize 40%
Tree: Resize 60%
Selections/Invert
Now highlight each element layer and tap the delete key.
Merge visible the elements and oval background.
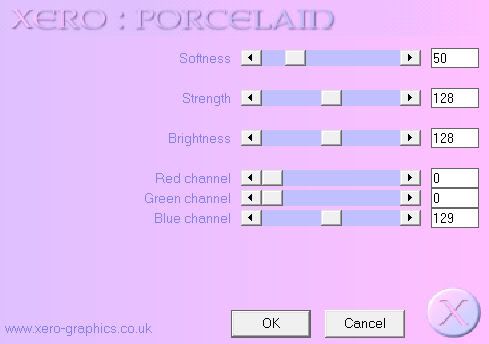
Apply Xero-Porcelain:

Highlight the bottom oval layer.
Select All/Float/Defloat
Copy and paste each of these elements below the frame of the oval:
House: Resize 30%
Tree 2: 50%
Fence: Resize 40%
Select All/Float/Defloat
Copy and paste each of these elements below the frame of the oval:
House: Resize 30%
Tree 2: 50%
Fence: Resize 40%
Selections/Invert
Now highlight each element layer and tap the delete key.
Merge visible the elements and oval background.
Apply Xero-Porcelain - same settings as before.
Add your embellishments. I used:
Flower 2: Resize 25%
Flower 1: Resize 25%
Flower Ribbon 1: Resize 40%
String 3: Erase the staples on the ends.
Resize 40% Free rotate left 20%
Duplciate/Free rotate right 20 degrees
Wooden Spoon: Resize 45% Free rotate right 25%
Rolling Pin: Resize 40% Free rotate right 75%
Crop your image.
Highlight your white background.
New Raster layer.
Copy and paste a paper of choice Into Selection.
Deselect.
Apply the mask.
Merge Group.
Use your Pick Tool and pull it out a bit on all sides.
Add your copyrights.
If you didn’t use a tube then please be sure to credit the designer.
All their hard work goes into their kits and they’d really appreciate it.
Add your name.
Resize all layers 80%.
I hope you enjoyed this tutorial.
I’d love to see your results and show it off in my Show Arena.
Email me!
Hugs,
Bev


No comments:
Post a Comment