
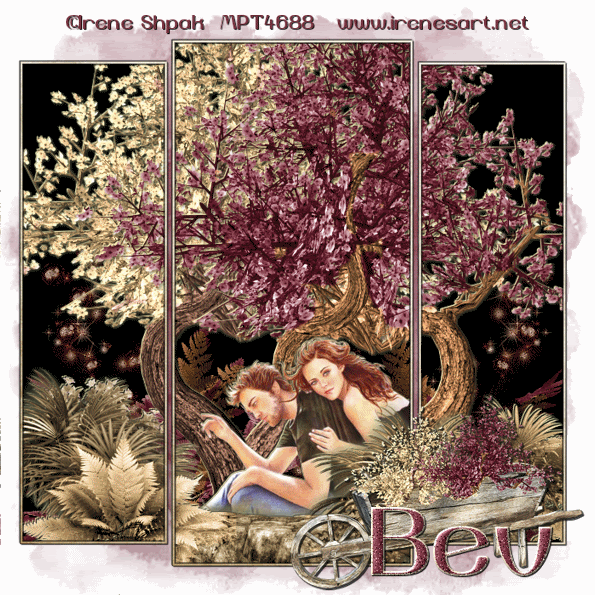
 Clicking on the above image will enlarge to full view.
The image below shows the animation.
Supplies
1 tube of choice - I’m using the artwork of Irene Shpak which you can purchase here
Font of Choice - Yiggivoo Unicode here
Beck Mask 22 here
Animation Shop
“A Walk in the Woods” is PTU tagger size scrap kit created by Deb’s Designs and be purchased at Butterfly Blush Designs. You can visit her blog here.
Thank you Deb for a most beautiful scrap kit that made my jaw drop!
“A Walk in the Woods” is PTU tagger size scrap kit created by Deb’s Designs and be purchased at Butterfly Blush Designs. You can visit her blog here.
Thank you Deb for a most beautiful scrap kit that made my jaw drop!
This tutorial was written assuming you have a working knowledge of PSP.
~♥~ Let’s get started ~♥~
Open a transparent 700 x 700 canvas.
Flood Fill white.
In your color pallet close off your foreground.
Background: Black
Using your Preset Rectangle make a Rectangle in the center of your canvas. See mine for reference.
Convert to Raster layer.
Create another rectangle beside it.
Convert to Raster Layer.
Duplicate/Mirror.
Move into better position it you have to.
Close out your white canvas.
Merge Visible.
Reopen your white canvas.
Select All/Float/Defloat
New Raster layer over the merged layer.
Copy and Paste a paper of choice Into Selection.
Selections/Modify/Contract by 3.
Selections/Invert
Tap the delete key.
You’ve now created a “Frame”.
Deselect.
Give this layer a Drop Sahdow
Vertical and Horizontal: 1
Opacity: 100
Blur: 1
Color Black.
Repeat the Drop Shadow accept change the Vertical and Horizontal numbers to -1.
Copy and paste your elements below the “Frame”.
Don’t worry about them overhanging….we’ll get to that in a bit.
These are the elements I used:
Love Tree 1 & 2
Rock Fern
Fern 2
Glitter 1: Resize 50%. Duplicate/Mirror
My tube of choice.
Highlight your Black Rectangles Layer.
Select All/Float/Defloat
Selections/Invert.
Now highlight each of your element layers and tap the delete key.
Deselect.
If you plan to animate then Merge Visible your Glitter 1 layers.
Duplicate 2 times for a total of 3.
Rename them Glitter 1, 2, and 3.
Highlight Glitter 1
Adjust/Add Remove Noise/Add Noise
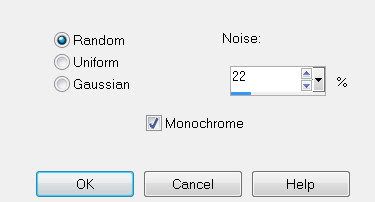
Highlight Glitter 2 and apply Noise accept change the Noise number to 44.
Highlight Glitter 3 and apply Noise accept change the Noise number to 66.
Highlight Glitter 3 and apply Noise accept change the Noise number to 66.
Close out Glitter 2 & 3.
Keep Glitter 1 open.
Highlight the top layer in your layer pallet.
Copy and paste Wagon 2 as a new layer.
Resize 50%.
Highlight your white canvas.
New Raster Layer.
Select All.
Copy and paste a paper of choice Into Selection.
Deselect.
Apply the Mask.
Merge Group.
Add your copyrights.
Add your name.
I gave mine a hint of Glitter by changing the Noise number back to 22.
Resize all layers 85%.
Time to Animate:
Copy Merge and carry into Animation Shop.
Edit/Paste/As New Animation.
Back in PSP.
Close out Glitter 1 and open up Glitter 2.
Copy Merge and carry into Animation Shop.
Edit/Paste/After Current Frame.
Back in PSP.
Close out Glitter 2 and open up Glitter 3.
Copy Merge and carry into Animation Shop.
Edit/Paste/After Current Frame.
View your animation.
If you're happy then save.
I hope you enjoyed this tutorial.
I hope you enjoyed this tutorial.
I’d love to see your results and show it off in my Show Arena.
Email me!
Hugs,
Bev
Thanks Bev for creating such a beautiful tag with my kit hugs Deb
ReplyDelete