
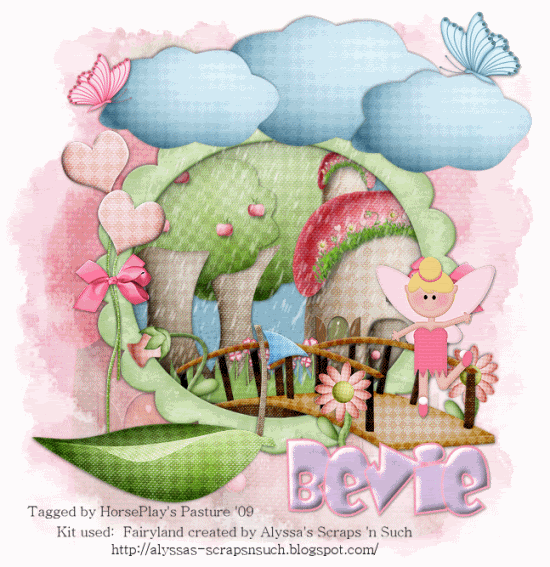
 Clicking on the above image will enlarge to full view.
The image below shows the animation.
Supplies
Font of Choice - Baby Kruffy here
Becky Mask 22 here
VanDerLee Snowflakes
Animation Shop
“Fairland” is a PTU Full size scrap kit created by Alyssa of Alyssa’s Scraps ‘n Such and can be purchased at Paradise4Scrappers.
Thank you Alyssa for such an adorable kit!
This tutorial was written assuming you have a working knowledge of PSP.
~♥~ Let’s get started ~♥~
Open up a 700 X 700 transparent image.
Flood fill white.
We’ll create the layer for the mask first.
New Raster Layer.
Select All.
Copy and paste a paper of choice Into Selection.
Deselect.
Copy and paste House 5 as a new layer.
Resize 80%
Lower the opacity to about 42 or so.
Merge down.
Apply the mask.
Merge Group.
Copy and paste Frame 2 as a new layer.
Resize 50%
Use your Magic Wand and click inside of it.
Selections/Modify/Expand by 4
Copy and paste Paper 4 below the frame.
Selections/Invert
Tap the delete key.
Copy and paste the Bridge as a new layer above the frame.
Position it exactly where you want it.
Duplicate and move that one below the frame.
Tap the delete button.
Highlight the Original bridge layer.
Use your Eraser Tool and erase the portion of the bridge you don’t want sticking outside of the frame.
Arrange the following elements below the frame - tapping the delete button on each element after it’s moved into position:
Tree 2: Resize 40%
Tree 1: Resize 50%
House 5: Resize 40%
Grass 2: Resize 40%
Flower Bunch 1: Resize 25%
Move this next set of elements into position outside of the frame:
Cloud: Resize 40% Duplicate/Resize 80%/Duplciate
Flower 2: Resize 20%
Flower 3: Resize 20%
Fairy Boat: Resize 50%
Fairy 1: Resize 20%
Heart: Resize 50%/Duplciate/Mirror
Bow 3: Resize 30%
Butterfly 4: Resize 20%
Butterfly 3: Resize 20% and 80%
Merge Visible your 3 Cloud layers.
Using your Free Hand Selection Tool, box out an area you want the rain in.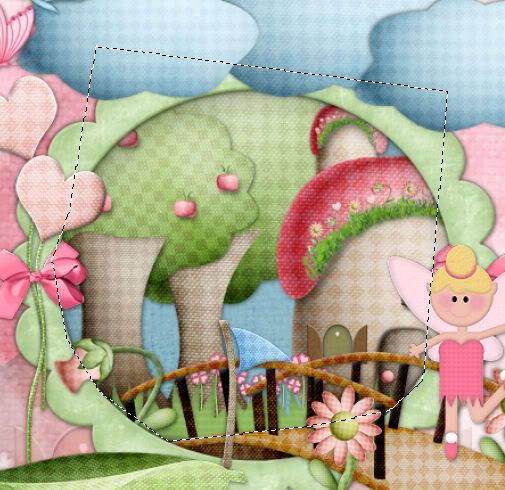
New Raster layer below the Clouds.
Duplicate twice for a total of 3 layers.
Rename them Rain 1, 2. And 3.
Highlight Rain 1.
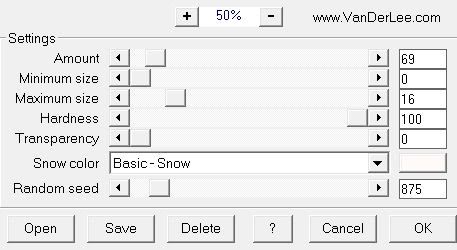
Apply the VanderLee Plug In with these settings:
Adjust/Blur/Gaussian Blur
Radius: 10
Repeat the above 2 steps with Rain 2 & 3 layers accept for each layer move the Random Seed button.
Select None.
Close out Rain 2 3.
Add your copyrights if you used a tag. If you didn’t use a tag and it’s all scrap, please be considerate and place credit to the designer on your tag.
Add your name.
Resize all layers 85%
Time to animate:
Copy Merge and carry into Animation Shop
Edit/Paste/As new Animation
Go back into PSP.
Close out Rain 1.
Open up Rain 2.
Copy Merge and carry into Animation Shop.
Edit/Paste/After current frame.
Go back into PSP.
Close out Rain 2.
Open up Rain 3.
Copy Merge and carry into Animation Shop.
Edit/Paste/After current frame.
View your animation.
If you’re happy then save and show off your awesome work!!
I hope you enjoyed this tutorial.
I’d love to see your results and show it off in my Show Arena.
Email me!
Hugs,
Bev
No comments:
Post a Comment