Supplies
3 tubes of choice - I’m using the artwork of Jennifer Janesko here.
Font of Choice - Pendulim here
Weescotlass Mask 249 here
jbs2designs Template 27 here
Animation Shop
“Subtle Gifts” is a PTU tagger size scrap kit, also available in full size and was created by Lynn of Designs by Moo and can be purchased at The Scrappindivaz Designz here.
Thank you Lynn for such a beautiful kit!
This tutorial was written assuming you have working knowledge of PSP.
~♥~ Let’s get started ~♥~
Open up the template.
Shift + D. Close out the original.
Delete the copyright.
Resize all layers 120%
Highlight Rater 1
Image/Canvas Size
700 X 700
Flood fill white.
Highlight the Shape layer.
Select All/Float/Defloat
Copy and paste a paper of choice as a new layer.
Selections/Invert
Hit the delete button.
Deselect.
Delete the template layer.
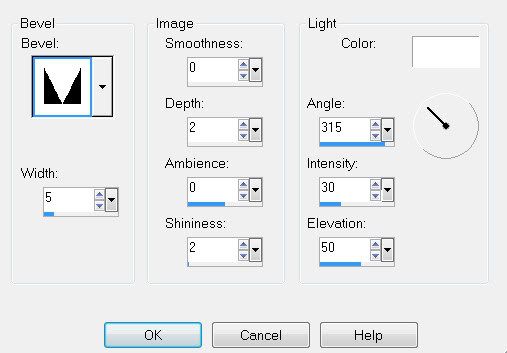
Give it a slight inner bevel:

Highlight Ribbon 1 layer.
Select All/Float/Defloat
New Raster layer.
Create a gradient and flood fill.
DO NOT DESELECT.
Copy and paste Ivy with Flowers as a new layer.
Resize 70%.
Position over the ribbon layer.
Selections/Invert
Tap the delete button.
Deselect.
Merge Down.
Give it the same inner bevel.
Delete the template layer.
Repeat the above steps with Ribbon 2 and Ribbon 3 layers.
Highlight the Top Circle Frame Layer.
Select All/Float/Defloat
Copy and paste a paper of choice as a new layer.
Selections/Invert
Hit the delete button.
Deselect.
Give it the same inner bevel.
Delete the template layer.
Highlight the Top Circle Layer.
Select All/Float/Defloat.
Flood fill with a gradient.
DO NOT DESELECT.
New Raster Layer.
Effects/3D Effects/Cutout
Vertical and Horizontal: 10
Opacity: 25
Blur: 35
Color: Black
OK
New Raster layer.
Apply the same cutout accept change Horizontal & Vertical numbers to -10.
DO NOT DESELECT YET.
Copy and paste your tube as a new layer below the Cutout layers. Selections/Invert
Hit the delete button.
Deselect.
Repeat the above steps with the Bottom Circle Frame Layer and Bottom Circle layer.
Copy and paste your tube as a new layer.
Add your embellishments. I used:
Ivy with Flower: Resize 50%
Butterfly 2: Resize 25% & 80%. Duplicate/Mirror: Resize 70%
Pretty Flower: Resize 25%
Copy and paste the Doodle as a new layer just aboev your white canvas.
Resize 70%
Colorize to match your tag if you like.
Flip and move into position at the bottom left of your tag.
See mine for positioning.
Duplicate/Mirror, Flip.
Merge Down.
Duplicate twice for a total of e of these layers.
Rename Doodle 1, Doodle 2, and Doodle 3.
Highlight Doodle 1
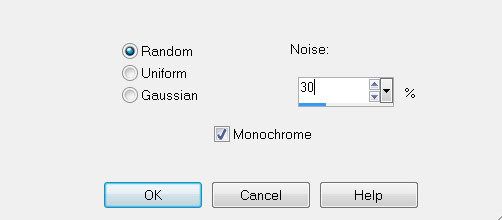
Adjust/Add Remove Noise/Add Noise
Apply the following:

Highlight Doodle 2.
Add the same noise accept change the noise level to 40.
Add the same noise accept change the noise level to 40.
Highlight Doodle 3.
Add the same noise accept change the noise level to 50.
Be sure to close out Doodle 2 and Doodle 3 layers.
Highlight your white canvas.
New Raster Layer.
Select All.
Copy and paste a paper of choice Into Selection.
Deselect.
Apply the mask.
Merge Group.
Add your copyrights.
Add your name.
I gave mine the same inner bevel.
Crop your image.
Resize all layers 85%.
Time to Animate:
Copy Merge and carry into Animation Shop.
Edit/Paste/As New Animation
Go back into PSP.
Close out Doodle 1 layer and open up Doodle 2 layer.
Copy Merge and carry into Animation Shop.
Edit/Paste/After Current Frame.
Go back into PSP.
Close out Doodle 2 layer and open up Doodle 3 layer.
Copy Merge and carry into Animation Shop.
Edit/Paste/After Current Frame.
View your animation. If you’re happy with it then save.
I hope you enjoyed this tutorial.
I’d love to see your results and show it off in my Show Arena.
Email me!
Hugs,
Bev


No comments:
Post a Comment