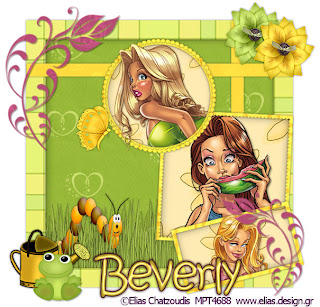
Clicking on the image will enlarge to full view.
Supplies
Supplies
3 tubes of choice - I’m using the artwork of Elias Chatzoudis which you can purchase here
Font of Choice - I’m using Kristen ITC (came on my pc)
Chica’s Template #9 here
“Summertime Fun” a PTU tagger scrap kit by DanI and can be purchased at her store Dazzling Scraps. Visit her blog here.
Font of Choice - I’m using Kristen ITC (came on my pc)
Chica’s Template #9 here
“Summertime Fun” a PTU tagger scrap kit by DanI and can be purchased at her store Dazzling Scraps. Visit her blog here.
This tutorial was written assuming you have working knowledge of PSP.
~♥~ Let’s get started ~♥~
Open up the template. Shift + D. Close out the original. Delete the watermark layer, Word Art 1, and Word Art 2. New Raster Layer. Send to bottom and flood fill white.
Highlight Frame Back 1 layer. Select All. Float/Defloat. Copy and paste a paper of choice as a new layer. Selections/Invert. Hit the delete key. Deselect. Delete the template layer.
Highlight Frame 1 layer. Select All. Float/Defloat. Copy and paste a paper of choice as a new layer. Selections/Invert. Hit the delete key. Deselect. Delete the template layer.
Highlight Ribbon 2 layer. Select All. Float/Defloat. Copy and paste a paper of choice as a new layer. Selections/Invert. Hit the delete key. Deselect. Delete the template layer.
Repeat the above step for Ribbon 1.
Highlight Circle Frame layer. Select All. Float/Defloat. Copy and paste a paper of choice as a new layer. Selections/Invert. Hit the delete key. Deselect. Delete the template layer.
Highlight Circle Back layer. Select All. Float/Defloat. Copy and paste a paper of choice as a new layer. Selections/Invert. Hit the delete key. Deselect. Delete the template layer.
Highlight Circle Frame layer again. Use your Magic Wand and click inside of it. Copy and paste a tube of choice below the frame layer. Move into position. Selection/Modify/Expand by 4. Selections/Invert. Hit the delete key.
Merge visible Circle Frame, Circle Back, and the tube layer.
Repeat the above steps for Frame 2 and 3.
Repeat the above steps for Frame 2 and 3.
Highlight Doodle 1 layer. Select All/Float/Defloat. Copy and paste a paper of choice Into Selection. Selections/Invert. Hit the delete key. Deselect. Delete the template layer.
Repeat the above step for Doodle 2 layer.
Add your embellishments. I used:
Grass 1: Resize 30%
Earthworm 2: Resize 30%
Watering Pot 2: Resize 30%
Frog 1: Resize 20% and 90%
Butterfly 1: 25% and 80%
Flowers 1 & 3: Resize 25%
Grass 1: Resize 30%
Earthworm 2: Resize 30%
Watering Pot 2: Resize 30%
Frog 1: Resize 20% and 90%
Butterfly 1: 25% and 80%
Flowers 1 & 3: Resize 25%
Add your copyrights.
Add your name.
I gave mine an inner bevel:
Bevel: 5
Width: 7
Smoothness: 55
Depth: 16
Ambience: -27
Shininess: 45
Color: white
Angle: 135
Intensity: 31
Elevation: 88
Ok
Bevel: 5
Width: 7
Smoothness: 55
Depth: 16
Ambience: -27
Shininess: 45
Color: white
Angle: 135
Intensity: 31
Elevation: 88
Ok
Then I gave it a drop shadow
Vertical and Horizontal: 0
Opacity: 60
Blur: 6.89
Color: 390813
I repeated the drop shadow accept changed the color to
#000000
Vertical and Horizontal: 0
Opacity: 60
Blur: 6.89
Color: 390813
I repeated the drop shadow accept changed the color to
#000000
I hope you enjoyed this tutorial.
Hugs,
Bev

No comments:
Post a Comment