
Supplies Needed
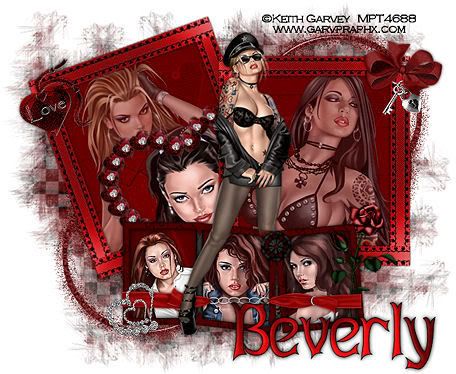
7 tubes of choice – 3 of them close up images - I'm using the artwork of Keith Garvey which you can purchase here
7 tubes of choice – 3 of them close up images - I'm using the artwork of Keith Garvey which you can purchase here
Font of choice - I used Abagail Jackson, but for some reason
I can't find it on any font site today! Pontifica Demo font will work just a nice.
Weescotlass Mask 297 here
Greg’s Factory Output Vol. II (Optional)
"A Day for Romance" PTU kit by Southern Scrapz which can be found here.
This tutorial was written assuming you have working knowledge of PSP.
~♥~ Let’s get started ~♥~
Open a 750 X 700 transparent canvas. Flood fill white.
Copy and paste ADRele 16 (red frame) as a new layer. Duplicate and then hide the duplicate layer. Highlight the original frame layer and click inside with your magic wand. Selections/Modify/Expand by 6.
Copy and Paste a paper of choice beneath the frame. Invert/Delete.
Copy and paste a close up image of choice beneath the frame. Hit the delete key. Deselect. Close out your white canvas and merge visible. Resize 60%. Free rotate left 20 degrees. Close that layer out.
Open up the Duplicate frame layer and repeat the above steps accept don’t rotate.
Copy and paste a heart frame of choice and repeat the same steps as you did for the first frame and this time free rotate it left 20 degrees and then position it between the two frames. See my tag for reference.
Copy and paste ADRele 58 (triple frame) as a new layer. Resize 60%. Use your magic wand and click inside each frame.
Copy and paste a paper beneath the triple frame. Invert/delete. Copy and paste 3 images – one into each of the frames. Close out your 3 large frame layers and your white canvas. Merge visible. Now move all your merged frame layers into their final places. See my tag for reference.
Copy and paste ADRele 1 (silver heart lock and key) as a new layer. Resize 40%. Move to the top right corner of your large right frame.
Copy and paste ADRele 49 (Bow) as a new layer. Resize 35% and position it over the heart lock and key.
Copy and paste ADRele 47 (red heart with Love on it) as a new layer. Resize 40%. Free rotate left 20 degrees and position on the left side of the large left frame.
Copy and paste ADRele 28 (belt/ribbon) as a new layer. Resize 60% and then use your pick tool to resize to exact, position the belt/ribbon near the bottom of the triple frame.
Copy and paste ADRele 3 (silver heart) as a new layer. Resize 50% and position near the bottom left of the triple frame.
Copy and paste ADRele 19 (rose) as a new layer. Resize 40% and position behind the belt/ribbon layer and move toward the right side of the frame.
Copy and paste ADRele 75 as a new layer just above your white canvas layer. Position near bottom left of your image. Duplicate and move so that it’s near the top right of your image. See my tag for reference.
Copy and paste your last tube as a new layer. Position where you like.
Highlight you white canvas. New Raster Layer. Select All. Copy and paste a paper of choice Into Selection. Apply your mask. Merge Group.
Add all your copyrights.
Add your name.
I used these settings with the font Abagail Jackson:
Foreground: black
Background: a4090b
Stroke: 1
The size is up to you.
After you’ve added your name (make sure it’s a Raster Layer)
Select All/Float/Defloat/Modify/Contract by 1.
Apply the following plug in:
Greg’s Factory Output Vol. II – Pool Shadow
Apply the default settings.
Deselect.
Apply a bevel:
Width: 20
Smoothness: 17
Depth: 3
Ambience: 0
Shininess: 14
Color: white
Angle: 248
Intensity: 28
Elevation 63
Apply a drop shadow. Crop your image and resize all layers if you like and your tag is finished.
I hope you enjoyed this tutorial as much as I had fun creating it.
I would love to see your results.
Email me!
Hugs,
Bev
No comments:
Post a Comment