
Supplies Needed
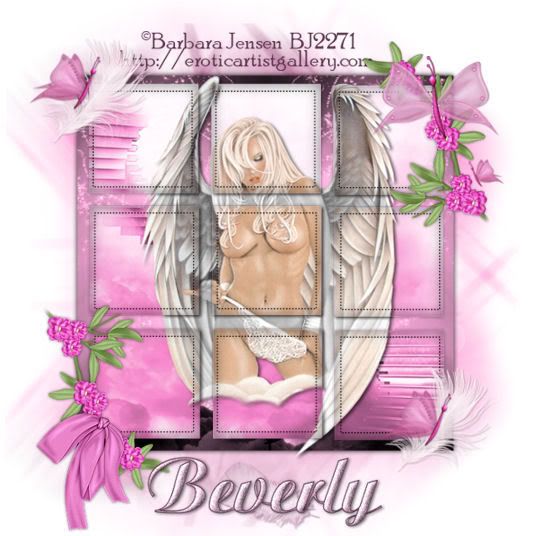
1 Tube of choice – I'm using the artwork of Barbera Jensen
which you can purchase here
Font of choice - I'm using Agnes here
Mask of choice
Template by Rebel Chick here. Be sure to leave some love when you download.
"Wings ‘n Blings" a FTU kit by Rebel Chick which can be found here.
1 Tube of choice – I'm using the artwork of Barbera Jensen
which you can purchase here
Font of choice - I'm using Agnes here
Mask of choice
Template by Rebel Chick here. Be sure to leave some love when you download.
"Wings ‘n Blings" a FTU kit by Rebel Chick which can be found here.
Please leave a Thank You when downloading. It's a small gesture for hard work given freely.
This kit is stunning and beautiful!
This tutorial was written assuming you have working knowledge of PSP.
~♥~ Let’s get started ~♥~
Open up the template. Shift + D to duplicate and close out the original. Delete Rasters 3 and 2. Highlight Raster 1. Image/Canvas Size. Make it 700 x 700. Flood fill the layer white.
Highlight the large square. Select All/Float/Defloat. Copy and paste a paper of choice. Resize 70%. Invert. Hit the delete key. Delete the template layer. Rename Large Square Background.
Highlight Top Squares layer. Select All/Float/Defloat.
Copy and paste Paper 23 as a new layer. Resize 70%. It’s important you don’t move the layer. Select/Invert. Hit the delete key. Deselect. Delete the template layer. Rename Top Squares
Highlight Middle Squares layer. Select All/Float/Defloat. Paste Paper 23 as a new layer again. Resize 70%. Select/Invert. Hit the delete key. Rename Middle Squares.
Repeat the above step with the Bottom Squares layer and rename Bottom Squares.
This next step is optional to do to each square layer.
Select All/Float/Defloat. New Raster Layer. Effects/3D Effects/Cutout.
H & V: 3
Opacity and Blur: 35
Color: black
OK
Repeat above step accept change H & V to -3. Deselect. Rename each layer Shadow Top Squares, Shadow Middle Squares, Shadow Bottom Squares.
***You’ll need to really follow the rest of the directions carefully***
Copy and paste your tube as a new layer at the very top in your layer pallet. It’s important that you position it exactly where you want it to be when once your tag is complete. Once you’re happy where it is move the layer in your layer pallet just above your Large Square Background layer.
Duplicate and move it just above your Top Squares layer. Highlight your Top Squares layer. Select/Float/Defloat/Invert. Highlight your duplicated tube layer and hit the delete key.
Highlight your Original tube layer that is just above your Large Square Background and duplicate. Move the duplicated layer just above your Middle Square layer and repeat the above step.
Repeat all of the above for the Bottom Square Layer.
Highlight your original tube layer once again that’s just above your Large Square Background. Adjust/Hue & Saturation/Colorize.
Change both Hue and Saturation to 0.
Close out your white canvas, Large Background Layer, and Original tube layer that you just turned black and white. Merge visible. Open up all layers.
I hope you’re still with me….hehehe
Copy and paste a flower vine of choice as a new layer and position on the bottom left and top right corner of your image.
Copy and paste a Feather of choice as a new layer and position at the top left corner of your image. Duplicate and move to the bottom right corner of your image.
Copy and paste butterflies of choice as a new layer, resizing to your liking and position where you choose.
Copy and paste a bow of choice as a new layer. Resize 50% and position at the bottom left corner of your image.
Highlight your white canvas. New Raster Layer. Copy and paste a paper of choice Into Selection. Apply your mask. Merge Group.
Add your copyrights.
Add your name.
Crop if need be and resize all layers if you like.
I hope you enjoyed this tutorial.
If so, leave me a note on “Over the Fence” – would love to hear from you!
I would love to see your results.
Email me!
Hugs,
Bev
I would love to see your results.
Email me!
Hugs,
Bev
No comments:
Post a Comment