Supplies
1 tube of choice - I used the artwork of Carlos Diez and can be purchased from Up Your Art. You must have a license to use.
Font of choice - I used Al Sandra here
Weescotlass Mask 267 here
Divine Intentionz Template 409 here
Plug Ins:
Eyecandy 3.1 - glow
DSB Flux - Bright Noise
“Beach Paradise” is a full size scrap kit (also available in tagger size) created by Wilma of Wilma4Ever and can be purchased from her store Wilma4Ever. You can visit her blog here.
Thank you Wilma for such a beautiful summer kit!
This tutorial was written assuming you have a working knowledge of PSP.
~♥~ Let’s get started ~♥~
Open up the template.
Shift + D.
Close out the original.
Delete the credit layer.
Resize all layers 85%
Image/Canvas Size
700 x 500
OK
Highlight and open Raster 1 layer.
Flood fill white.
Highlight Circle layer.
Click on it with your Magic Wand.
New Raster layer.
Copy and paste Paper 8 Into Selection.
Deselect.
Delete the template layer.
Apply Eyecandy 3.1 - Glow:
Width: 5
Opacity: 100
Opacity Dropoff: Fat
Color: White
OK
Copy and paste Paper 12 as a new layer.
Resize 25% and 40%
Free rotate Left 15 degrees.
Copy
Close the paper layer out.
Highlight Square Left layer.
Click on it with your Magic Wand.
New Raster layer.
Paste Into Selection.
Deselect.
Delete the template layer.
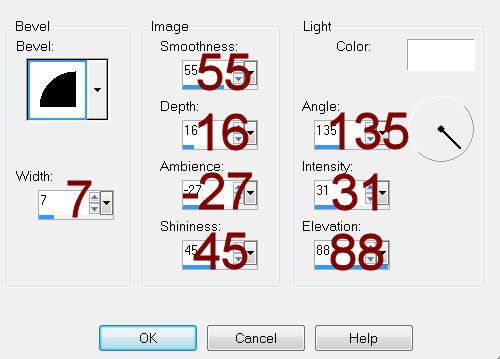
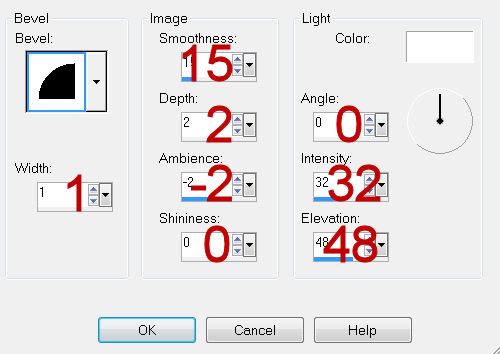
Give it a slight Inner Bevel:
Reopen the paper you resized.
Mirror/Flip/Copy
Delete the paper layer as you won’t be needing it any more.
Highlight Square Right layer.
Click on it with your Magic Wand.
New Raster layer.
Paste Into Selection.
Deselect.
Delete the template layer.
Give it the same slight Inner Bevel.
Highlight Rectangle layer.
Click on it with your Magic Wand.
New Raster layer.
Copy and paste Paper 7 Into Selection.
Deselect.
Delete the template layer.
Give it the same slight Inner Bevel.
Highlight Frame Back layer.
Click on both diamonds with your Magic Wand.
New Raster layer.
Copy and paste Paper 3 Into Selection.
Deselect.
Delete the template layer.
Highlight Frame 2 Back layer.
Repeat the above step.
Highlight Frame layer.
Click on it with your Magic Wand.
New Raster layer.
Copy and paste Paper 11 Into Selection.
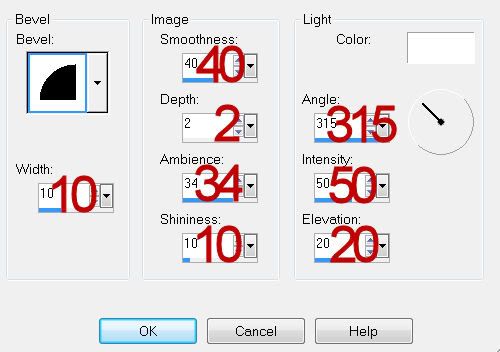
Give it a slight Inner Bevel:
Deselect.
Delete the template layer.
Apply DSB Flux - Bright Noise:
Intensity: 26
Mix checked
OK
Highlight Frame 2 layer.
Repeat the above step.
Copy and paste your tube below the left frame.
Move it into the position you want.
Duplicate/Mirror
Highlight the paper layer below the tubes.
Use your Magic Wand and click anywhere outside of it.
Highlight each of the tube layers and tap the delete key.
Deselect.
Change the Properties of both tube layers to Overlay.
Copy and paste your tube as a new layer.
Center it over the middle frame.
Add your embellishments. I used:
El 41: Resize 25% and 25%/Duplciate/Mirror
El 60: Resize 25% and 50%
El 77: Resize 25% and 40%/Mirror
El 50: Resize 25% and 50%/Free rotate Right 20 degrees/Duplicate
El 82: Resize 25% and 40%
El 80: Resize 25% and 35%/Duplicate/Mirror
El 81: Duplicate
El 3: Resize 25% and 40%
El 30: Resize 25% and 40%
El 16: Resize 25% and 50%
Copy and paste El 51
Resize 25%
Be sure it’s at the top of your layers pallet.
Move it into position.
Highlight your white canvas.
Select All.
Selections/Modify/Inside Outside Feather
Both checked
Feather amount: 43
OK
Highlight the palm tree layer.
Tap the delete key until you have a nice feathered effect.
Deselect.
Highlight your white canvas.
New Raster layer.
Select All.
Copy and paste Paper 2 Into Selection.
Deselect.
Apply the mask.
Merge Group.
Duplicate
Change the Properties to Multiply.
Add your copyrights.
Add your name.
Resize all layers 80%.
I hope you enjoyed this tutorial.
I’d love to see your results and show it off in my gallery.
Email me!
Hugs,
Bev
1 tube of choice - I used the artwork of Carlos Diez and can be purchased from Up Your Art. You must have a license to use.
Font of choice - I used Al Sandra here
Weescotlass Mask 267 here
Divine Intentionz Template 409 here
Plug Ins:
Eyecandy 3.1 - glow
DSB Flux - Bright Noise
“Beach Paradise” is a full size scrap kit (also available in tagger size) created by Wilma of Wilma4Ever and can be purchased from her store Wilma4Ever. You can visit her blog here.
Thank you Wilma for such a beautiful summer kit!
This tutorial was written assuming you have a working knowledge of PSP.
~♥~ Let’s get started ~♥~
Open up the template.
Shift + D.
Close out the original.
Delete the credit layer.
Resize all layers 85%
Image/Canvas Size
700 x 500
OK
Highlight and open Raster 1 layer.
Flood fill white.
Highlight Circle layer.
Click on it with your Magic Wand.
New Raster layer.
Copy and paste Paper 8 Into Selection.
Deselect.
Delete the template layer.
Apply Eyecandy 3.1 - Glow:
Width: 5
Opacity: 100
Opacity Dropoff: Fat
Color: White
OK
Copy and paste Paper 12 as a new layer.
Resize 25% and 40%
Free rotate Left 15 degrees.
Copy
Close the paper layer out.
Highlight Square Left layer.
Click on it with your Magic Wand.
New Raster layer.
Paste Into Selection.
Deselect.
Delete the template layer.
Give it a slight Inner Bevel:
Reopen the paper you resized.
Mirror/Flip/Copy
Delete the paper layer as you won’t be needing it any more.
Highlight Square Right layer.
Click on it with your Magic Wand.
New Raster layer.
Paste Into Selection.
Deselect.
Delete the template layer.
Give it the same slight Inner Bevel.
Highlight Rectangle layer.
Click on it with your Magic Wand.
New Raster layer.
Copy and paste Paper 7 Into Selection.
Deselect.
Delete the template layer.
Give it the same slight Inner Bevel.
Highlight Frame Back layer.
Click on both diamonds with your Magic Wand.
New Raster layer.
Copy and paste Paper 3 Into Selection.
Deselect.
Delete the template layer.
Highlight Frame 2 Back layer.
Repeat the above step.
Highlight Frame layer.
Click on it with your Magic Wand.
New Raster layer.
Copy and paste Paper 11 Into Selection.
Give it a slight Inner Bevel:
Deselect.
Delete the template layer.
Apply DSB Flux - Bright Noise:
Intensity: 26
Mix checked
OK
Highlight Frame 2 layer.
Repeat the above step.
Copy and paste your tube below the left frame.
Move it into the position you want.
Duplicate/Mirror
Highlight the paper layer below the tubes.
Use your Magic Wand and click anywhere outside of it.
Highlight each of the tube layers and tap the delete key.
Deselect.
Change the Properties of both tube layers to Overlay.
Copy and paste your tube as a new layer.
Center it over the middle frame.
Add your embellishments. I used:
El 41: Resize 25% and 25%/Duplciate/Mirror
El 60: Resize 25% and 50%
El 77: Resize 25% and 40%/Mirror
El 50: Resize 25% and 50%/Free rotate Right 20 degrees/Duplicate
El 82: Resize 25% and 40%
El 80: Resize 25% and 35%/Duplicate/Mirror
El 81: Duplicate
El 3: Resize 25% and 40%
El 30: Resize 25% and 40%
El 16: Resize 25% and 50%
Copy and paste El 51
Resize 25%
Be sure it’s at the top of your layers pallet.
Move it into position.
Highlight your white canvas.
Select All.
Selections/Modify/Inside Outside Feather
Both checked
Feather amount: 43
OK
Highlight the palm tree layer.
Tap the delete key until you have a nice feathered effect.
Deselect.
Highlight your white canvas.
New Raster layer.
Select All.
Copy and paste Paper 2 Into Selection.
Deselect.
Apply the mask.
Merge Group.
Duplicate
Change the Properties to Multiply.
Add your copyrights.
Add your name.
Resize all layers 80%.
I hope you enjoyed this tutorial.
I’d love to see your results and show it off in my gallery.
Email me!
Hugs,
Bev