Supplies
1 tube of choice - I used the beautiful artwork of Karen Middleton here.
Font of choice - I used Pendulum here
Weescotlass Mask 220 here
Scrappity Scrap and More Template 17 here
“Glam and Glitter” is a FTU tagger size scrap kit created by Terry of Treasure’s by Terry and can be found on her blog here.
Please leave a simple thank you when downloading. It’s a small gesture for hard work given freely.
Thank you Terry for such a delicate freebie!
This tutorial was written assuming you have a working knowledge of PSP.
~♥~ Let’s get started ~♥~
Open up the template.
Delete the credit layer.
Image/Canvas Size
600 X 400
Highlight Raster 1 and flood fill white.
Highlight Raster 3.
Select All/Float/Defloat
New Raster layer.
Copy and paste a paper of choice Into Selection.
Deselect.
Delete template layer.
Select All/Float/Defloat
New Raster layer.
Copy and paste a paper of choice Into Selection.
Deselect.
Delete template layer.
Highlight Raster 4.
Select All/Float/Defloat
New Raster layer.
Flood fill with a gradient of your choice..
Deselect.
Delete template layer.
Adjust/Add Remove Noise/Add Noise
Gaussian and Monochrome checked
Noise: 22%
OK
Highlight Raster 5.
Repeat the above step.
Repeat the above step.
Highlight Raster 6.
Select All/Float/Defloat
Copy and paste a paper of choice Into Selection.
Deselect.
Delete template layer.
Highlight Copy of Vector 1 layer.
Select All/Float/Defloat
New Raster layer.
Copy and paste a paper of choice Into Selection.
Deselect.
Delete template layer.
Repeat the above step with Copy of Raster 7 layer and Raster 7 layer.
Copy and paste your tube as a new layer.
Add your embellishments. I used:
Flower 9: Resize 80% Duplciate/Mirror/Flip
Ribbon and Chain 2: Resize 38%. Use Pick Tool to pull ends in slightly.
Flower 1: Resize 40%
Flower 2: Resize 30%
Flower 9: Resize 80% Duplciate/Mirror/Flip
Ribbon and Chain 2: Resize 38%. Use Pick Tool to pull ends in slightly.
Flower 1: Resize 40%
Flower 2: Resize 30%
Highlight your white background.
New Raster layer.
Select All.
Copy and paste a paper of choice Into Selection.
Deselect.
Apply the mask.
Resize 110%
Merge Group.
New Raster layer.
Select All.
Copy and paste a paper of choice Into Selection.
Deselect.
Apply the mask.
Resize 110%
Merge Group.
Add your copyrights.
Add your name.
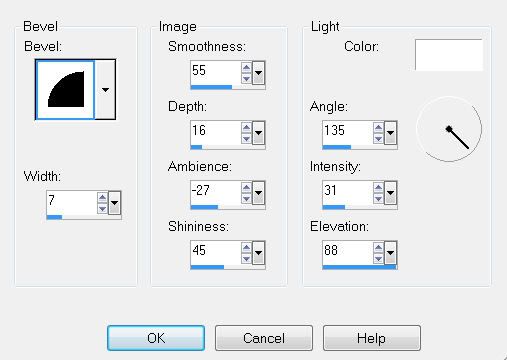
Give it a slight inner bevel:
I hope you enjoyed this tutorial.
I’d love to see your results.
Email me!
Hugs,
Bev