

Supplies
Font of choice - I used Chicken Basket which I’ve supplied here
Weescotlass Mask 249 here
Dezigns by Ali Template 84 here
“Winter Wishes” is a FTU tagger size scrap kit created by Deb of Debs Design and can be found on her blog here.
Thank you Deb for such an adorable freebie!
This tutorial was written assuming you have a working knowledge of PSP.
~♥~ Let’s get started ~♥~
Open up the template.
Image/Canvas Size
600 x 600
Highlight Shape 1 Layer.
Select All/Float/Defloat
New Raster layer.
Copy and paste a paper of choice Into Selection.
Deselect.
Delete the template layer.
Highlight Shape 2 Layer.
Select All/Float/Defloat
New Raster layer.
Copy and paste a paper of choice Into Selection.
Deselect.
Delete the template layer.
Copy and paste Chair as a new layer.
Resize 70%
Change the Properties to Soft Light.
Highlight Shape 3 Layer.
Select All/Float/Defloat
New Raster layer.
Copy and paste a paper of choice Into Selection.
DO NOT DESELECT.
Copy and paste Santa as a new layer.
Resize 40%
Move into position.
Selection/Modify/Feather
Number of Pixels: 53
OK
Selection/Invert
Tap the delete key until you have the feathered look you like.
Deselect.
Delete the template layer.
Highlight the top Shape 4 Layer.
Select All/Float/Defloat
New Raster layer.
Copy and Paste a paper of choice Into Selection.
DO NOT DESELECT.
Copy and paste Rudolf 2 as a new layer.
Resize 40%
Copy and paste Rudolf 1 as a new layer.
Resize 35%
Merge visible both Rudolf layers.
Selection/Modify/Feather
Number of Pixels: 33
OK
Selection/Invert
Tap the delete key until you have the feathered look you like.
Deselect.
Delete the template layer.
Highlight the bottom Shape 4 Layer.
Select All/Float/Defloat
New Raster layer.
Copy and Paste a paper of choice Into Selection.
DO NOT DESELECT.
Copy and paste Momma Bear as a new layer.
Resize 40%
Selection/Modify/Feather
Number of Pixels: 33
OK
Selection/Invert
Tap the delete key until you have the feathered look you like.
Deselect.
Delete the template layer.
Resize 40%
Selection/Modify/Feather
Number of Pixels: 33
OK
Selection/Invert
Tap the delete key until you have the feathered look you like.
Deselect.
Delete the template layer.
Add your embellishments. I used:
Sleigh 3: Resize 60%
Tree 1: Resize 60%
Highlight your white background.
New Raster layer.
Select All.
Copy and paste a paper of choice Into Selection.
Deselect.
Apply the mask.
Resize 120%
Merge Group.
If you used an artist’s tube(s) then add their copyrights.
If you only used the mask then please give credit to the designer. I’m positive it would be greatly appreciated.
Add your name.
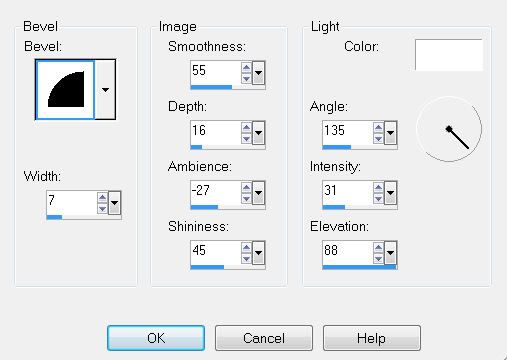
Give it a slight inner bevel:
Resize all layers 80%.
I hope you enjoyed this tutorial.
I’d love to see your results.
Email me!
Hugs,
Bev
No comments:
Post a Comment