Tuesday, October 29, 2013

Sassy Devil


Supplies:

1 tube of choice - I used the awesome artwork of Carmilla Drakenborg which can be purchased from Up Your Art.  You must have a license to use.

Fonts of choice - I used Impact (came with my program) and KR Boo Lane here

Gem Mask 6 here

Plug Ins used:
Graphics Plus

This tutorial assumes you have a working knowledge of PSP.

~ Let's get started ~

Open up a 700 x 700 blank canvas.
Flood fill white.

Copy and paste your tube as a new layer.  If you're using the same tube as I did, resize 70%

Color Pallet:
Foreground: #0b0303
Background: #c46543

Make your Text tool active using the font, Impact.
Stroke set on 1.5
Using all caps, type your name across your canvas.  
Move your name and tube into their exactly positions - see my tag for reference.
To be sure your name is centered -
Objects/Align/Horizontal Center in Canvas
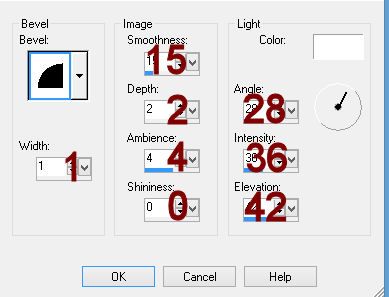
Give it a slight Inner Bevel:

Make your Freehand Selection Tool active set on Freehand.
Section off the bottom area of your name - make the link a little wavy:


Ctl + H - the Feather SEleciton Box will appear:
Number of Pixels: 30
OK

Shift + B - the Brightness/Contrast Box will appear.
Match your settings to mine:

Selections/Invert
Shift + B - the Brightness/Contrast Box will appear again.
Match your settings to mine:

Deselect.

Apply Graphics Plus plug in:
Use Default Settings.

Duplicate your name layer.
Move below your original name in your layers pallet.
Adjust/Blur/Gaussian Blur:
Radius: 15
OK
Tap the letter K on your keyboard to activate your Pick Tool and flatten the blurred name layer - see my tag for reference.
Make your Target Tool active and change the color to #86285a.

Highlight your white background.
New Raster layer.
Flood fill with your foreground color.
Apply the mask.
Merge Group.
Move it up slightly on your canvas - see my tag for reference.

Copy and patse your tube as a new layer over the mask layer.  This tube you'll be applying the mask to so move it into position that makes it slightly askew from your main tube layer.
Apply the mask.
Merge Group.
Change the Properties to Overlay.

Make your Text Tool active using KB Bool Lane font.
Stroke set at 1.0
Type the letter H.  It will be a bush and you want to move this behind your tube.  All pc's font sizes differ which is why I don't bother putting in a number when I write tutorials, but for this I set my font size to 60.  You may need to play with your font size.  See my tag for the approximate size you need.
Give the bush a slight Inner Bevel:

Color Pallet:
Foreground and Background: #0b0303
Stroke: 1.0
Type the letter F - see my tag for approximate size
Give it the same slight Inner Bevel you used last - 4x's.

Color Pallet:
Foreground: #0b0303
Background: 
Stroke: 1.o

Using KB Boo Lane font type the letter H - this will be the smaller bush that sits in front of your name - see my tag for reference.
Give it the same slight Inner Bevel 2x's.

Add your credit.

Crop your image.

Save your tag.

I hope you enjoyed this tutorial as much as I did creating it for you.

Would love to see your results.
Email me!

Hugs,
Bev

Monday, October 28, 2013

Autumn Calling


Supplies

1 tube of choice - I used the wonderful artwork of Deanna Bach-Talsma which can be purchased from PSP Tube Stop.  You must have a license to use.

Font of choice - I used Windless here

Weescotlass Mask 362 here

My Template 159 here

"Autumn Calling" is a tagger size scrap kit created by Cindy of ChiChi Designs and can be purchased from any of her stores here.

This tutorial assumes you have a working knowledge of PSP.  

~♥~ Lets get started ~♥~

Open up the template.
Shift + D.
Close out the original.
Image/Canvas Size:
700 x 700
OK
Highlight Raster 1 layer.
Flood fill white.
Delete the top 2 layers.

Highlight Raster 2 layer.
Click on it with your Magic Wand.
New Raster layer.
Copy and paste Paper 8 Into Selection.
Deselect.
Delete the template layer.
Give it a slight Inner Bevel:
 photo TellingSecretsIB_zpsefe9a583.jpg 
Copy and paste Fence as a new layer over the paper layer.
Resize 70%
Change the Properties to Soft Light and move into a position you like.
Highlight the paper layer.
Click anywhere outside of it with your Magic Wand.
Highlight the fence layer.
Tap the delete key.
Deselect.

Highlight Raster 3 layer.
Click on it with your Magic Wand.
New Raster layer.
Copy and paste Paper 3 Into Selection.
Deselect.
Delete the template layer.
Give the paper the same slight Inner Bevel.
Duplicate
Change the Properties to Hard Light.
Copy and paste Fence as a new layer over the top paper layer.
Resize 70%
Change the Properties to Soft Light and move into a position you like.
Highlight the bottom paper layer.
Click anywhere outside of it with your Magic Wand.
Highlight the fence layer.
Tap the delete key.
Deselect.
Give a drop shadow to the bottom paper.

Color Pallet:
Foreground: #000000
Background: #240f06

Highlight Raster 4 layer.
Make your Color Replacer Tool active.
Double right click your mouse on the film strip.  It should change to your background 

color.
Click inside of each film frame with your Magic Wand.
Selections/Modify/Expand by 2.
New Raster below the film layer.
Copy and paste Paper 4 Into Selection.
Deselect.
Do not give the film layer a drop shadow yet.

Highlight the film layer.
Click inside the top frame with your Magic Wand.
Selections/Modify/Expand by 2.
Selections/Invert
Copy and paste your tube as a new layer just above the paper layer.
Resize as needed.
Move into a position you like.
Change the Properties to Soft Light.
Tap the delete key.
Deselect.

Highlight the film layer again.
Click inside the middle frame with your Magic Wand.
Selections/Modify/Expand by 2.
Selections/Invert
Copy and paste your tube as a new layer just above the paper layer.
Resize as needed.
Paste your tube again.
Change the Properties to Soft Light and lower the Opacity to about 59.
Resize as needed and move into a position you like.
Highlight each tube layer and tap the delete key.
Deselect.

Highlight the film layer again.
Repeat the above step accept move your tubes into position below the bottom frame.

Add your elements.  I used:
Branch:  Resize 50%/90%/Mirror
Mushrooms:  Resize 50%
Flower: Duplicate
Frame 1:  Resize 60%/Duplicate/Mirror/Flip/Duplicate original/Resize 70%/Mirror
Lamp:  Resize 60%
Flower 2:  Resize 30%/Duplicate/Resize 70%
Leaf 1;  Resize 50%/Duplicate/Mirror (use this one to decorate your name)
Butterfly Gem:  Resize 20%/Duplicate/Mirror/Resize 70%
Bird 1:  Resize 30%
Branch 3:  Resize 60%
Sparkle

Highlight your white background.
New Raster layer.
Select All.
Copy and paste Paper 3 Into Selection.
Deselect.
Apply the mask.
Resize 105%
Merge Group.

Add your credit.

Add your name:
Color Pallet:
Foreground: #240f06
Background: #7b0200
Stroke: 1.0

Type your name.
Give it a slight Inner Bevel:

Save your tag.

I hope you enjoyed this tutorial as much as I did creating it.  

I'd love to see your results.  
Email me!

Hugs,
Bev