Monday, April 29, 2013

Western Gal


Supplies Needed

1 tube of choice – I used the wonderful artwork of Ted Hammond which can be purchased from CDO.  You must have a license to use.

Font of choice – I used PW Signature here

Becky Mask 22 here

 “Western Gal” is a FTU scrap kit and part of a collab created by Jenny’s Designz and Creationz by Sharon and can be downloaded from here.  Thank you Jenny and Sharon!
  
This tutorial was written assuming you have working knowledge of PSP. 

~~ Let’s get started ~~

This tutorial uses the kit created by Jenny’s Designz accept for one element which is from Creationz by Sharon and I have indicated which element it is.

Open up the a 700 x 700 blank canvas.
Flood fill white.

Copy and paste Frame 2 as a new layer.
Resize 20%
Paste the frame again as a new layer.
Resize 15%
Duplicate
Move all 3 frames into position – see my tag for reference.

To each Frame:
Click inside the frame with your Magic Wand.
Selections/Modify/Expand by 4.
New Raster layer below the frame.
Copy and paste Paper 3 Into Selection.
Deselect.

Copy and paste your tube as a new layer.  Move into position in front of all the frames.
Duplicate
Resize 120%
Change the Properties to Lighten and move into position below the large frame – see my tag for reference.
Highlight the paper layer below the frame.
Click anywhere outside of it with your Magic Wand.
Highlight the tube layer just above it.
Tap the delete key.
Deselect.

Add your elements.  I used:
Old Fence with Ivy:  Resize 20%/Duplicate
Feathers:  Resize 70%/Duplicate/Mirror
Grass:  Resize 50%/Duplicate/Mirror
Lamp
Keys:  Resize 50%
Pail:  Resize 10%
Shrub 1 (From Sharon’s kit):  Resize 60%/Duplicate 2x’s

Add your copyrights.

Add your name.
Color Pallet:
Foreground:  #000000
Background: #808080
Stroke: 1.0

Type your name.
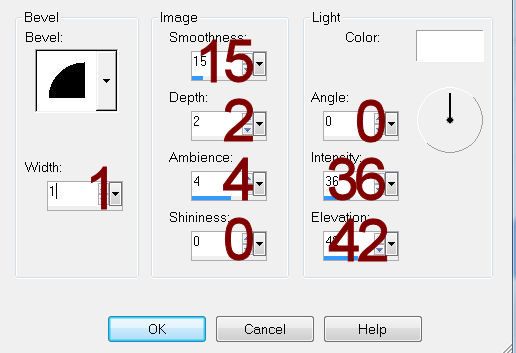
Give it a slight Inner Bevel:
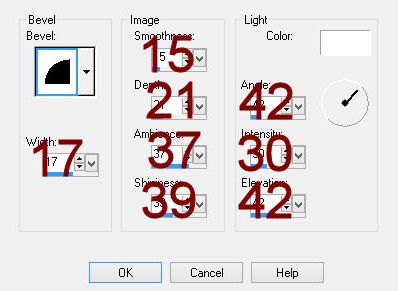
 photo frameinnerbevel-1_zpsfd439719.jpg

Resize all layers 80%.
   
I’d love to see your results.
Email me!
Hugs,
Bev

Sunday, April 28, 2013

A Whispering Touch


Supplies Needed

2 tube of choice – I used the wonderful artwork of Christina Lank which can be purchased from PSP Tube Stop.  You must have a license to use.

Font of choice – I used Elementary Gothic here

My Template 140 here

 “A Whispering Touch” is tagger size scrap kit created by Jessica of Gothic Inspirations and can be purchased from her store here.  You can visit her blog here.  
Thank you Jess for another fabulous kit!
  
This tutorial was written assuming you have working knowledge of PSP. 

~~ Let’s get started ~~

Open up the template.
Shift + D.
Close out the original.
Delete the credit layer.
Highlight the background layer.
Image/Canvas Size
700 x 700
OK
Flood fill white.

Highlight Rec layer.
Click on it with your Magic Wand.
New Raster layer.
Copy and paste Paper 3 Into Selection.
Copy and paste Sparkles as a new layer.
Resize 60%
Move into a position you like.
Duplicate – move into another position you like.
Selections/Invert
Highlight each sparkles layer and tap the delete key.
Deselect.
Delete the template layer.
Give the paper layer a slight Inner Bevel:
 photo redinnerbevel_zps089a307c.jpg

Highlight Right Stripe layer.
Merge Down.
Both stripe layers should be on the same layer now.
Click anywhere outside of them with your Magic Wand.
Selections/Invert
New Raster layer.
Copy and paste Paper 8 Into Selection.
Deselect.
Delete the template layer.
Give it a slight Inner Bevel:
 photo frameinnerbevel-1_zpsfd439719.jpg

Highlight Frame layer.
Click on it with your Magic Wand.
New Raster layer.
Paste Paper 8 Into Selection.
Deselect.
Delete the template layer.
Give it the same slight Inner Bevel.

Highlight Oval layer.
Click on it with your Magic Wand.
New Raster layer.
Copy and paste Paper 4 Into Selection.
Copy and paste your tube as a new layer.
Selections/Invert
Tap the delete key.
Deselect.

Add your elements.  I used:
Flower 1:  Resize 25%/Duplicate/Mirror/Duplicate the original/Flip
Lamp Post – Erase the bottom part of the post
Word Art 1:  Resize 70%
Flair:  Resize 30%Frame 4
Butterflies:  Resize 55%/Duplicate/Mirror
Crow:  Resize 30%

Add your copyrights.

Add your name.
Color Pallet:
Foreground:  #000000
Background: #86bc51
Stroke: 1.0

Type your name.
Give it the same Inner Bevel.

Resize all layers 80%.
   
I’d love to see your results.
Email me!
Hugs,
Bev