Wednesday, June 27, 2012

Summer Innocence

Supplies

1 tube of choice – I used the beautiful artwork of Alex Prihodko which can be purchased from Pics for Design.  You must have a license to use.

Font of choice - I used Aquarelle here

Weescotlass Mask 208 here

“Blue Innocence” is a tagger size scrap kit created by Sanie of Creation by Sanie and can be purchased from TwilightScraps.   You can visit her blog here.
Thank you Sanie for a really beautiful kit.

This tutorial was written assuming you have a working knowledge of PSP.

~~ Lets get started ~~

Open up a 700 x 700 blank canvas.
Flood fill white.

Copy and paste Frame 3 as a new layer.
Resize 70%

Copy and paste Frame 4 as a new layer.
Resize 70%
Duplicate

Move all 3 frame layers into position – see my tag for reference.

Highlight the blue frame.
Click inside of it with your Magic Wand.
Selections/Modify/Expand by 4.
New Raster layer below the frame.
Copy and paste Paper 2 Into Selection.
Deselect.

To each of the white frames:
Repeat the above step accept paste Paper 1 Into Selection.

Copy and paste your tube as a new layer below the blue frame.
You want this tube layer to be large enough to cover all 3 frames.  Move into a position that looks good covering all 3 frames.

Highlight the paper below the blue frame.
Click anywhere outside of it with your Magic Wand.
Selections/Invert
Highlight the tube layer.
Right Click/Promote Section to layer.
Deselect.

Highlight the paper below one of the white frames.
Click anywhere outside of it with your Magic Wand.
Selections/Invert
Highlight the tube layer.
Right Click/Promote Section to layer.
Deselect.

Highlight the paper below the last white frame.
Click anywhere outside of it with your Magic Wand.
Selections/Invert
Highlight the tube layer.
Right Click/Promote Section to layer.
Deselect.

Delete the original tube layer.
Move each of the promoted layers below the frame it belongs to.
Change the Properties of each of the promoted tube layers to Burn.
The tube layer below the blue frame – lower the Opacity to about 89.

Copy and paste your tube as a new layer.
Position it in front of all the frames.

Copy and paste Frame 6 as a new layer.
Resize 50%
Click inside of it with your Magic Wand.
Selections/Modify/Expand by 4.
New Raster layer below the frame.
Copy and paste Paper 12 Into Selection.
Deselect.
Highlight the frame.
Merge Down.
Move this merged layer into position – see my tag for reference.

                                                     Add your elements.  I used:
Cherry Blossom 1:  Free rotate Right 20 degrees/Duplicate 3x’s
Heart Deco
Blossom 1:  Resize 30%/Duplicate
Blossom 2:  Resize 25%
Butterfly 4:  Resize 30%
Butterfly 3:  Resize 30%/Mirror
Splat 1:  Duplicate/I used Target Tool and changed to a color from my tube

Highlight your white background.
New Raster layer.
Select All.
Copy and paste Paper 8 Into Selection.
Apply the mask.
Merge Group.

Add your credits.

Add your name.
Foreground & Background: #eb4f9f
Type your name.
Convert to Raster layer.
Apply EyeCandy 3.1 – Glow:
Width: 3
Opacity: 100%
Opacity Drop Off: Fat
Color: White
OK

Resize all layers 80%.

I’d love to see your results.
Email me!
Hugs,
Bev

Monday, June 25, 2012

Summer Heat


Supplies

1 tube of choice – I used the beautiful artwork of Carlos Diez which can be purchased from Up Your Art.  You must have a license to use.

Font of choice - I used  Mardian here

My Mask 8 here

“By the Bay” is a tagger size scrap kit created by me, Bev of HorsePlay’s Pasture Designs and can be purchased from either of your favorite stores – Lollipops n Gumdrops or Butterfly Blush Designs.   You can visit my designing blog here.

This tutorial was written assuming you have a working knowledge of PSP.

~~ Lets get started ~~

Open up a 700 x 700 blank canvas.
Flood fill white.

New Raster layer.
Make your Selection Tool active set on Rectangle.
Create a rectangle approximately 550 x 250 pixels.
Copy and paste Paper 7 Into Selection.
Deselect.
Center it on your canvas.
Click anywhere outside of the rectangle with your Magic Wand.
Selections/Invert
Selections/Modify/Contract by 7.


Open up the tube.
Make your Selection Tool active and section off the water area at the bottom.
Be sure that particular layer is highlighted.
Copy.

Make your working canvas active.
New Raster layer.
Paste Into Selection.
Deselect.
To get rid of the legs in the image :
Make your Clone tool active – I set my size to about 65.
Right click at the left side of the image.  Hold down the left button on your mouse and run it over the legs.  If you went beyond the edges of the image using this tool DON’T WORRY!  We’ll clean that up in a bit.
Once you have the image so it looks pretty much like all water then highlight the tan rectangle layer.
Click anywhere outside of it with your Magic Wand.
Selections/Invert
Selections/Modify/Contract by 7.
Selections/Invert
Highlight the water image layer.
Tap the delete key.
Deselect.

Copy and paste 68 as a new layer.
Use your Pick tool and shorten to a length of approximately 450 pixels.
Duplicate 2 x’s for a total of 3 ribbons and move into position – see my tag for reference.
Merge Visible all 3 ribbon layers.
Copy and paste your tube as a new layer over the ribbons.
Give the tube a drop shadow.
Highlight the merged ribbon layer.
Click anywhere outside of it with your Magic Wand.
Highlight the tube layer.
Tap the delete key.
Deselect.
Change the Properties to Overlay.

Copy and paste your tube as a new layer.
Move into position at the right side of the rectangle – see my tag for reference.

Add your elements.  I used:
37:  Resize 70%
49:  Resize 60%/Duplicate/Mirror/Duplicate each of them and move into a position you like.
49 again:  Resize 40%/Position in front of the ribbon layer
56:  Resize 30%/Position in front of the fern/Duplicate/Flip/Position behind the fern
46:  Resize 25%/Duplicate/Mirror
55:  Resize 15%
8:  Resize 15%/Free rotate Left 20 degrees
40:  Resize 40%
36:  Resize 80%/Duplicate
16:  Resize 15%
15:  Resize 15%/Duplicate/Resize 70%/Duplicate

Crop your image.

Highlight your white background.
New Raster layer.
Select All.
Copy and paste Paper 5 Into Selection.
Apply the mask.
Resize 105%
Use your Pick Tool to pull the sides out just a little.
Merge Group.
Move it up slightly on your canvas.

Add your credits.

Add your name.
Foreground: #000000
Background: #dc2512
Stroke: 1.0
Type your name.
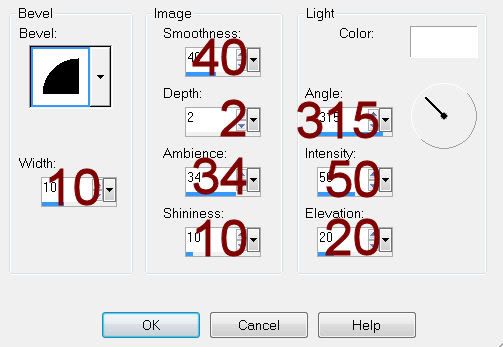
Give it a slight Inner Bevel:

Resize all layers 80%.
I’d love to see your results.
Email me!
Hugs,
Bev