Supplies
1 tube of choice - I used the gorgeous artwork of Zlata_M which is an exclusive tube from Pics for Design.
Font of choice - I used Nadall here
Weescotlass Mask 249 here
Dee’s Sign Post “Make Hay” here. You’ll find it under Tuesday, August 23, 2011
Plug Ins:
Mura’s Meister - Copies
Eyecandy 3.1 - Glow
Eyecandy Nature - Snow Drift
Xerox - Porcelain
“Rustic Holiday” is a tagger size scrap kit created by Kesha of KnC Scrapz and can be purchased from her store Lollipops n Gumdrops. You can visit her blog here.
Thank you Kesha….I totally loved this kit!!
This tutorial was written assuming you have a working knowledge of PSP.
~♥~ Let’s get started ~♥~
Open up the template.
Shift + D.
Close out the original.
Delete the top 4 layers and Half Circle layer.
Highlight Black Rectangle layer.
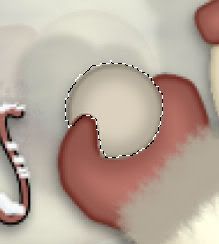
Click anywhere outside of it with your Magic Wand.
Copy and paste Paper 5 as a new layer.
Resize 80%
Selections/Invert
Tap the delete key.
Deselect.
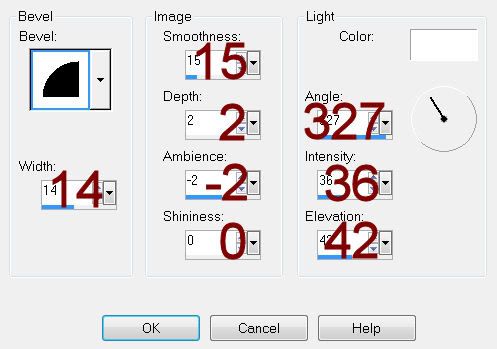
Give it a slight Inner Bevel:
Highlight Bottom Dark Grey Rectangle layer.
Click on it with your Magic Wand.
New Raster layer.
Copy and paste Paper 3 Into Selection.
Adjust/Add Remove Noise/Add Noise:
Gaussian and Monochrome checked
Noise: 43%
OK
Deselect.
Delete the template layer.
Highlight Top Dark Grey Rectangle layer.
Repeat the above step.
Highlight Bottom Light Grey Rectangle layer.
Copy and paste Paper 4 as a new layer.
Resize 70%
Free rotate Right 20 degrees.
In your layers pallet highlight Bottom Light Grey Rectangle layer.
Click anywhere outside of it with your Magic Wand.
Highlight the paper layer and move into position - see my tag for reference.
Tap the delete key.
Deselect.
Delete the template layer.
Highlight Top Light Grey Rectangle layer.
Repeat the above step accept Free rotate Left 20 degrees.
Highlight White Strip layer.
Click on it with your Magic Wand.
New Raster layer.
Copy and paste Paper 5 Into Selection.
Deselect.
Delete the template layer.
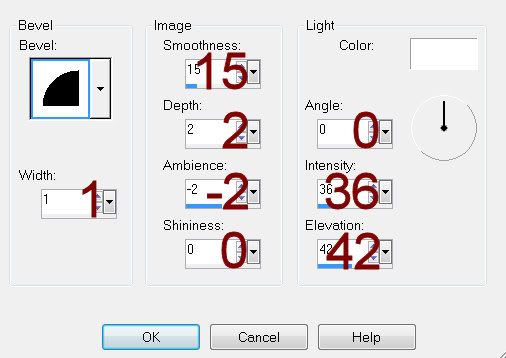
Give it the same Inner Bevel.
Highlight Dotted Strip layer.
Click anywhere outside of it with your Magic Wand.
Selections/Invert
New Raster layer.
Copy and paste Paper 3 Into Selection.
Deselect.
Delete the template layer.
Highlight Dotted Circle layer.
Repeat the above step.
Highlight White Circle layer.
Click on it with your Magic Wand.
New Raster layer.
Copy and paste Paper 7 Into Selection.
Give it the same Noise effect.
Deselect.
Delete the template layer.
Highlight Grey Circle layer.
Click on it with your Magic Wand.
New Raster layer.
Copy and paste Paper 6 Into Selection.
Deselect.
Delete the template layer.
Highlight Top White Square layer.
Click anywhere outside of it with your Magic Wand.
Selections/Invert
New Raster layer.
Paste Paper 7 Into Selection.
Give it the same Noise effect.
Deselect.
Delete the template layer.
Highlight Bottom White Square layer.
Repeat the above step.
Highlight Top Square layer.
Click on it with your Magic Wand.
New Raster layer.
Copy and paste Paper 1 Into Selection - Rename Top Square
Deselect.
Delete the template layer.
Highlight Bottom Square layer.
Repeat the above step accept rename the layer Bottom Square.
Copy and paste your tube as a new layer over the Bottom Square paper layer.
Change the Properties to Overlay.
Resize as you like and move into a position you like.
Duplicate/In your layers pallet move this layer over the Top Square paper layer.
Highlight Top Square paper layer.
Click anywhere outside of it with your Magic Wand.
Highlight the tube layer just above it.
Tap the delete key.
Deselect.
Highlight Bottom Square paper layer.
Repeat the above step.
Paste your tube again as a new layer just over the Black Strip layer.
Change the Properties to Overlay.
Find an area of the face you like and center that over the strip in the area that’s between the Top and Bottom square layers.
Apply Mura’s Meister - Copies:
Choose Line
Change Number to 6.
OK
Duplicate/Apply Xerox - Porcelain:
Use Default Settings accept move the Blue Channel button down to 0.
OK
Highlight the Original tube line layer.
Adjust/Blur/Gaussian Blur:
Radius: 2
OK
Highlight Black Strip layer.
Click anywhere outside of it with your Magic Wand.
Highlight each tube layer and tap the delete key.
Deselect.
Add your elements. I used:
Frame 2: Resize 65%
Branch: Resize 25% and 70%
Pine Branch: Resize 25%/Duplicate
Flower: Resize 40%
Bow 2: Resize 30%
Pinecone: Resize 25%/Free rotate Left 15 degrees/Duplicate/Mirror/Resize 70%
Element 1: Resize 25%
Ornament: Resize 25% and 40%
Snow 1: Resize 50%/To Feather:
Use your Freehand Selection Tool and section around the snow - making the line touch wherever you want the snow feathered.
Selections/Modify/Inside Outside Feather:
Both checked
Feather amount: 43
OK
Selections/Invert
Tap the delete key a few times.
Deselect.
Highlight your white background.
New Raster layer.
Select All.
Copy and paste Paper 2 Into Selection.
Deselect.
Apply the mask.
Use your Pick tool and pull the side out a little.
Merge Group.
Duplicate
Change the Properties to Burn.
Lower the Opacity to about 83
Add your copyrights.
Add your name:
Foreground and Background: #2a2429
Type your name.
Convert to Raster layer.
Apply Eyecandy 5: Nature - Snow Drift -
On the Settings Tab:
Small, First Flakes
Basic Tab:
Default settings accept lower “Dust on All Features” to about 14
OK
Resize all layers 80%.
I hope you enjoyed this tutorial.
I’d love to see your results.
Email me!
Hugs,
Bev