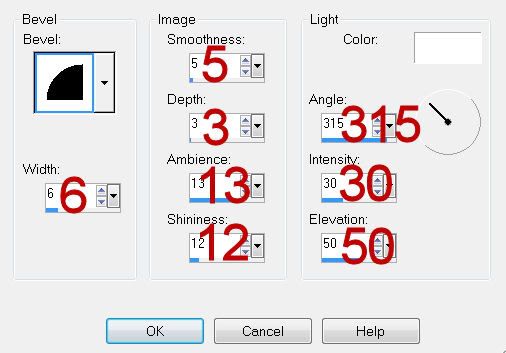
Clicking on the image will allow you to enlarge for bigger view.
Supplies
1 tube of choice and 1 close up image - I used the artwork of Bits N Bob. This is an exclusive tube for ACDivas and can be purchased at Exquisite Scraps.
Font of Choice - I used Riesling here
Weescotlass Mask 249 here
“Opposites Attract” is a tagger size scrap kit created by Julie of Bits N Bobs and can be purchased at Exquisite Scraps. You can visit Julie’s blog here.
This tutorial was written assuming you have a working knowledge of PSP.
~♥~ Let’s get started ~♥~
Open up a 700 x 700 blank canvas.
Flood fill white.
Copy and paste Frame 7 as a new layer.
Resize 80%
Click inside each square with your Magic Wand.
Selections/Modify/Expand by 6.
New Raster layer.
Copy and paste Paper 9 Into Selection.
Copy and paste your close up image as a new layer below the frame.
Move into position.
Selections/Invert
Tap the delete key.
Deselect.
Copy and paste your tube as a new layer.
Add your embellishments. I used:
Little Flowers 2: Free rotate left 45 degrees
Little Flowers 1: Free rotate left 35 degrees
Sprinkles 2: Duplicate/Flip/Mirror
Branch 3: Mirror
Feather 2: Resize 50%
Feather 1: Resize 40%/Mirror
Highlight your white background.
New Raster layer.
Copy and paste Paper 3 Into Selection.
Deselect.
Apply the Mask.
Merge Group.
Move it down slightly.
Add your credits.
Add your name.
Resize all layers 80%
I hope you enjoyed this tutorial.
I’d love to see your results and show it off in my gallery.
Email me!
Hugs,
Bev
Supplies
1 tube of choice and 1 close up image - I used the artwork of Bits N Bob. This is an exclusive tube for ACDivas and can be purchased at Exquisite Scraps.
Font of Choice - I used Riesling here
Weescotlass Mask 249 here
“Opposites Attract” is a tagger size scrap kit created by Julie of Bits N Bobs and can be purchased at Exquisite Scraps. You can visit Julie’s blog here.
This tutorial was written assuming you have a working knowledge of PSP.
~♥~ Let’s get started ~♥~
Open up a 700 x 700 blank canvas.
Flood fill white.
Copy and paste Frame 7 as a new layer.
Resize 80%
Click inside each square with your Magic Wand.
Selections/Modify/Expand by 6.
New Raster layer.
Copy and paste Paper 9 Into Selection.
Copy and paste your close up image as a new layer below the frame.
Move into position.
Selections/Invert
Tap the delete key.
Deselect.
Copy and paste your tube as a new layer.
Add your embellishments. I used:
Little Flowers 2: Free rotate left 45 degrees
Little Flowers 1: Free rotate left 35 degrees
Sprinkles 2: Duplicate/Flip/Mirror
Branch 3: Mirror
Feather 2: Resize 50%
Feather 1: Resize 40%/Mirror
Highlight your white background.
New Raster layer.
Copy and paste Paper 3 Into Selection.
Deselect.
Apply the Mask.
Merge Group.
Move it down slightly.
Add your credits.
Add your name.
Resize all layers 80%
I hope you enjoyed this tutorial.
I’d love to see your results and show it off in my gallery.
Email me!
Hugs,
Bev